Hello Kitty Themed Kids Surfboard Bench

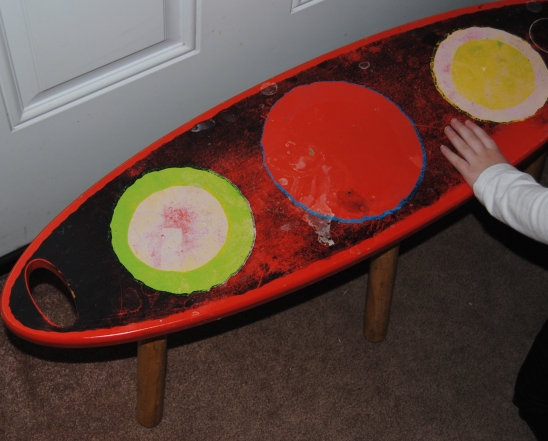
It has been an especially harsh Northeast winter and many of my usual thrifting haunts have been light on stock especially when it comes to furniture pieces.  Despite this, I certainly don’t mind the thrill of the hunt. You never know when you will find something unique.  On such a trip, I came across an interesting kids bench (At least that’s what I think it was!) at a local Goodwill store.    It appeared to be a surfboard and the painted design was hideous!  Despite all of the negatives with this piece, I felt this would be a fun redesign, and I loved the detachable legs.  This feature made the legs easier to paint.  Nothing conjures up images of summer like a surfboard, and that is just the kind of project I needed!

DSC_0112

I cleaned the entire piece with a Magic Eraser. It had an unidentifiable sticky substance all over it and the Eraser worked well to remove it.  I used a white spray primer to cover the brightly colored design.  I was planning on using a fabric decoupage, but felt the bright colors may bleed through the fabric.  Using a primer first prevents this, and gives me a clean slate to work with.  Once the primer dried, I used a foam craft brush to apply Mod Podge to the bench surface.

DSC_0114

My daughter and I stopped by the craft store and I let her look through the aisle filled with different character fabrics.  She seemed to like this Hello Kitty print and I happily obliged, being a Ms. Hello Kitty fan myself. When I was young the local mall had a store called Sanrio and they sold Hello Kitty and all her “friends” merchandise. It was one of my favorite stores to visit in the mall.  I bought a half yard, and roughly traced the fabric to cover the table surface. Once the Mod Podge dries, any excess fabric left over around the edges and handles I trim with a box cutting knife.  The glue stiffens the fabric and makes it easier to cut.  I placed the fabric down on the Mod Podge soaked surface carefully smoothing out any wrinkles with my hands.

DSC_0115

I placed it aside to dry, eventually I would add a total of three full coats of Mod Podge on the fabric table surface.  I painted the legs with two coats of pink and white acrylic paint.  Once the legs were dry I covered them in a Mod Podge layer.   I then reassembled the table legs by screwing them easily back in to place.

DSC_0122

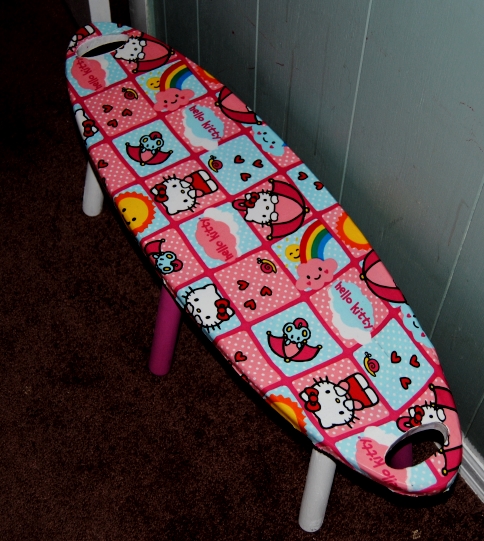
My daughter loves sitting on it.  It looks great in her room and it is a nice piece of kids furniture to use while helping her get dressed for her day.


Hello Kitty Girls Surfboard Bench

Before and After

Untitled


Advertisement

Why Not DIY? Toddler Sensory Play Table

When I first heard about sensory play, I loved the idea!  It allows a child to explore their world at home (and get a little or a lot messy in the process) It has many benefits and plays an important role in child development.  It allows all children to explore their world with all of their senses, sight, smell, hearing, touch, and taste.  It boosts language skills, stimulates developement and helps children who have autism or are on the spectrum and children with sensory integration dysfunction disorder.

Many of you have already seen the sand and water tables sold at the big box stores in the summertime.  This is a similar concept.  These outdoor sensory play tables are easy to recreate indoors from items found in your home. I had seen a few home-made versions of play tables on the web and thought my 33 month old daughter would love playing with one.  I had tried a simple plastic bin on the floor, but it became too messy.  I had to come up with a better solution.

DSC_0061

I had an old end table in our attic that we hadn’t used in years.  I thought this would make a great foundation for this project. I found three great red, yellow and green plastic bins at a thrift store, that would hold various sensory play materials. You can use rice, sand, elbow macaroni and so much more in these plastic tubs.  Just remember to be mindful of your child’s age and whether certain materials may pose a choking risk.

First, I painted the entire table.  I used red acrylic paint and covered the table tops and legs.  I allowed it to dry between coats. Full coverage was a total of three coats of paint.

DSC_0064

Once the table was completely dry, I used Mod Podge for the initial seal and a layer of polyurethane to protect the table if it were to get wet during messier types of play.  I cleaned the plastic bins with soapy water and used a total of 12 Phillips head screws (4 per bin) and an electric screwdriver to anchor the bins to the table.  It was important for the contents of the bins to stay in the bins (mostly) and this would also not allow them to tip over.

DSC_0068

I had an alphabet puzzle and animal magnets lying around the house.  I thought these would add a fun element the to project while encouraging letter recognition.  I decided to spell out my daughter’s name on the front of the table and for the sides place the alphabet puzzle pieces on either side of the table: ABC,XYZ. The animal magnets I placed on the front of the bins.  I used a hot temp glue gun to permanently adhere them to the table and the bins.

DSC_0079

I went to Dollar Tree and purchased the materials for the bins.  These were the items I thought a child her age would have fun playing while minimizing mess:

plastic Easter eggs

fake coins

rice

elbow macaroni

left over alphabet puzzle pieces

pom-pom balls

great to also include shovels and cups.

I also picked up a foam number puzzle.  I had space on the back of the table, so I hot glued the puzzle sans the pieces to the table for additional educational play.

DSC_0077

I dumped the items in the pins and hid the coins, letters and poms in the macaroni and the rice. This also helps a child’s fine motor skills.  The plastic eggs went in a separate bin.  The play table was now ready for a curious 2 1/2 year-old girl to explore her senses. She loved it and it kept her attention for a long time!  She loved digging and pulling out the coins and letters and running the rice through her fingers.

You can create themed bins, and change materials as much as you like. Check out a few more ideas for DIY sensory tables.

DSC_0074

DSC_0078

The Genealogy Series: Greetings From Niagara Falls

It has been slim pickings lately on the upcycle front.  It seems everyone (myself included) is battling the impact felt from mother nature. Thrift store stock is limited and picked through, and the curb sides are piled with (you guessed it…snow)  Thank goodness I have yard sale season to look forward too as it is only about a month or two away.  To remain occupied, I now look around the house and get ideas on how to improve on things we already have.  One such item is my husband’s side table,  which adorned his childhood home. I have wanted to work on this piece for a very long time. This table has seen better days, and I am in the process of hand sanding it, a messy and sometimes slow process.  Working on it made me think of treasuring and preserving those family heirlooms, even if they are worth no more than sentimental value. For me, the more sentimental, the better.

Recently, I have been scanning and uploading old family photographs, and trying to unlock their mysteries. It has been a while since I have blogged about family history and genealogy but don’t let my inactivity on the subject fool you.  Sure, I take a rest from it from time to time, sleep on it, put it away, but it is always pulled back out, and revisited. I came across this wonderful photograph of my Great Grandfather Harry Long with my Great Grandmother Daisy (Plummer) Long at Niagara Falls NY.

Harry and Daisey at Niagra

Photo taken some time between 1935-1945

Many things do change with time, but natural beauty can last for generations.  Millions of people have passed through New York or Canada to see the wonders of Niagara Falls.  They pose with their loved ones in front of its massive beauty.  It reminds me that although the years become an obstacle keeping us from knowing our beloved ancestors,  the experiences and places that remain allow us to walk in their footsteps.  What is left behind allows those who have passed away to have a “voice”  This I believe brings us closer together.  Different time, but we are not so different.  I think this photograph proves that.  Just an ordinary married couple leaning into the mist as so many others have done before and after them.

“Be Mine Daddy”…. Valentine’s Day Kid’s Craft Ideas

On this Valentine’s day morning, many areas of the country are beginning the task of “digging out” after yet another treacherous winter storm hit the east coast overnight.  Just days before the same winter Nor’Easter  wreaked havoc in other parts of the country such as Georgia and the Carolinas. On top of it,  the little one and I have been battling a series of winter colds and are being forced to spend much of our time in the house due to the lousy weather.  Despite this, we have managed to make the best of these situations and have spent a lot of quality time together as a family.

I wanted to make my husband something special for Valentine’s day this year, and as with most of my creations,  I like to get my 2 1/2 year-old daughter (Also known as the toddler apprentice) involved in the process. I also knew that my husband being the wonderful dad he is, would appreciate the fact that his daughter helped mommy make his gift with “her own little hands.”  I have seen many great Valentine’s day kid’s crafts online via Pinterest and other sites, and I had many ideas swirling around in my head. I saw a great project courtesy of the Roylco kids craft blog (which I follow, and love) and although I decided to create my own version,  The Roylco project was quite inspiring.  Be sure to check it out!

For this project you will need:

Black, Pink, Red and White Construction Paper

Scissors

Kids White School Glue

Black Marker

White Non Toxic Kids Craft Paint

Frame (Optional)

First, I dipped my daughter’s hand in the white paint after pouring it on a paper plate. I pressed her hand on the black construction paper.  This was challenging and it took a few tries after the first two attempts became slightly smudged.  There is no greater excitement to a little one then “messy fun” so she didn’t seem to mind the multiple attempts at getting it right! Once I achieved the desired effect I allowed the construction paper to dry. After about an hour, the paper was dry and ready.  I drew different sized hearts on the red, white and pink paper and carefully cut them out.  The little one enjoyed squeezing the glue on the hearts and sticking them to the paper!

Valenine's Day Kid's  Craft fun!

Such a Good Helper……

Next, I wrote little sayings in the hearts.  I thought this would be cute, but if you prefer it, you can skip this step.  I wanted to make it more personalized for him.  I then found a great glass frame in our attic to frame it in. Now we have a great piece of Valentine’s Day wall art for years to come, permanently immortalizing our daughters little two year-old hands forever. (Can’t you tell I am an overly sentimental person?)

Valentine's Day Kids Craft For Daddy

The apprentice and I also made a Valentine’s Day glass jar lamp.  I had some great left over heart themed scrapbook paper I won courtesy of Ray’s So Crafty’s Labor Day Giveaway.  I have made several jar lamps, and like to interchange them on the light bases, depending on the mood, or for holidays.  I simply cut the paper, applied Mod Podge to the glass and adhered it around the jar carefully matching up the seam.  An easy, simple decoration guaranteed to warm hearts during this frigid Valentine’s Day.

Valentine's Day Jar Lamp made with Scrapbook paper and Mod Podge

“On The Upcycle” would like to wish everyone a safe and happy Valentine’s Day.  Hoping you are able to spend it with those you love today!

ScrapHacker – The Hub for “Scrap Cycling” Innovation & D.I.Y “Scrap Hack” Inspiration

cover-photo-600x340

If you are like me and love to search the vast web for great ideas check out Scrap Hacker.com an online hub of green crafting and upcycle ideas. The blog hasn’t been updated in a while, but there is plenty of content to scroll through.  The site features everything from Ikea Hacks, tips on repurposing items, and a vast number of photographs featuring the green crafting arts.  Sometimes I come across a site in my internet travels too good not to share, so check it out when your curiosity gets the better of you!

ScrapHacker – The Hub for “Scrap Cycling” Innovation & D.I.Y “Scrap Hack” Inspiration.

Upcycled Tiles: Instant Wall Art, And Much More!

Most of us have a box of  ceramic tiles collecting dust in the basement.  In our case, my helpful neighbor passed them on to us thinking we could use them, after I told him that I was attempting a DIY kitchen backsplash.   I utilized most of the box but still did not manage to use them all.  These were plain, white ceramic tiles, a clean slate just waiting to be reused, and make an artistic statement!

Tiles are a great medium for decoupage, and make great wall art!  It is also a great decoupage beginner project and virtually any image can be decoupaged on tile. Often times when I am working on a project, I will do a smaller side project at the same time.  The tile below, is an example of such a project. I had some great smaller prints and decided to use one of them on this tile.  Simply apply Mod Podge to the tile using a foam craft brush, or smaller paint brush, apply the print and once dry, apply the Mod Podge over the print.  Then simply use a small amount hot glue to adhere the tile to your wall.  You can make photo collages, decorative maps, and create different artistic schemes, while sprucing up boring walls.

DSC_1555

The above is simply one example of repurposed tile. It is displayed on the wall in my craft room.  Due to the magic of sites such as Pinterest, the ideas are flowing.  Below are a few examples of such ideas.

Two Girls Being Crafty Blog

These lovely drink coasters were made by Two Crafty Girls using Mod Podge and scrapbook paper.

instructables com

Take a favorite photo and divide it among several tiles to create wall art. Thanks to C.B.I.D Home Decor and Design for featuring yet another unique and crafty idea!

Indulgy

I love the idea of decorating with sheet music, and using it for decoupage!  Check out all of indulgy’s ideas!

On that note, happy crafting and stay warm my friends!