“Me Want Cookie!!!” Cookie Monster Decoupage Cookie Jar

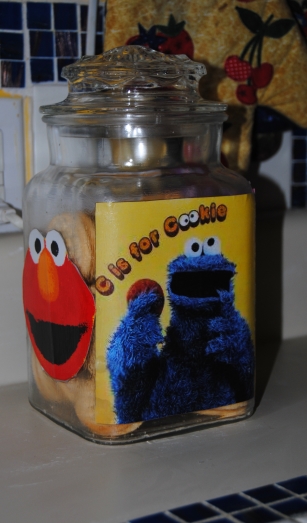
Family Proclamation: We really need a cookie jar!  Every time me or my husband open a bag of vanilla wafers for our little one, the bag rips and the box won’t stay closed. The cookies also don’t stay fresh for very long under these conditions.  Often times, I end up cramming all the cookies into one sandwich bag, not very attractive!  So, I just so happened to be in the thrift store last week, when I  came across a large glass jar with a lid for only $1.99!  This I thought to myself, would make a perfect cookie jar so into my cart it went.

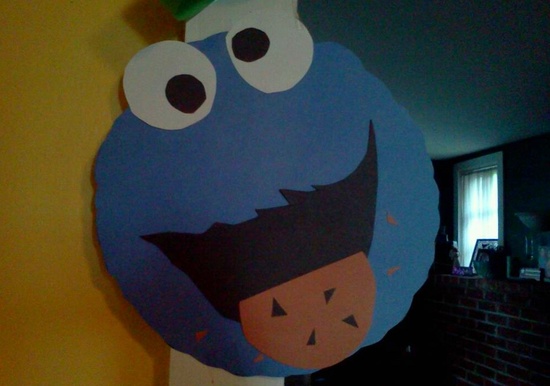
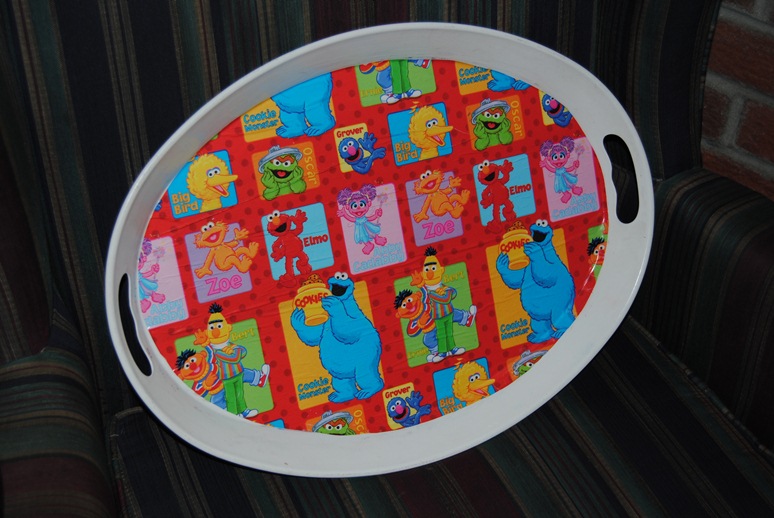
As most of my readers already know my daughter is a HUGE Sesame Street fan.  Her favorite doll is her Ernie doll which she carries with her everywhere she goes and takes with her to bed at night. Her other favorites are Elmo and Cookie Monster.  It just seemed like a no brainer that a Cookie Monster/Sesame Street Cookie Jar was in order.  I printed out 5×7 Cookie Monster image from online, and for the sides of the jar I decided to recycle an old Sesame Street Birthday Party Decoration.

Materials:ImageImage

I cut out all of the images I wanted to decoupage to the jar.  The birthday decorations were a bit larger than needed so I carefully trimmed them up so they would fit. The great thing about using the birthday decorations you ask?  They are double-sided and reflected the same image on the inside of the  jar as well as the outside-Awesome.

Image

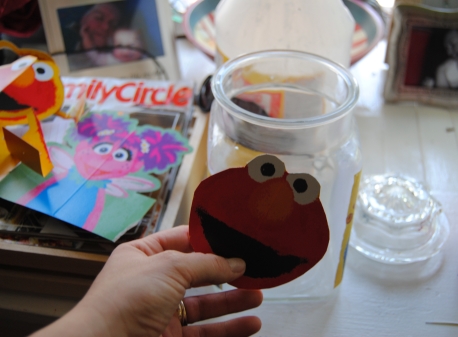
Next step was to  apply the Mod Podge with a medium-sized artist’s brush.  I carefully glued the images on the glass.  I did this slowly, smoothing out the paper with my hand as to capture as little air between the paper and the glass as possible. Once dry, I applied two coats of Mod Podge over each image to seal it permanently to the glass.

Now, we have a fun and decorative place to keep our cookies fresh without dealing with those frustrating bags!

Image

Image

Sesame Street: Abby Cadabby Decoupage Jewelry Box

I had this piece for a while as I was not sure what I wanted to do with it.  I picked it up at Goodwill for $2.99.  The last week has been focused mostly on my daugter’s birthday party.  It was a nice smaller project for me.  Most of this project was completed before she woke from her afternoon nap.

As my daughter gets older, she is accumulating quite a bit of jewelry, hair bows and other various adornments.  I thought this box would be great because it consisted of three fairly deep drawers for storage.  I wanted to make it girly and restyle it using a character that Erin loves.  I chose Abby Cadabby from Sesame Street.  I love the pink and purple colors that make up her character. I printed out some Abby images along with a nice purple and pink floral inspired background on photo paper.  I removed the drawers.  I had already primed this piece previously, so it was ready to paint.  I painted the top surface dark purple and the sides pink with acrylic paint. I set aside and to dry.  I cut out the Abby images first and glued them to the drawer using Mod Podge Matte Finish.   I then measured out the floral background.  The biggest challenge was applying the paper around the knob.  The knobs on the drawers did not appear removable so I lined it up with the paper and cut a small round hole carefully feeding the knob through.  I then used a smaller paint brush and applied the Mod Podge to glue the paper down to the drawer surface.  Once dry, I applied the Mod Podge generously over the drawer and photo surface and the painted  jewelry box.  This seals the entire piece.  I used several coats to seal.  Letting dry between coats.  I usually sit them in front of a fan to speed up the drying process.   The result is what you see here and I like overall how it turned out.  For some reason when taking a picture it appears more blue than purple!

Abby Cadaby Girls Jewelry box

Materials used:

Mod Podge Matte

Old wooden jewelry box

Scissors

smaller artist paint brushes

paper for decoupage

pink and purple acrylic paint

Abby Girls Jewelery box

Sesame Street Birthday decorations made from construction paper

Image
As we get closer to our daughter’s 2nd birthday party this Saturday, I thought I would share some tips from last year’s party.  One of the more expensive elements of throwing a party, other than food is the party decorations.  My husband and I always try to follow a budget the best we can.  We plan, make lists and try to keep costs down, but in this current economy that can sometimes be difficult.  Our theme last year was Sesame Street and since my daughter is still obsessed with these characters, I didn’t stray too far this year from her 1st birthday theme.  Her theme this year is all her favorite Sprout channel characters with a patriotic twist in celebration of Memorial Day.  Stay tuned for more on this idea.

Last year, I created most of her decorations from construction paper and glue.  I searched the internet for all her favorite Sesame characters and used the more basic cartoon images as a guide for making the different characters.  Most of the characters are based on simple shapes, so I drew these shapes onto the construction paper, cut them out and glued together to form the individual characters.  Pretty simple, cost effective, and I think they turned out great and are unique in their own way. I also summoned my old elementary school days cutting out strips of construction paper and making paper chains.  I also used re-cycled gift bags and anything else I could get my hands on, cut out and make into a party decoration.  There are so many great ideas on Pinterest as well, much more than I could ever try myself.  Let your imagination run wild and in the process save a little money!

Elmo Birthday Decoration

Sesame Street sign made from construction paper

Bert and Ernie Birthday Decoration

Oscar Trash Can

Sesame Street Decorations

Character Cupcake trays made with Mod Podge

Sesame Street Cupcake tray

Ahhh ugly old trays! Gotta love them!  There is no shortage of them at your local thrift store, or Dollar Store.  I am on a mission to rescue as many of these trays as possible!  They make great decorations and are simple and easy to repurpose.  I will admit as great wrapping paper is to use when decoupaging, I always struggle a bit with the wrinkles and air bubbles, but the variety of paper and styles available keep me coming back.  In this case, I used Sesame Street, but you can use any characters you like.  My daughter’s 2nd birthday theme is all of the Sprout channel characters.   Sesame Street seemed like a great choice for this cupcake tray and I thought it would make a great decoration for her party.  These are pretty simple to make.  I simply traced the tray onto the wrapping paper, carefully cutting the paper along the line with a pair of scissors.  I used Mod Podge to glue the wrapping paper to the tray, doing my best to smooth out as many air bubbles and wrinkles as I could.  I then applied several coats of Mod Podge to seal the image onto the tray.  I find when using wrapping paper the more coats of Mod Podge the better so use the Mod Podge generously!

Materials:

Ugly old tray of your choice

Mod Podge Matte Finish

Character Wrapping paper

Scissors

Thin tip black marker

Sesame Street Girls Painted Kids Rocking Chair Made With Mod Podge

Image

Monday’s get me down, but rainy days don’t!  It has been raining all weekend and what better indoor therapy is there, than starting and finishing a new project!

Last week, I was on my lunch break and something told me to stop in the local Good Will Store. The last time I was in this store I was very disappointed with their prices and stock.  I am glad I listened to my “thrifty senses” and gave it another try.  As soon as I walked toward the back of the store where they keep all the furniture, I noticed the little rocking chair sitting there.   Before anyone else had time to notice this little “diamond in the rough”, I snatched it up.  I knew this was not going to be easy.  The chair was black lacquer and in several places on the chair, it looked like a small dog had chewed on it. The chair was also loose, but appeared it could easily be tightened up.  The chair was priced $6.99, which was a bit steep for an item in this condition, but who knows when I might find a kids rocking chair again?

I took it home and hand sanded the areas where the wood was damaged until it was smooth.  I then used two coats of latex primer and painted the entire chair.  Once dry I began the process of working out the color scheme and hand painted the chair using acrylics.This took a while as when dry I had to add additional coats.  Once the chair was painted, I used Sesame Street wrapping paper for the chair back and on the seat.  I glued the wrapping paper down with Mod Podge carefully smoothing out any air bubbles.  Once dry, I coated the entire chair with Mod Podge matte finish and repeated a total of 3 times.  The result is what you see here.  Now, My little girl will have her very own chair to sit on and read in her room. I think I am in love with kids furniture!

Image

Erin reading a book in her new rocking chair