Crazy for Corduroy: Girls Flower Power Decoupage Side Table

It has been a very hectic week in the “On The Upcycle” household.  I have been working late into the night to prepare for my first flea market this Saturday.  I am happy to report, that my crafting area is looking more like a usable work space, and less like a storage closet!  My hope is clearing out some older items will make way for new projects.

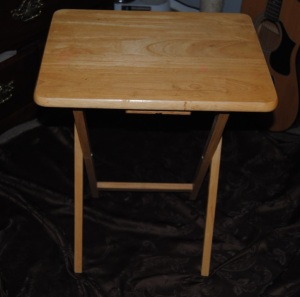
I have also been working on a few projects specifically to use in the sale.  I picked up this nice, wooden side table at Goodwill for a couple of dollars.

20150419_200300

The original idea, was to use a black and white scarf I had for the decoupage and then paint the table with neutral colors.  It is amazing how quickly a plan can change!  I used a white, spray on primer to prepare the table.  I applied the scarf and instantly was not all that impressed with the result.  Scarves can be tricky because the fabric is very thin, and once it is glued to the table top, it has a tendency to show any imperfections on the wood underneath.  That is exactly what happened in this case.  Once the Mod Podge was dry, I removed the fabric and decided to start over.  Then it hit me:  I had this great flower power corduroy fabric from an old dress that looked very cute on my daughter but no longer fit her.  I saved it in the hopes that I would find a use for it someday.  That time was now!

20150421_175548

I cut the fabric and measured out a large enough piece to cover the top of the table.  I applied a generous amount of Mod Podge to the table surface.  The general rule is the thicker the material the more Mod Podge you will need to use to achieve the desired effect.

20150421_180715

Once the glue was dry, I hand painted the table with pink, purple and white acrylic paint.  This was turning out to be a much different table then I had originally anticipated.  After a few more coats of paint,  I added generous amounts of Mod Podge to the table top to seal the fabric.  I repeated this process three times allowing it to dry between coats. I also applied Mod Podge to the painted surfaces, to seal the entire piece.

20150421_195011

Once dry, I trimmed off the excess fabric on the edges and applied more Mod Podge to seal those edges.

20150422_074658

This is a side table with a lot of flower power and 1960’s appeal.  I am hoping this table makes some little girl very happy!  It will be just one of the items for sale this weekend.  I also loved working with corduroy!  Because of the thickness of the fabric, I was unsure as to how it would turn out and was more than pleased with the end result!

Before:

2015-04-28 (1)

After:

Materials Used:

Old kids Garment

Mod Podge

Spray or brush on white primer

Acrylic Paint

Paint Brushes (Various sizes)

Scissors and Box Cutter knife (to trim edges)

Smells Like Team Spirit: Decoupage TV Trays

Writer’s block is a terrible thing!  I have been inflicted with a horrible case, which explains my lack of posts in the month of October. Despite my loss for words,  I have still managed to stay busy and continue crafting. It has been the healthiest and most productive stress reliever for me to date.  I am always searching the crevices of my brain for new ideas, and it keeps me going.   Quite surprisingly it is the familiar ideas that get revisited most often due to popular demand.  One such project is the decoupage TV Trays. The themes for these tables are endless.  I have posted various tutorials on how to make these TV tray tables more fun and decorative.    Various family members have expressed interest in having one, and I love to make others happy.    My two young nieces are involved in school sports and what better way to show team spirit than with something unique and functional at the same time?

Look familiar?  Everyone has a set of these trays, and  they make frequent appearances in thrift stores for just a few dollars.   All you need is a graphic that can be enlarged without becoming distorted, and a printer.

TV Tray before

Add some paint, apply the Mod Podge and you can create unique, spirited gifts that the other kids at school will want to have!

20140601_191920 (1)

DSC_0841

Sports, Music, Art, Personalized the possibilities keep coming.  As long as there are boring TV trays left in the world, this project will live on.  How would you redesign your table?

Crazy For Half Tables: Table Restyle using Mod Podge

Image

I love half tables!  I was so excited when I found this one at a thrift store while shopping one weekend with the family.  It was the first item in my cart.  I was also ecstatic over the reasonable price- only $5.99! I knew exactly where I would put this table in our house, at the base of our stairs.  Space is limited in this area and this half table would be a perfect space saver.

I searched through my available scrapbook paper and went through several styles before I settled on this one.  I turned the table upside down onto the backside of two sheets of paper and traced the table top onto the paper.  I cut the tracing and used Mod Podge Matte Finish to glue the paper to the table top. I used my rubber Mod Podge tool and my hand to gently smooth out any air bubbles.  While the table top dried, I painted the rest of the table black with acrylic paint. One of the things I like about this table is, it had some etched details on the legs and top.  I accentuated this by painting the floral etching white.  Once all the paint dried I used about 4 coatings of Mod Podge to seal the piece.  I skipped priming the piece because the table felt rough almost like it had been lightly sanded before I bought it. The paint covered well with about two coats. I was happy with the design and the neutral black and white design goes well with our living room walls which are painted with Behr paint and primer in one sandstone color.

before and after

Image

Materials:

Two pieces of scrapbook paper design of choice

Black Acrylic paint

Mod Podge Matte Finish

Rubber Mod Podge

Scissors, Paint Brushes, Black Marker

Table top close up

Restyled Side Table

100_6249

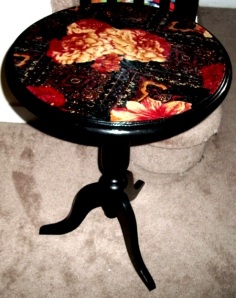
Their is nothing I love more then a good side table.  They can add so much to a room if you can find one with the right look.  I purchased this side table at Walmart for under 20 dollars more than 6 years ago.  Sure, the table served it’s purpose well, but was far from anything special. I decided to give it a new look, but what to do?  These days, I find myself looking at things differently.  When I am out and about,  I am always looking for fabric, textiles that stand out in the crowd.  Mod Podge and fabric are great for revamping furniture.

On this day I found a really nice woman’s scarf for 99 cents at the thrift store. It was perfect to cover the table top of a smaller piece of furniture.  I primed the table using my trusty latex primer.  Once the table was dry, I painted the entire table with black acrylic paint.  Several coats were required.  I turned the table upside down and carefully traced with a black sharpie marker, onto the scarf material.  I used scissors to cut the fabric.  Now I was ready for Mod Podge!  I covered the table top with Mod Podge and glued down the material.  Through experience I find different materials are better in this process than others.  This scarf because of it’s texture was difficult to smooth out the air bubbles.  I wish I could tell you the materials make up , but the tag was cut off the item.

Once the piece was dry, I coated the entire table with 4 coats of Mod Podge. The result is what you see here and I love it especially the splash of colors (Did I mention I LOVE COLOR)

In the end, The table top had a rougher finish than I preferred so you may want to try using the gloss finish to add a bit more sheen. I generally use Matte finish in most of my projects and it is fine, but sometimes the material you use makes a difference.

side table made with Modge Podge