Hot Summer Nights: Paradise By The Back Porch Light

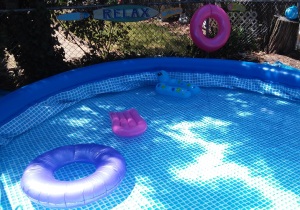
This past memorial day weekend, my husband and I were determined to get the yard ready for summer.  My daughter received an Easy Set Intex Pool from her Uncle and Aunt for Christmas and we could not wait to get the pool setup and operational.  My daughter’s 4th birthday this year will have a pool party theme, and the date for the party is quickly approaching.  My husband and I leveled out the ground in the area the pool would be placed.  We laid down a tarp and spread the pool out.  These inflatable Easy Set’s are great starter pools, and in our case the simpler the better since this is our first attempt at putting up a pool.

20150523_141004

We inflated the ring with a pump, and from the inside smoothed out the lining.  It took all day to fill.  The next day, we hooked up the filter, placed chlorine tabs in the floater, and assembled the ladder.  The water was very cold, so I hopped in to the pool for a test run.  For the most part everything went great and the set up was easy.  I was disappointed to find some parts in the lining that were not as smooth as we had wanted.  I can’t stress enough the importance of making sure the ground is clear of any debris and level.  Even after all our careful work, what seemed smooth at the surface was not always the case.  Once the weight of the water pressed the ground flat, some rocks and roots underground seemed to appear out of nowhere through the lining.  That being said the only way to remedy this would be to drain the pool and remove the debris from the area to smooth it out.  Until it is necessary to do so, we are going to take our chances.  I would feel guilty wasting all that water!  Luckily the pool came with plenty of patches if needed.

20150524_131400[1]

We purchased a few fun summer signs from Dollar Tree and lined the fence with them for added decoration.

I  also accomplished a few smaller projects.  I had a decorative metal star that I picked up at Christmas Tree Shop.  It was on clearance and I was never happy with the tan color.  I surmised that this was most likely the reason why it was on clearance.

20141108_172420[1]

Since it was Memorial day and the house was decorated in Americana….

20150509_132943-1[1]

I had some extra Rust-Oleum red spray paint, and I sprayed on a quick coat.  I like the star better now that it is red and I purchased it for half the price!

20141108_201050[1]

The other area I wanted to address was the corner of the yard by the pool. There is a rather large tree stump in this area.  Some time ago, I blogged about ideas here.

I struggled with what to do with this stump for some time.  This weekend that changed.  I decided to make it a fun project for my daughter and I to do together.  I had an old broken wooden TV tray.  I removed the table top from the legs and screwed it on to the tree stump surface.  My neighbor had given me some decorative, shells, glass pebbles and decorative rock. I thought it would be fun for us to create a mosaic table top for it.  I used some old tile grout and glue in one and spread it onto the table surface evenly.  The toddler apprentice and I then applied the rocks and glass pebbles.  We wiped off any excess grout and allowed it to dry overnight.  I used the unused legs of the TV tray as a garden trellis, another great re-purpose!  My goal was to use as much of the table as possible. Mission accomplished!

20150525_172623[1]

I placed the shells around for decoration.   Now Mommy has a place to put “her” sippy cup and relax by the pool, while my daughter has fun exploring and playing with the various sea shells.

20150525_173659[1]

20150525_172714[1]

Since this spring has been a bit sparse in the rain department, our grass took a hit and much of it died.  Once all the yard work was done, we raked the yard and spread out grass seed in the hopes of bringing our lawn back to life!  Once the grass grows under our feet, our little backyard oasis will be complete!

What do you have planned for your backyard oasis?  Do you have any summer projects you are eager to complete?  How do you like to kick off summer?

Flea Market Bar Cabinet Makeover

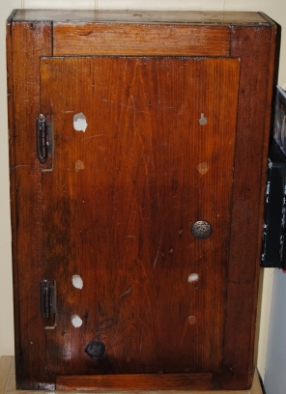
My husband and I picked up this wooden cabinet many years back at a local outdoor flea market.  It  had two mirrored bar signs glued to the door and was a perfect “novelty” cabinet for our bar.  We acquired quite a few shot glasses over time, collecting them as an inexpensive souvenirs wherever we traveled.  This cabinet was a perfect way to store them.

Now that the bar has become a distant memory in our family friendly household, this cabinet sat on the floor in our spare bedroom with the shot glasses still in it increasing the chances of something getting broken. The  signs began to fall off, so I decided to remove them all together.  I planned to restyle this cabinet and hang it in a much safer place-Our kitchen.

Image

I used a scraper, to remove the access glue front the door and cleaned the cabinet with a wet wipe.  I removed the knob and door and set aside.  The cabinet was heavily lacquered so I used a white latex sealer to prime the cabinet before getting started.

Removed door and Primed

I used fabric to cover the outside of the door and glued it to the wood with Mod Podge, I then applied a thick coating of Mod Podge with a Large brush to the top of the fabric.  Once dry, I trimmed the excess fabric away from the door with a pair of scissors.  I painted the entire cabinet with black acrylic paint except for the inside and shelves. Once dry, I applied Mod Podge over the entire piece.  I spray painted the knob white, and once everything was completely dry, I re-attached the cabinet door and knob.

I hung the cabinet in our kitchen by our table, with its much more sophisticated look, It is a great place to store our souvenir glasses!

Restyled cabinet using paint and Mod Podge

Inside wooden shelves

Materials:

Wooden Cabinet

Fabric

Mod Podge

Black acrylic paint

White latex primer

White spray paint

Small and large paint brush

Scissors

Before and After:

Cabinet Re done

Upcycled Decorative Jar Lamp: Take Three

Upcycled Decorative Jar Lamp


It all started with a spaghetti Jar, a broken lamp and a upcycle idea.  I found myself making a third decorative fabric covered glass jar lamp tonight.  (See Decorative Lamp # 1 and #2 to read tutorials on how I make these jar lamps.) I enjoy making these because each one turns out unique and the style possibilities are endless when it comes to the different fabrics you can use.

I also had the chance to work on a few smaller projects and organizing my craft space.  I decided to use the same sheet  I used for Cloth Covered Galvanized Bucket.  The Lamp is being displayed in a built-in vanity in our hallway that displays a special family blue vase.  The light this lamp omits illuminates the vase nicely and it is pleasing to the eye as you walk up our stairs.  Upon further inspection today, on a trip up to our attic, I stumbled across more of these “nightlight bulb lights”  These certainly will come in handy for future luminary crafts!

Upcycled Decorative Jar Lamp Reflection


Upcycled Spaghetti Jar Decorative Lamp

I was upstairs in the attic last night searching for a lost box of crafting materials, when I came across a box of light bases that were at one time,  miniature decorative table lamps. The glassware that was originally attached to them had broken.  I had forgotten I had kept these items.  I am sure at the time, I was thinking I may be able to utilize them in the future in some way. and then I thought to myself, the future is now!

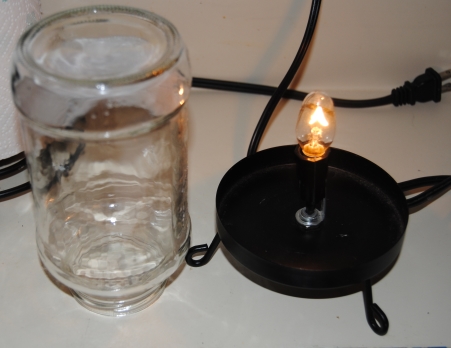
One in particular caught my eye.  It was a black, metal, pedestal light base that utilized a night-light bulb. My initial idea was to utilize a glass jar to replace the broken glass. but several different glass items could be modified to use for this project. Ball jars, glass vases from the dollar store etc.  I just happened to have an old Spaghetti sauce jar in the recycle bin.  I happily removed it cleaning it with hot soapy water.  I placed it in a bucket of hot water to remove the jar label.

Broken Lamp and Glass Jar

Materials:

Mod Podge

Light Base

Fabric

Foam Craft Brush, Scissors

fine tipped marker

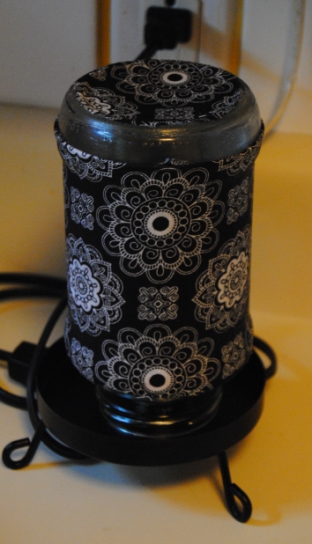
I had some great fabric left over from Ugly Accent Table Makeover.  If you are looking for something more colorful you can try holding  different fabrics up to the light.  That way, you can tell what the finished lamp will look like when the light illuminates it.  I took the fabric, and wrapped it around the glass jar so I knew how much fabric I would need.  I measured and cut and placed aside.  I wanted to also add fabric to the “bottom” of the jar, which would be the “top” of the lamp. I traced the jar onto the back of the fabric and carefully cut it out with scissors.  I cut inside the tracing to factor in the edges of the glass, so the fabric would not hang over.    I then applied  Mod Podge with a foam craft brush to the glass.  I applied and smoothed out the fabric, adhering it to the glass.  I applied another coat of Mod Podge over the top of the fabric.  In this case I applied a total of two coats allowing to dry throughly in between.  I couldn’t be more happy with the result!  A true upcycle and a great decorative lamp for a fraction of the cost!

Upcycled Spaghetti Jar Decorative Lamp

Spaghetti Jar Lamp Made with fabric and Mod Podge

Mail Call: Upcycled, Decoupage Mail and Key Holder

Image

I found this little wooden mail and key holder for two bucks at an outdoor swap meet.   I decided to use it by our front door so we could have a centralized place for our keys, cell phones and any other small items we take with us to work each day.  Initially, I was unsure of the design I would choose.  Then I remembered,  I still had some of the recycled gift bag I had used for my living room switch plate and outlet covers.  It became evident , the key/mail holder would be hanging  in close proximity to the switch plate and I thought it would look better if they matched.

Decoupage Switch Plate, Outlet

I measured and cut the gift bag to fit the mail slots. I then applied Mod Podge to glue the gift bag tracings to the slots.  While drying, I painted the rest of the piece black with acrylic paint.  Once the paint was completely dry I applied about three coats of Mod Podge over the entire piece to seal it. This was a very simple project with dramatic resulst!  It really stands out nicely against the Sandstone background and keeps electronics and other important items out of little toddler hands.

Before

Materials:

Mail/Key Holder

Mod Podge Matte finish

Gift bag/Scrapbook  paper

Black Acrylic Paint

Pen/Scissors/Paint Brushes

Decoupage key holder