I am “Thankful” For My Readers: Decoupage Wooden Tray Giveaway!

The Thanksgiving holiday is a time to reflect on the many blessings a person has in their life. Many times the stresses of everyday life cloud our thinking and distract us from what really matters. I am so deeply blessed to have connected with so many wonderful people in my life past and present. This includes all those who have taken the time out of their day to stop by  “On The Upcycle” to read, comment and share ideas with me. It has been a little over 6 months since I started my blog and the response has been overwhelming.  A special “thank you” to those in the Word Press community whom helped lend a helping hand to yours truly along the way!

I thought to myself, that this would be a great time to show a small token of appreciation to my readers who have inspired me to keep going even after feeling discouraged. What better way to show it than a Thanksgiving day drawing and giveaway?!

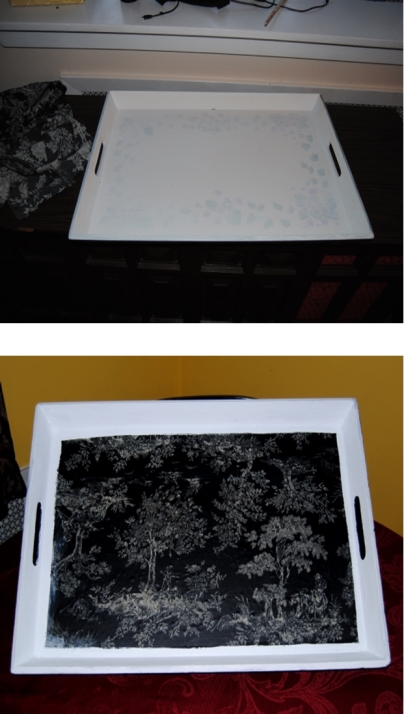
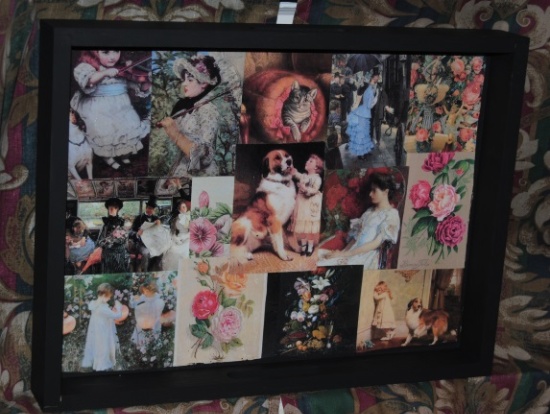
Stay Calm and Craft- A Simple Wooden Tray Decoupage

Image

Win The Decorative Victorian Inspired Wooden Tray Decoupage Pictured Above:

All you have to do to enter the drawing is “Like” On The Upcycle on Facebook, and comment on this post.  I would love to hear what you are thankful for in life or if you have a favorite “On The Upcycle” project what is it and what do you like about it?  I will draw one winner on Thanksgiving day and announce the winner on my blog.  I ask that the winner contact me with their address, and I will happily mail your prize. Thanks again to all my readers and  Good Luck!


Another Large Wooden Tray Restyle

I picked up this tray for just a couple of dollars at Goodwill and had no initial plans for it.  I admit I love rescuing old trays even if I have no idea what to do with them.  It sat in our spare room for quite sometime primed, but unfinished.  I then picked up some Victorian inspired black with white fabric during a second Goodwill trip.  I liked it because it had trees on it with children playing.  It reminded me of some of the decor we had in my house growing up in the late 70’s early 80’s. I decided to use the fabric on the tray. I thought it would be a great way to display the fabric and keep the scene intact. I painted the tray with white acrylic paint and then applied the Mod Podge.  Since the fabric was dark, I couldn’t trace it, so I applied the fabric I had to the tray, and when the Mod Podge dried and the fabric hardened I used a box cutter knife to remove the excess fabric. Once dry I used about two more coats of Mod Podge over the entire piece.  If you are just starting out working with Mod Podge, trays are definitely the way to go!  They are a great starter project and the possibilities for styling are endless.

Image

Materials:

Mod Podge

Tray

Fabric

Box Cutter style knife

White acrylic paint and primer

Character Cupcake trays made with Mod Podge

Sesame Street Cupcake tray

Ahhh ugly old trays! Gotta love them!  There is no shortage of them at your local thrift store, or Dollar Store.  I am on a mission to rescue as many of these trays as possible!  They make great decorations and are simple and easy to repurpose.  I will admit as great wrapping paper is to use when decoupaging, I always struggle a bit with the wrinkles and air bubbles, but the variety of paper and styles available keep me coming back.  In this case, I used Sesame Street, but you can use any characters you like.  My daughter’s 2nd birthday theme is all of the Sprout channel characters.   Sesame Street seemed like a great choice for this cupcake tray and I thought it would make a great decoration for her party.  These are pretty simple to make.  I simply traced the tray onto the wrapping paper, carefully cutting the paper along the line with a pair of scissors.  I used Mod Podge to glue the wrapping paper to the tray, doing my best to smooth out as many air bubbles and wrinkles as I could.  I then applied several coats of Mod Podge to seal the image onto the tray.  I find when using wrapping paper the more coats of Mod Podge the better so use the Mod Podge generously!

Materials:

Ugly old tray of your choice

Mod Podge Matte Finish

Character Wrapping paper

Scissors

Thin tip black marker

Frida Kahlo inspired decorative decoupage tray and art case

Nothing is worth more than laughter. It is strength to laugh and to abandon oneself, to be light.
~Frida Kahlo

I picked up this ugly old tray for $2.00 at the flea market about a week ago.  At that time I really had no idea what I was going to do with it.  I did know one thing it needed a makeover! My sister’s birthday is coming up and since discovering my new upcycling obsession, I wanted to make her something special.  I always admired the artist Frida Kahlo and I was intrigued by her artwork and her life story.  My sister is also a fan of her art and got to see an exhibit of her work a few years back.  I recently did a quick project of my own when I decoupaged my art box with Frida Kahlo art and scrap book paper. (Pictured below)

This gave me the idea for the tray. Simple projects too!

Her birthday is next week.  Hope she likes the tray, but I am keeping the art box!

; 0 )

Art Case Before

DSC_0037

DSC_0067

DSC_0080

Decoupage “Ugly Tray” Re-styling using Mod Podge

One of the things I look for when I go to thrift stores and swap meets are ugly trays.  I like them because they are great items to decoupage and I love decoupage!  They are also fairly inexpensive.  They are great practice and experimental pieces, and they are functional.  The possibilities are endless as to  themes and what you can do with these trays.  They also make great gifts. For My first decoupage tray, I used a freestyle approach.  I printed out all these lovely Victorian Era prints.  I love the Victorian era artwork and elegant look.  I had this old tray that was quite boring and a few times I had actually thought of throwing it away because it took up space and was just plain ugly.  I decided it would be a great piece to experiment on.   I painted the entire piece black with acrylic paint, and cut out the prints I wanted to use in the collage. I then used Mod Podge Gloss finish to glue the images to the tray.  Once completely dry, I sealed the entire piece with 3 coats of Mod Podge gloss finish.   I decided to hang the tray on our living room wall.   These trays also make great wall art.

Image