Crazy for Corduroy: Girls Flower Power Decoupage Side Table

It has been a very hectic week in the “On The Upcycle” household.  I have been working late into the night to prepare for my first flea market this Saturday.  I am happy to report, that my crafting area is looking more like a usable work space, and less like a storage closet!  My hope is clearing out some older items will make way for new projects.

I have also been working on a few projects specifically to use in the sale.  I picked up this nice, wooden side table at Goodwill for a couple of dollars.

20150419_200300

The original idea, was to use a black and white scarf I had for the decoupage and then paint the table with neutral colors.  It is amazing how quickly a plan can change!  I used a white, spray on primer to prepare the table.  I applied the scarf and instantly was not all that impressed with the result.  Scarves can be tricky because the fabric is very thin, and once it is glued to the table top, it has a tendency to show any imperfections on the wood underneath.  That is exactly what happened in this case.  Once the Mod Podge was dry, I removed the fabric and decided to start over.  Then it hit me:  I had this great flower power corduroy fabric from an old dress that looked very cute on my daughter but no longer fit her.  I saved it in the hopes that I would find a use for it someday.  That time was now!

20150421_175548

I cut the fabric and measured out a large enough piece to cover the top of the table.  I applied a generous amount of Mod Podge to the table surface.  The general rule is the thicker the material the more Mod Podge you will need to use to achieve the desired effect.

20150421_180715

Once the glue was dry, I hand painted the table with pink, purple and white acrylic paint.  This was turning out to be a much different table then I had originally anticipated.  After a few more coats of paint,  I added generous amounts of Mod Podge to the table top to seal the fabric.  I repeated this process three times allowing it to dry between coats. I also applied Mod Podge to the painted surfaces, to seal the entire piece.

20150421_195011

Once dry, I trimmed off the excess fabric on the edges and applied more Mod Podge to seal those edges.

20150422_074658

This is a side table with a lot of flower power and 1960’s appeal.  I am hoping this table makes some little girl very happy!  It will be just one of the items for sale this weekend.  I also loved working with corduroy!  Because of the thickness of the fabric, I was unsure as to how it would turn out and was more than pleased with the end result!

Before:

2015-04-28 (1)

After:

Materials Used:

Old kids Garment

Mod Podge

Spray or brush on white primer

Acrylic Paint

Paint Brushes (Various sizes)

Scissors and Box Cutter knife (to trim edges)

Crib Rail Repurpose: Children’s Book Wall Rack

Recently, we began preparation to move my daughter from her crib to a toddler bed.  When we chose a crib for our registry, we made sure it was a convertible style crib that would grow with her.  We were looking for what most consumers want, quality at a reasonable price.  We chose   the Graco convertible crib in espresso finish.

Graco Crib

It appeared sturdy on the showroom floor and was priced right.  Initially, I was happy with the crib.  Then 18 months later, I notice a few of the metal springs had broken off the frame they were welded on.  One by one the springs broke off.  The crib needed to be reinforced with bungee cords.  We knew this bed would not last like we had previously anticipated. We were forced to come up with an alternative and purchased a new mattress and a toddler bed.  The original mattress was torn by sharp edges left where the springs used to reside.  This was a big disappointment.  We were expecting to use this convertible through her toddler years, but it was not to be.  The crib finally gave way and it was obvious it was no longer safe.  Luckily, the new bed was purchased and was on standby and we were able to quickly make the switch.

I am happy to report that the toddler apprentice loves her new “big girl” bed and the toddler bed experiment has gone surprisingly well!  She lays down and falls right to sleep! We were surprised how quickly she has adjusted.

Toddler Bed

When I dismantled the crib, most of it was broken and not salvageable.  The rail was still in decent shape.  I had seen some ideas online upcycling old cribs ranging from Repurposed crib benches  to crib rail Garden Trellis’s.  I wanted to keep this project simple.  I was preoccupied by a much larger, more daunting, task cleaning my daughter’s messy playroom!  I filled one trash bag with broken items and another with items to donate to those in need. This emptied one toy box for additional storage which reduced clutter.

My daughter has a large book collection she acquired before she was even born.  At my baby shower, the guests brought a signed book instead of a card. I loved this idea, but I did not have an ideal way to store all the books we received.  They basically sat in a wooden box on the playroom floor.

I thought the crib rail would be a great alternative way to display her books, and keep them off the floor.  Since I was struggling to get her room organized, and did not have the time,  I decided to leave the crib rail in its original finish.  It also matched the playroom well.

crib rail

If you would like to change the original color, a can of white latex primer works well.  Once dry, paint as desired.    I also suggest using longer screws to anchor each side of the crib rail to the wall. When doing this, lean the crib against the wall on a slight angle so the books can hang over the rails.  I did not have the proper screws handy, so I had to improvise and use one smaller screw through the first rail.  This worked, but the trade-off  is that the first rail cannot be used for display.

Repurposed Crib Rail Book Rack

I love it!   Being the sentimental fool that I am, it also is nice to keep a piece of the crib for nostalgia!  I also repurposed her changing table into a kitchen shelf.  If you missed it,   You can view that project here.


DSC_0440


Repurposed Crib into a children's book rack


Play it again, Kid: Upcycled Vintage Jaymar Kids Piano

When I take a trip to an antique shop or thrift store, the thing I enjoy the most is the element of surprise.  Sometimes I come away with nothing and other times when I least expect it I find something rare.  Speaking from experience antique shops tend to have pieces that are in better physical condition. Thrift stores such as Goodwill often times are stocked with basement throw aways and estate sale clean-ups.  Many of these items are not well cared for and in some cases downright abused.  I have come across items that I wanted to rescue, but I felt with my skill level I could not save them.  It always leaves me with mixed emotions.  On this day I was about to leave the store.  The husband and I have been regularly stopping in searching for a vintage rotary phone.  Not only have I always wanted to upcycle one of these phones, My husband and I love the loud ring it produced from our childhood memories.  We have missed many calls at home unable to hear our landline phone ring if we are in a certain part of our house. Upon taking one last stroll through the cluttered furniture aisle, my eyes wandered and there it was staring back at me! It seemed too good to be true: a vintage Jaymar Kids Piano. The toddler apprentice and I had been out shopping last year around Christmas at The Christmas Tree Shop, and stumbled upon an adorable kids baby grand piano.  She loved playing it and I could barely peel her off it at the store.  The price tag was a bit hefty weighing in at $89.99.  When we left the store without it,   I couldn’t get that little piano out of my mind and finding the vintage Jaymar at Goodwill seemed a bit like the product of fate. As with any upcycling story there are challenges to be faced and this adorable piano was no different.  The wood in many places was peeled away, It had its share of loose nails, and a large crack spreading across the base and back of the piano.  Incredibly, all the white keys worked perfectly and all, but one of the black keys worked perfectly.  The plastic keys were more yellow than white as is what happens to plastic stored under certain conditions with age.  It did not have a price tag so I took it up to the associate at the register. Even in rough shape I was surprised it was priced at a mere $5.99!

Vintage Kids Jaymar Piano Est 1960's

I snatched it up and brought it home.  I may not have found the rotary phone that I was searching  for that day, but I was surprised and delighted to find the piano.

Despite its charms, I knew very little about the toy.  I grabbed my laptop and did some research.  Thanks to Old Wood Toys.com  I was able to read about the history of the Jaymar company.  The toy company produced wooden novelty trinket toy through World War II.  After the war the company exclusively produced kids pianos and puzzles.  The company officially closed it’s doors in 1990. When I searched on Ebay, there were a few for sale, many of them in rough shape with price tags ranging from $39.99-$89.99.  On most, keys were broken. I concluded I had gotten a very good deal on this toy!

Jaymar Kids Piano

Since the piano did not come with a bench, I had a kids unfinished step stool that I thought would repurpose and stand in nicely as a piano seat.

Unfinished Step  Stool

I decided the cracked area of the piano would benefit from decoupage.  I believed the Mod Podge and fabric would reinforce the cracked wood and prevent it from spitting further.  I chose black and white music note fabric from Joann Fabric.  I used a white brush on acrylic primer to paint the entire piano after cleaning it thoroughly with a damp cloth.  I measured the area I wanted to decoupage and cut a piece of fabric to fit.  Once the paint was dry, I applied Mod Podge generously to the cracked area underneath with a foam craft brush, and carefully applied the fabric smoothing it put with my hands.  Once dry, I applied three more coats of Mod Podge over top of the fabric allowing it to dry between coats.  I then painted the entire piano with several coats of black acrylic paint with an appropriate sized paint brush.  I painted parts of the piano white for emphasis.  While the piano dried between coats, I worked on repurposing the step stool into a piano seat.  I traced the seat surface on to the back of the music note fabric with a pencil.  I cut out the fabric with scissors and placed it aside.  I painted the entire chair black except for the seat which I planned to decoupage with fabric. Once dry, I applied Mod Podge to the seat and applied the traced fabric.  I applied three coats over top of it to seal it.  Once the Mod Podge was dry I used a Polyurethane clear semi-gloss sealer to add a final protective coat over the piano and the piano chair.

Upcycled Vintage Kid's Piano

The one frustration with this project was the yellowed plastic piano keys.  I would have preferred a method to whiten them, but after doing some research decided not to mess with the patina on the keys.  I have read everything from sanding the keys with fine sandpaper or cleaning them white toothpaste.  In the end, I decided the risk of damaging the function of the piano was too great and simply used the corner of a Magic Erasure pad to throughly clean the keys.

Play it again kid, restyled kids piano


Have any safe plastic whitening tips?  I would love to hear them!

Materials used:

Black and White Acrylic Paint

White Acrylic Primer

Large and Small Paint Brushes/Foam Craft Brush

Mod Podge

Polyurethane Clear Sealer

Fabric Of Choice

Scissors

Wet Cloth or Magic Erasure Pad for cleaning

Kids Piano/Kid Step Stool (for seat)


Hello Kitty Themed Kids Surfboard Bench

It has been an especially harsh Northeast winter and many of my usual thrifting haunts have been light on stock especially when it comes to furniture pieces.  Despite this, I certainly don’t mind the thrill of the hunt. You never know when you will find something unique.  On such a trip, I came across an interesting kids bench (At least that’s what I think it was!) at a local Goodwill store.    It appeared to be a surfboard and the painted design was hideous!  Despite all of the negatives with this piece, I felt this would be a fun redesign, and I loved the detachable legs.  This feature made the legs easier to paint.  Nothing conjures up images of summer like a surfboard, and that is just the kind of project I needed!

DSC_0112

I cleaned the entire piece with a Magic Eraser. It had an unidentifiable sticky substance all over it and the Eraser worked well to remove it.  I used a white spray primer to cover the brightly colored design.  I was planning on using a fabric decoupage, but felt the bright colors may bleed through the fabric.  Using a primer first prevents this, and gives me a clean slate to work with.  Once the primer dried, I used a foam craft brush to apply Mod Podge to the bench surface.

DSC_0114

My daughter and I stopped by the craft store and I let her look through the aisle filled with different character fabrics.  She seemed to like this Hello Kitty print and I happily obliged, being a Ms. Hello Kitty fan myself. When I was young the local mall had a store called Sanrio and they sold Hello Kitty and all her “friends” merchandise. It was one of my favorite stores to visit in the mall.  I bought a half yard, and roughly traced the fabric to cover the table surface. Once the Mod Podge dries, any excess fabric left over around the edges and handles I trim with a box cutting knife.  The glue stiffens the fabric and makes it easier to cut.  I placed the fabric down on the Mod Podge soaked surface carefully smoothing out any wrinkles with my hands.

DSC_0115

I placed it aside to dry, eventually I would add a total of three full coats of Mod Podge on the fabric table surface.  I painted the legs with two coats of pink and white acrylic paint.  Once the legs were dry I covered them in a Mod Podge layer.   I then reassembled the table legs by screwing them easily back in to place.

DSC_0122

My daughter loves sitting on it.  It looks great in her room and it is a nice piece of kids furniture to use while helping her get dressed for her day.


Hello Kitty Girls Surfboard Bench

Before and After

Untitled


Strawberry Shortcake Sunday | CheekyGeeks

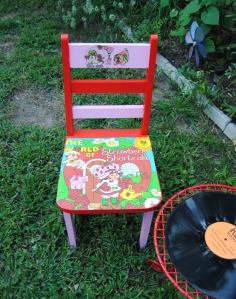
I want to thank Elise from Cheeky Geeks for featuring “On The Upcycle” during Geek month.  This week is retro week and what a better way to celebrate than with an upcycled Kids Strawberry Shortcake Record table and chair.  Be sure and check out my full tutorial on Cheeky Geeks.

Strawberry Shortcake Sunday | CheekyGeeks.

r\Retro Strawberry Shortcake Chair and Record table
Cheeky Geeks : Geek Month Celebration

Upcycled Strawberry Shortcake Kids Record Chair

Super Hero Seat: Decoupage Justice League Of America Kids Chair

My husband and I are kids at heart, and when I told him my plans to creat a “super heroes” decoupage kids chair, he was excited to see the final result. After a trying week and a busy weekend, I figured it was a good idea to jump right back on the “crafting horse”, and keep the upcycle going.

I passed this chair up many times.  I stop by the Goodwill right down the street from our house periodically.  It is usually a quick walk through,  and this chair sat, un purchased through several of these “walk throughs”,  The chair was in very rough shape and was doused in a heavy lacquer finish, that I suspected, would not be easy to apply paint to. It is difficult for me to pass up kids furniture because I love it so much, so during this particular walk through with my daughter in tow, I finally decided to buy it.

Old Beat Up Kids Chair

First, I tightened the chair and legs,  and used sand paper to smooth any rough edges on the chair.  I cleaned it with a damp cloth to remove any dust and dirt, and boy this chair was very dirty!  Once that was done, I used a white, latex primer to paint the chair from top to bottom. This was essential and even with the chair’s lacquered finish, it covered nicely.

After the primed chair was completely dry,  I painted the chair with a red and blue color scheme to mimic the Justice League of America colors. The Justice league of America is great because it incorporates the best superhero characters from DC, Comics.

I applied Mod Podge to the chair seat with a large paint brush. I then placed the prints onto the chair seat, slowly smoothing it out with my hands to avoid wrinkles. I repeated the same process for the chair back,  I decoupaged the Justice League symbol and two additional characters I could not fit onto the chair seat, These characters were The flash and The Green Lantern. I cut them out with scissors and applied them so they would appear as though they were “leaping” off the chair seat.  I made three white, printer paper stars to add some “pop” to the top of the chair back.

I placed the chair in front of a stand up fan to dry.  The next day, I applied Mod Podge to the entire piece to seal it and repeated this process twice, allowing the chair to dry in between coats.

My husband loved how it turned out, and it was nice to complete a strictly “just for fun” project.  I hope you enjoy it too!

Justice League Of America Decoupage Kids Chair

Materials:

Kids Chair

Comic books,or Comic Prints

Mod Podge

Red and Blue Acrylic Paint

White Latex Primer

brushes, scissors, pen

sandpaper

It’s a Good Night To Be A Doll : Upcycled Wooden Doll Bed

I saw this nice little wooden doll bed propped up against a thrift store wall, and found myself compulsively reaching out, and placing it in my cart.  It was priced at only $2.99, and I am a total sucker when it comes to children and doll furniture.  It looked like it was lovingly hand crafted and bore the battle scars of previous use.  It had charm, and for these reasons I couldn’t resist it.

Image

I decided to go with scrapbook paper for the decoupage.  I picked these sheets up at Joann Fabric for a mere $.59 cents each.  The biggest challenge was cutting out the paper to fit around the tiny spindles.  I probably could have done this more cleanly in retrospect.  I decided to square them off and I filled in any bare spots with brown paint. Once the paper was trimmed to fit, I used Mod Podge to slowly glue the paper to the wood smoothing out any air bubbles in the process.  I allowed to dry and then applied another coat of Mod Podge over top of the paper and waited until the area was dry to begin painting.  I decided to go with the bright pink and brown color scheme.  I used two coats of pink and brown acrylic paint to paint the entire piece.  Once the paint was completely dry, I applied another coat of Mod Podge over the entire piece to seal it.  My plan is to add a doll pillow and an old receiving blanket for doll bedding. I would like to make one myself, but sewing is not one of my crafting strong points.

Image

Image

Now, my a little girl’s dolls have a stylish place to rest when in the world of my daughter’s imagination.

Materials:

Wooden Doll Bed

Mod Podge

Three sheets of scrapbook paper

Foam Craft Brush (to apply Mod Podge)

Pen/Scissors/paint brushes

Acrylic Bright Pink and dark brown paint

To Upcycle or not to Upcycle. That is the question.

I’ll admit when I go thrifting I am attracted to certain items, but not for the reasons you may think.  Sure everyone dreams about finding the picture frame with a copy of the original US constitution in it resulting in the big “pay day”, but I am not always in it for what something is worth. I still have a lot to learn when it comes to determining what has the most value. More often than not, my choices are simply based on what I like.  I love anything retro, furniture, and fabric. I love to think outside the box when it comes to how I utilize these materials.

It was on one of many trips to the Goodwill that I came across this kids rocking chair:

Image

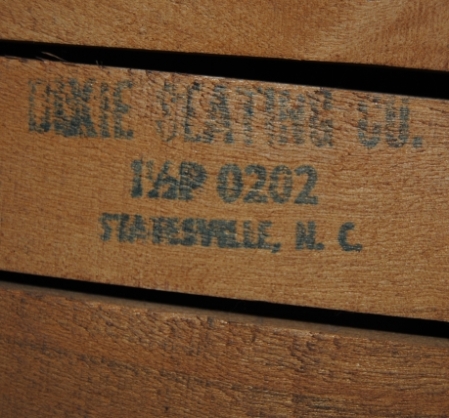
I saw it from a far and I didn’t waste anytime making my way over to it.  In my cart it went without hesitation. I didn’t even check the price at first.  Anytime I see kids furniture, I can restyle I buy it. Looking down at the tag I couldn’t believe my eyes.  I could tell it was a well made chair and it was only $5.99! I flipped the chair over and saw this:

Image

When I got the chair home, I did a little internet research on it and the company that made the chair. The Dixie Seating Company was founded in 1930’s and are known for making quality chairs and furniture for kids and adults. Most of these chairs are going for $76-$200 per chair online! I paid $5.99.  Except for some minor wear, the chair is in excellent condition.

After taking this all into consideration, I have put away the primer and I am instead taking out the Murphy’s oil soap. I am rethinking the upcycle and my decision is to leave the chair in it’s original state.

What do you think?  Have you ever decided not to upcycle an item because you were concerned  a redesign could effect value?  I would love to hear what others think on this.  Do you all think I made the right decision?

I e-mailed the company to try to gain more info on the chair including when the chair was made. They have not  have responded. The company started in 1934, but has changed owners a few times, and they had no information on this serial #.  They said best guess early 50’s. I believe the chair is at least  30 years old.  If anyone out there can offer any additional info on this chair, I would greatly appreciate and would love to hear from you!

Image

Fabric and Mod Podge Mania- Upcycled Kids Wooden School Desk

What to do? Yesterday, the hubby had to go off to work so it was just me and the daughter dear all day. I decided to take a trip up to the new Joann Fabric  mega store that just opened up down the street from my house (I now have a craft store practically within walking distance, this could be dangerous!)  Usually, as you all know, I am a “thrifty” shopper, but today I had a few crafting supplies I had to pick up and I figured why not give it a look?  They had a great coupon I found online,  30% off total purchase (except for sale items of course) Which was icing on the cake –if I decided to buy anything.  I walked into the store and it was HUGE!  The place was filled with aisles, upon aisles of fabric.  I am used to Goodwill prices, so I was shocked at how expensive fabric can be! One fabric in particular  was $49.99 per yard… yikes!  Thank goodness they had good sales and aisles filled with fabric at $4.99 a yard phew!

Image

I found this great school themed material. I had purchased a wooden school desk at an outdoor flea market some time ago, and had no idea how or with what material I was going to restyle it.  Now it was no question the winner was… fabric! I picked up a yard for about $5.89 on sale.  Once me and the giggle-goo got home, nap time was approaching so, I put the little one to bed and gathered my materials I would need to get started.

Image

First thing was to make sure the piece was clean and free of dust.  Then I used a black marker to trace the desk top and seat onto the fabric.  Once this was done, I carefully cut the cloth with a pair of scissors. I then generously applied the Mod Podge Matte finish on the desk top and on the seat using a larger paint brush to smooth it out.  Then I applied it to the fabric, using my hands to smooth out any air bubbles.  Messy you say?  Absolutely, but I feel with fabric it gives me more control, than using the Mod Podge tools.  Besides, I have never been afraid to get my hands dirty!  Once it was smoothed out, I then applied a layer of Mod Podge over top of the fabric. While that was dying, I painted the piece.  I used Red, Black, and Blue all colors featured in the fabric. The wood was ready to paint and not in need of priming, but it was very dry and soaked the paint in initially.  It took about 3 coats overall to get the desired result. I brought the piece back upstairs and allowed it to dry for several hours under a stand up fan.

Fast forward to later in the evening.,with the daughter asleep for the night and the hubby finally home, I worked on finishing the piece. I decided to cut out some swatches from the material and Mod Podge these onto the sides to add a little more life to that area.  I then covered the entire desk with 2 coats of Mod Podge.  I usually add more coats to the areas that will get more use and where the cloth was applied.  I used 4 coats on the seat and the desk top areas.  Pictured below is the wooden desk before and after:

Image

The hubby loved how it turned out and I can’t wait for the little one to use it!  She loves sitting at her little table and chair so I think she will enjoy this just as much and it will grow with her.  I also love the neutrality of the desk a boy or girl could use it!

Image

Stay calm and happy crafting my friends : 0 )

Sesame Street Girls Painted Kids Rocking Chair Made With Mod Podge

Image

Monday’s get me down, but rainy days don’t!  It has been raining all weekend and what better indoor therapy is there, than starting and finishing a new project!

Last week, I was on my lunch break and something told me to stop in the local Good Will Store. The last time I was in this store I was very disappointed with their prices and stock.  I am glad I listened to my “thrifty senses” and gave it another try.  As soon as I walked toward the back of the store where they keep all the furniture, I noticed the little rocking chair sitting there.   Before anyone else had time to notice this little “diamond in the rough”, I snatched it up.  I knew this was not going to be easy.  The chair was black lacquer and in several places on the chair, it looked like a small dog had chewed on it. The chair was also loose, but appeared it could easily be tightened up.  The chair was priced $6.99, which was a bit steep for an item in this condition, but who knows when I might find a kids rocking chair again?

I took it home and hand sanded the areas where the wood was damaged until it was smooth.  I then used two coats of latex primer and painted the entire chair.  Once dry I began the process of working out the color scheme and hand painted the chair using acrylics.This took a while as when dry I had to add additional coats.  Once the chair was painted, I used Sesame Street wrapping paper for the chair back and on the seat.  I glued the wrapping paper down with Mod Podge carefully smoothing out any air bubbles.  Once dry, I coated the entire chair with Mod Podge matte finish and repeated a total of 3 times.  The result is what you see here.  Now, My little girl will have her very own chair to sit on and read in her room. I think I am in love with kids furniture!

Image

Erin reading a book in her new rocking chair