Spring into Decoupage: Scrapbook Paper Drawer Makeover

Spring fever has hit the suburbs, despite the meteorologists predicting yet another snowstorm/nor’easter early next week.  With that the spring cleaning begins which was apparent yesterday after receiving a knock at the door from one of my many fantastic neighbors.  He was cleaning out his garage and wanted to know if I was interested in a really lovely unfinished celestial shelf.

Unfinished Celestial Wooden Shelf

and this absolutely lovely unfinished wooden bench with seat storage!

Unfinished Wood Bench With Storage

I thought it was a dream that these beautiful pieces would literally show up at my door but it was true!  If I didn’t want them, my neighbors were taking them to Goodwill to donate them.  I know Goodwill would have been happy to have these items especially during this unsuccesful trip when I snapped a photo of their depleted furniture room which is usually FILLED with items.   It has been a tough winter indeed!

Empty Goodwill store

Now, the challenge begins… I have to come up with design ideas for these wonderful pieces that do them the justice they deserve.  Meanwhile, all of this did make me think about my own much-needed spring cleaning and looking for items to reuse and repurpose that I already have instead of buying additional pieces.  A project I did fairly recently incorporates that idea.  As crafters we accumulate various supplies some of which we never use.  I have a collection of scrapbook paper that fits this profile.  The good news is there is nothing better than scrapbook paper when it comes to decoupage.  It can be used for so many projects not just it’s obvious purpose.  One of my very first projects involved a pair of upcycled bedroom tables.  It has been almost a year since completing these tables and they have held up fantastically well.  When I restyled them, I left the inside of the drawers undone and decided this would be a great way to use up some of that scrapbook paper.

Decoupage Nightstand with drawers

The process is simple first I figured out how much scrapbook paper I would need.  I added creases on areas I would cut.  I set these pieces aside.

Scrapbook drawer lining

I applied Mod Podge to the drawer surface with a foam brush.

DSC_0036

I carefully applied the paper smoothing it out with my hands.  The Mod Podge Rubber Squeegee Tool  also works well for this, especially in the corners.  Once the Mod Podge was dry, I applied an additional coat over top.

Line your drawers with Scrapbook Paper

A great way to reuse, restyle, repurpose. Do you have any green crafting ideas for spring? Am I the only one excited at what I might find while Spring cleaning?


“Be Mine Daddy”…. Valentine’s Day Kid’s Craft Ideas

On this Valentine’s day morning, many areas of the country are beginning the task of “digging out” after yet another treacherous winter storm hit the east coast overnight.  Just days before the same winter Nor’Easter  wreaked havoc in other parts of the country such as Georgia and the Carolinas. On top of it,  the little one and I have been battling a series of winter colds and are being forced to spend much of our time in the house due to the lousy weather.  Despite this, we have managed to make the best of these situations and have spent a lot of quality time together as a family.

I wanted to make my husband something special for Valentine’s day this year, and as with most of my creations,  I like to get my 2 1/2 year-old daughter (Also known as the toddler apprentice) involved in the process. I also knew that my husband being the wonderful dad he is, would appreciate the fact that his daughter helped mommy make his gift with “her own little hands.”  I have seen many great Valentine’s day kid’s crafts online via Pinterest and other sites, and I had many ideas swirling around in my head. I saw a great project courtesy of the Roylco kids craft blog (which I follow, and love) and although I decided to create my own version,  The Roylco project was quite inspiring.  Be sure to check it out!

For this project you will need:

Black, Pink, Red and White Construction Paper

Scissors

Kids White School Glue

Black Marker

White Non Toxic Kids Craft Paint

Frame (Optional)

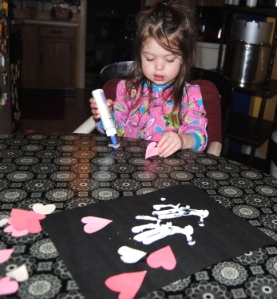
First, I dipped my daughter’s hand in the white paint after pouring it on a paper plate. I pressed her hand on the black construction paper.  This was challenging and it took a few tries after the first two attempts became slightly smudged.  There is no greater excitement to a little one then “messy fun” so she didn’t seem to mind the multiple attempts at getting it right! Once I achieved the desired effect I allowed the construction paper to dry. After about an hour, the paper was dry and ready.  I drew different sized hearts on the red, white and pink paper and carefully cut them out.  The little one enjoyed squeezing the glue on the hearts and sticking them to the paper!

Valenine's Day Kid's  Craft fun!

Such a Good Helper……

Next, I wrote little sayings in the hearts.  I thought this would be cute, but if you prefer it, you can skip this step.  I wanted to make it more personalized for him.  I then found a great glass frame in our attic to frame it in. Now we have a great piece of Valentine’s Day wall art for years to come, permanently immortalizing our daughters little two year-old hands forever. (Can’t you tell I am an overly sentimental person?)

Valentine's Day Kids Craft For Daddy

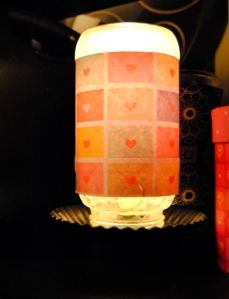
The apprentice and I also made a Valentine’s Day glass jar lamp.  I had some great left over heart themed scrapbook paper I won courtesy of Ray’s So Crafty’s Labor Day Giveaway.  I have made several jar lamps, and like to interchange them on the light bases, depending on the mood, or for holidays.  I simply cut the paper, applied Mod Podge to the glass and adhered it around the jar carefully matching up the seam.  An easy, simple decoration guaranteed to warm hearts during this frigid Valentine’s Day.

Valentine's Day Jar Lamp made with Scrapbook paper and Mod Podge

“On The Upcycle” would like to wish everyone a safe and happy Valentine’s Day.  Hoping you are able to spend it with those you love today!

Decoupage your Cell Phone: Take Two

Back on May 28th, I posted an entry regarding decoupaging your smart phone called Crafting Is Worth The Risk.  At the time it was unknown as to how such a project would turn out.   I actually  loved it, and decided to decoupage my computer tablet as well.   I received so many compliments on my phone case!  If they only knew!  Cell phone cases can be quite expensive, and this is certainly is a thrifty way to add an artistic flare to your phone without spending a lot of money, but what happens  when you decoupage your phone, but need a change?  No problem!

I wanted to change my smart phone’s look to something more colorful.  I loved the scrapbook paper I used on my tablet.  I had a small piece of this paper left and decided to use it to update my phone’s look.  It was fairly easy to remove the old decoupage, I simply peeled it off with my fingers and cleaned the back of the phone cover and removed any of the old dried, Mod Podge.  I was surprised, because the decoupage held up amazingly well, and I didn’t think it would be so easy to remove.   I then repeated the same process I used during my initial restyle.  I removed the back of the phone, and traced this  on to the back of the paper with a pen, and using an X-Acto knife I carefully trimmed the areas such as the speaker and camera lens.  I applied Mod Podge directly to the phone cover to adhere the paper and then applied multiple coats over top to seal.

A few additional phone decoupage tips:

Use Mod Podge Matte finish as the gloss finish I find dries tacky!

Be careful and keep your phone dry (Decoupage or not this is always a good tip!)

Always remove the cover from the phone before you start.  (Don’t want any glue finding its way in any of the phone’s electronic components.)

Do not place a decoupage phone on another decoupaged item such as a table.  The two mod podged surfaces will “stick” to each other!

Before Decoupaging, If your phone is under warranty, be sure and check if altering your phone in any way, could void the phone’s warranty (read the fine print)

For a more detailed tutorial, please see Restyle Your Smart Phone.

Restyle your cell phone/smart phone

IMG_20130829_104925

Living On The Upcycle: Money Saving Tips and More!

For those of you who have decided to follow my little DIY Blog, I can’t thank you enough.  It’s been about two months now since I started blogging, and I have really enjoyed the sense of online community here on Word Press.  Those of you who have been following me and my decoupage obsession have seen me use scrapbook paper on many of my projects.  I wanted to share with you the book of papers featured on my blog.  I purchased this scrapbook paper book at AC Moore for about $12.99 and it features damask and other patterns in mostly black and white.  I still have some sheets left, but have used many of the patterns featured inside.

Image

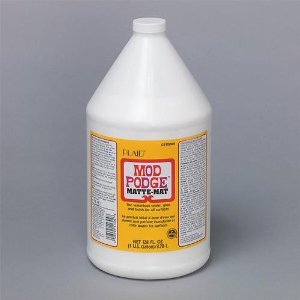
Recently, I had to purchase more Mod Podge Matte as I was in danger of running out.  We all know Mod Podge can be expensive.  When you restyle a lot of bigger projects such as furniture you can end up using a lot of the stuff.  I have been to a few craft stores locally, and so far the only one I have seen that sells Mod Podge by the gallon is AC Moore.  A gallon of Mod Podge is priced at $36.99!  Ouch!  The key is to wait until they feature the 50% off one regular priced item coupon. On a recent trip with the store coupon I saved over $18.00 off the price!  When the cashier keeps saying “Wow you saved a lot!” you know you got a great deal!  For current coupons and deals visit AC Moore Online

Mod Podge by the Gallon

Lastly, I have been working on an “On The Upcycle”  Logo.  I want to say thanks to Re:Retro for posting her blog entry Retro Office Stuff  featuring the retro Dymo label maker. I am a sucker for old, retro things and I just happened to have a Dymo label maker that I hadn’t used in a really long time.  Her blog entry inspired me to knock off the dust, have some fun, and use it again.  I came up with these logos.  To me it says what is old can be new again : )

On the Upcycle logo


On the Upcycle BW