Lighten Up: DIY Painted Fireplace Screen

Winter is quickly approaching, and now is the time to prepare and accomplish last-minute projects around the house before the frigid air takes hold. One such project on my fall to do list was preparing our fireplace for another possible harsh winter.

When my husband and I saw our house for the first time for me it was love at first sight, and this fireplace had me at “Hello.”  Some would, consider red brick outdated, but I loved its throwback flare and vowed never to change it. Fast forward years later, and my proclamation proved true. I managed to do absolutely nothing with the fireplace! We even had the same boring black fireplace screen we purchased at Target on clearance in 2007. The depth of our hearth made the unlit fireplace appear as if it were a “black hole.”  The dark screen blended in with the background and it’s vine detailing was lost in the fray.  As beautiful as the red brick was, it was missing something.  It is surprising that it took all this time to come to the realization that the fireplace needed some “pop”, after all it was the focal point of our living room.   Of course, a redo of the red brick was out of the question, so the hubby and I decided the screen needed a change. Instead of buying a new more exciting fireplace screen we vowed to do something to upcycle the old one!

Old Black Fireplace screen

I immediately took it outside and before I even bought the paint cleaned it thoroughly with the garden hose and allowed it to dry.  Since the screen would experience the extreme heat coming off the fireplace I decided to stop by Lowes and pick up 2 cans of white Rust-Oleum high heat paint.

High Heat Paint

According to the paint specs, it is intended for use in temperatures up to 1,200 degrees fahrenheit. The paint is also rust and corrosion resistant for durability.   I applied one can allowed it to dry overnight and then applied the other.  This DIY project is about as simple as it gets.  For me,  it made a dramatic difference. Painting the screen white, succesfully brought out the detail and added an extra dimension. Is their anything a fresh coat of paint can’t fix?

Repaint an old fireplace screen with high heat paint

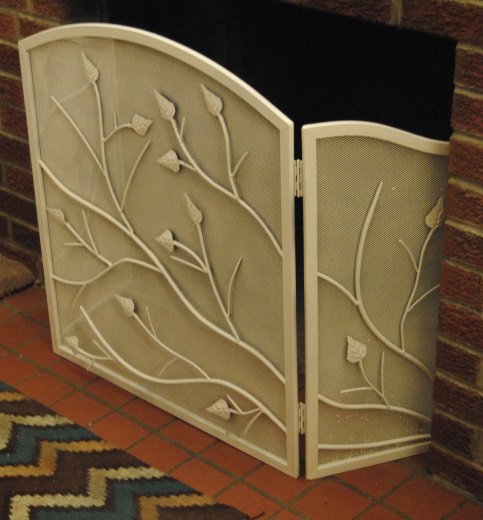
The screen also went well with the neutral sandstone walls, and former upcycle project black and white damask chair which currently resides as extra seating in our living room.

Lighten up up your fireplace

A special thank you to Nikkimarie at My People in History.  She is a family historian and genealogy buff like me, and if you are a lover of history, family stories and vintage photo’s stop by her blog and say hello!  Thank you for nominating “On The Upcycle” for the One Lovely Blog Award, and a big thank you to all my readers for the continued support and encouragement!

Wanna see more white fireplace screens?  Click Here

Advertisement

Tangled No More: Upcycled Wooden Shaker Peg Rack

I have a confession.  I am horrible when it comes to keeping my jewelry together and organized. I am always losing earrings,  and I constantly tangle my necklaces together.  When I picked up this Shaker Peg Rack at a thrift shop, I planned on using it to hang “crafty”things in my crafting area. I decided against it when I realized it was more urgently needed in our bedroom for jewelry.    I reached my breaking point this weekend, when I went to change my necklace only to discover a tangled mess!

Image

I decided I would use the fabric featured on Upcycled Spaghetti Jar Lamp.  I tried removing the pegs, but needed some of the hubby’s strength to remove them. He was able to loosen them and I was able to finally pop them out. My plan was to glue the pegs back on later. After pulling them out, they still fit snuggly which was great.  Removing the pegs would make it easier when covering the rack with fabric, and it would appear seamless.   I traced the rack surface onto the fabric with a black marker.

DSC_0274

I cut the fabric outline with a pair of scissors.  I placed the fabric aside.  I applied Mod Podge to the wooden rack with a foam craft brush, I carefully applied the cut fabric to the wooden surface smoothing it out on the surface with my hands.  I marked off the spot on the fabric, where the peg holes were.  This way, when dry I could pierce the holes with a scissor tip without making the fabric shift and move. I placed this piece aside to dry and painted the pegs with black acrylic paint.  I painted any areas not covered with fabric black.  Once the paint was completely dry, I covered all the painted and fabric covered areas with another layer of Mod Podge, and glued the wooden pegs back into the holes.  I used two long black screws to mount the jewelry holder to the wall.

This fabric and style looks great in our grey/neutral bedroom. You can use any fabric or color scheme you like and unfinished Shaker Peg Racks can easily be picked up at yard sales and thrift shops for a couple bucks. The perfect upcycle!

Upcycled Shaker Peg Rack Made with fabric, Paint and Mod Podge

The Patriotic Pasta Necklace~ Fun With Paint

I love getting my daughter interested in creative endeavours, and there is nothing more exciting for a 2-year-old than finger painting!  My little girl loves color!    There are many non toxic, and washable paints and markers available that are safe for young children. Making sure they are non toxic is key.  I looked down to find my little toddler apprentice lips were blue!  There is a great recipe to make your own edible toddler finger paint at Momtastic Be sure and check it out!

My daughter’s art room is our kitchen, which is the easiest area to clean, since inevitably the walls will get their own bit of artwork on them.  Once the painting was done, it was off to the bath and bed.  The artwork left to dry on the front of the fridge.

Vincet Van Goo Goo

What day of crafting would be complete without some sort of pasta art project.  I decided to make a pasta necklace in celebration of the 4th of July holiday. I thought it would be something fun for my daughter to play with and wear.  This was a pretty simple craft in which the kids can help make too!

Patriotic Pasta Necklace

I used three plastic cups.  I poured Red, White and Blue paint into the cups and dipped the dry Rigatoni noodles in each color.  I repeated this until I had enough to make the necklace my desired length.  It seemed like it was taking a while for them to dry, so I decided to I let them dry overnight.  Once they were dry, I threaded them onto the twine Red, White and Blue in that order, tied a good knot and Poof! Instant Patriotic Pasta Necklace!

Kids Craft Necklace

And Erin seemed to like it too!

Philadelphia Phillies Phanatic Painted Wall Mural

Before our daughter was born, my husband had the ultimate sports man room.  It was filled with sports memorabilia, and a fully stocked bar.  We hung out in there regularly  watched movies laughed and joked and even kicked back a few drinks.  Now, a new kind of laughter fills this room. It is no longer the ultimate man room, but it IS the ultimate little girl’s playroom.  My husband and I discussed doing something special in the family room for our daughter Erin. We both liked the nursery wall mural and how it turned out.   Sure, we could have decided on a mural of  princess’s and castles, but I wanted to do something different and also keep true to the original theme of  the room which was sports.  One of her favorite toys is her Phillie Phanatic Pillow Pet, which ultimately gave me the idea.  I also wanted to do something for the hubby.  He was more than happy to give up his room for his daughter, but I wanted to thank him too, after all he is a huge Phillies fan!

I searched the internet for a good example of a Phanatic image I wanted to use as a visual.  I often draw through visually studying a picture before I begin.  I usually use a pencil to outline where I am going to paint.  I found it easier this time to simply draw the lines with a fine brush and black paint onto the wall.  If I made a mistake, I used a magic eraser to wipe away the paint.  (Magic Eraser does not work on a flat painted wall) I thought it would be cute to have him holding a pennant with ” Go Erin” on it.  I used acrylic paints and applied about 3 coats total.    The mural measures a little over 5 feet tall.  Hopefully, it will be a good luck charm this season and beyond!

Some Phillie Phanatic trivia:

The Phanatic replaced “Philadelphia Phil” and “Philadelphia Phillis”, a pair of siblings dressed in 18th-century dress.

During the winter after the 1977 season, Dennis Lehman, thought that the team needed a mascot similar to San Diego’s Famous Chicken created the Phanatic with the help of Acme Mascots

The Phanatic debuted on April 25, 1978, at The Veterans Stadium, when the Phillies played the Chicago Cubs.

His mother, Phoebe Phanatic, occasionally appears with the Phanatic.

Phillie Phanatic Painted Wall Mural

Full lengths shot of Phillie Phanatic Wall mural

Retro Monday-Craft an EAT sign for the kitchen

Retro Style EAT sign

I am definitely what you would call “old school”.   I love retro, and throwback items.  I always say to my husband that if I ever won the lottery I would buy an old Victorian house and fix it up instead of buying a brand spanking new mansion!

One of those throwback items I have seen all over the internet are the “Eat” signs.  These signs were popular beginning in the 1930’s and continued being used into the 1950’s.  Many of these signs were posted along the famous Route 66 advertising popular diners along the route.  I just think they are cute and thought the iconic letters would look nice in our kitchen.  I purchased the wooden letters from Michael’s.  I went to several different craft stores to find the letters.  A little frustrating because none of the stores had all three letters I needed!  Once I purchased the letters I simply painted them using acrylics.  You can also decoupage the letters if painting them is simply too boring for you.  I was looking for the simple red and blue letters.  I wanted them to “pop” in our bright yellow kitchen.  I thought it would be cute to add the napkin with the fork and spoon.  I used an old placemat and my upholstery stapler and stapled the material to the wall.  The hardest part was hanging the letters!  I have a level, but was still having difficulty.  Not sure they are completely straight but I can live with it!

Materials used:

Wooden Letters

Acrylic Paint

Old Kitchen Placemat

Upholstery staple

Old Fork and Spoon.

Steppin’ It up~ Restyled Wooden Step Stool

I was on a mission: to find the perfect wooden step stool, I could restyle and put my own stamp on. It won’t be long before our little Erin will need one so that she can stand at our bathroom sink and wash her hands and brush her teeth. I thought finding the right one wouldn’t be easy. Going to thrift stores is hit or miss when it comes to finding something specific. As luck would have it hiding under a table of various thrift store tchotchke was the perfect little wooden steps tool. It was love at first site! I snatched it up immediately. As luck would also have it, I found the perfect material to use to decoupage onto the stool. A“groovy” drape designed by Helen Trast for Ikea. It was perfect for many reasons, the material was almost burlap- like, so it would hold up well after sealing, and it was colorful and fun.
Materials Used:
Cloth Drapery
Mod Podge Matte Finish
Red Acrylic Apple Barrel Paint
White Latex Primer
Mod Podge Roller tool
First I used white primer to paint over the wood. Then I turned the step stool upside down onto the drape material and traced the top surface with a black marker. I used scissors to carefully cut the outline. I used the Mod Podge to glue the material down and smoothed out any air bubbles with the Mod Podge Roller tool. I painted the remaining uncovered parts of the stool with red Apple Barrel Acrylic paint. Once everything was dry I used the Mod Podge to seal the item. I repeated this step 3 times letting it dry thoroughly between coats and Voila! Erin will now be able to step up in style with a 70’s groove!
Wooden Step Stool Redo