The Shirt That Didn’t Fit: Clothing Repurpose

I was up late shopping one night when I came across a lovely shirt on Ebay.  I usually don’t purchase clothes unless I can try them on first, but I had recently ordered something and it worked out perfectly, so I was feeling braver than usual.

I received the item, and to my dismay it did not fit.  The seller had a no refund policy, so I attempted to relist the item for sale. Unfortunately, I didn’t have any luck reselling the item,  so I decided to utilize the shirt in a different way.  I loved the pattern and material, so I decided to re-purpose the item and use the fabric for decoupage.

20160114_191835

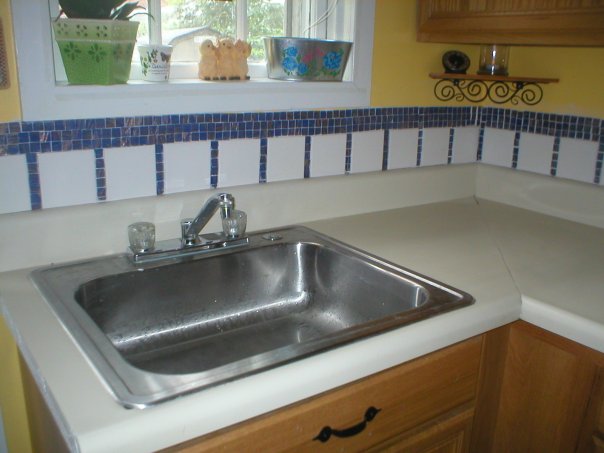
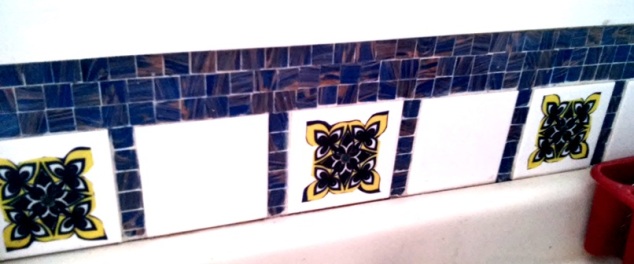
I carefully cut out the gold star pattern, and used a little Mod Podge to apply these to my kitchen back splash.  This added a much needed “pop” of color, and matched the kitchen decor perfectly.

Before:

DIY Kitchen Back Splash

After:

20160131_113806

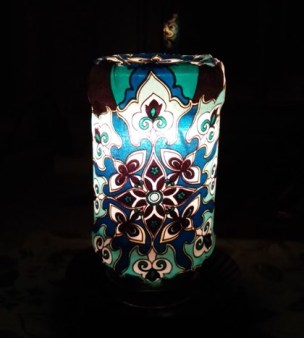
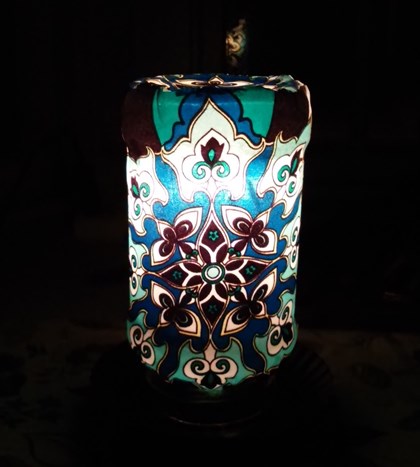
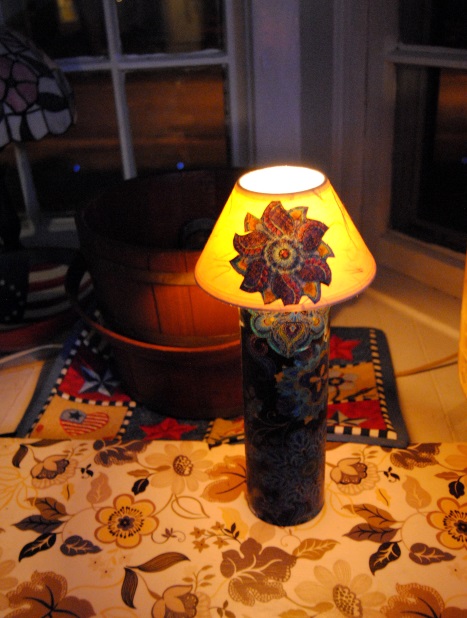
I had some fabric left over, so I decided to use it to make an accent lamp for my office.  I had an empty spaghetti jar which would work perfectly for this project.  I applied Mod Podge to the exterior of the jar and used some twine to add a decorative quality to the base. I applied the twine with hot glue.

20160216_074721

20160218_215538

For more details on how to create a decoupage jar lamp, check out some previous On The Upcycle decorative lighting projects…

Spaghetti Jar Lamp

Pickle Jar Lamp


Hot Summer Nights: Paradise By The Back Porch Light

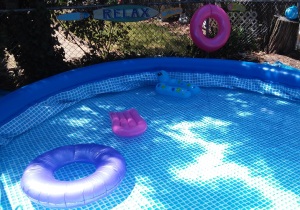
This past memorial day weekend, my husband and I were determined to get the yard ready for summer.  My daughter received an Easy Set Intex Pool from her Uncle and Aunt for Christmas and we could not wait to get the pool setup and operational.  My daughter’s 4th birthday this year will have a pool party theme, and the date for the party is quickly approaching.  My husband and I leveled out the ground in the area the pool would be placed.  We laid down a tarp and spread the pool out.  These inflatable Easy Set’s are great starter pools, and in our case the simpler the better since this is our first attempt at putting up a pool.

20150523_141004

We inflated the ring with a pump, and from the inside smoothed out the lining.  It took all day to fill.  The next day, we hooked up the filter, placed chlorine tabs in the floater, and assembled the ladder.  The water was very cold, so I hopped in to the pool for a test run.  For the most part everything went great and the set up was easy.  I was disappointed to find some parts in the lining that were not as smooth as we had wanted.  I can’t stress enough the importance of making sure the ground is clear of any debris and level.  Even after all our careful work, what seemed smooth at the surface was not always the case.  Once the weight of the water pressed the ground flat, some rocks and roots underground seemed to appear out of nowhere through the lining.  That being said the only way to remedy this would be to drain the pool and remove the debris from the area to smooth it out.  Until it is necessary to do so, we are going to take our chances.  I would feel guilty wasting all that water!  Luckily the pool came with plenty of patches if needed.

20150524_131400[1]

We purchased a few fun summer signs from Dollar Tree and lined the fence with them for added decoration.

I  also accomplished a few smaller projects.  I had a decorative metal star that I picked up at Christmas Tree Shop.  It was on clearance and I was never happy with the tan color.  I surmised that this was most likely the reason why it was on clearance.

20141108_172420[1]

Since it was Memorial day and the house was decorated in Americana….

20150509_132943-1[1]

I had some extra Rust-Oleum red spray paint, and I sprayed on a quick coat.  I like the star better now that it is red and I purchased it for half the price!

20141108_201050[1]

The other area I wanted to address was the corner of the yard by the pool. There is a rather large tree stump in this area.  Some time ago, I blogged about ideas here.

I struggled with what to do with this stump for some time.  This weekend that changed.  I decided to make it a fun project for my daughter and I to do together.  I had an old broken wooden TV tray.  I removed the table top from the legs and screwed it on to the tree stump surface.  My neighbor had given me some decorative, shells, glass pebbles and decorative rock. I thought it would be fun for us to create a mosaic table top for it.  I used some old tile grout and glue in one and spread it onto the table surface evenly.  The toddler apprentice and I then applied the rocks and glass pebbles.  We wiped off any excess grout and allowed it to dry overnight.  I used the unused legs of the TV tray as a garden trellis, another great re-purpose!  My goal was to use as much of the table as possible. Mission accomplished!

20150525_172623[1]

I placed the shells around for decoration.   Now Mommy has a place to put “her” sippy cup and relax by the pool, while my daughter has fun exploring and playing with the various sea shells.

20150525_173659[1]

20150525_172714[1]

Since this spring has been a bit sparse in the rain department, our grass took a hit and much of it died.  Once all the yard work was done, we raked the yard and spread out grass seed in the hopes of bringing our lawn back to life!  Once the grass grows under our feet, our little backyard oasis will be complete!

What do you have planned for your backyard oasis?  Do you have any summer projects you are eager to complete?  How do you like to kick off summer?

Two Years, One Sale- On The Upcycle

This April 27th 2015 marks the two-year anniversary of this blog and my creative mission to reuse, re-purpose and restyle.

2-years-old

For me, Upcycling is all about having fun and being creative with items that would otherwise be discarded.  The biggest challenge for me has been the writing. I love to craft, but I struggle with writer’s block from time to time.  The ideas for projects often come but the words to adequately describe them do not. Although I am not blogging with quite the same frequency as I once was, I am still happy that I was able to continue and complete a few larger and more challenging projects this past year, like my Lane Cedar Hope Chest. After two years of creating I am inevitably left with too many items and not enough room to keep them all. I was excited to hear that my daughter’s school is sponsoring a flea market in early May.  This seemed like a great oppurtunity to have my first “flea market experience.” I have never tried to sell my projects before, so this is a huge first step for me.  What better way to re-energize and make room for new projects?

It’s spring cleaning time for On The Upcycle. That being said, it’s also a fun time to squeeze in a few smaller projects in the days leading up to the sale.

I love wooden boxes and picked this one up for 99 cents at Goodwill.  I didn’t care for the boxes original design, but the box itself was in great shape.

20150419_201455[1]

I used a spray on white primer to properly cover the previous design on the box.

20150419_212220[1]

I had a nice celestial print.  I have been in a colorful mood lately and wanted to utilize a design with a lot of color

20150419_212452[1]

I applied Mod Podge with a brush, and placed the print on the box top and front.

20150419_212639[1]

I painted the box blue and pink to match colors contained within the print

20150420_212842[1]

This whimsical celestial themed box is one of the items crafted specifically for the sale.

20150420_212650[1]

Here are a few photo’s of previous projects I have agreed to part with for the upcoming sale:

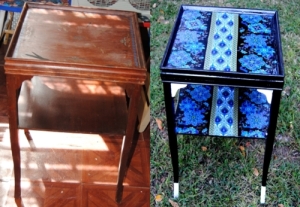
Peacock Table
peacock table before and after

Star Wars Kid Chair:

Star Wars Themed Fabric Decoupage Chair

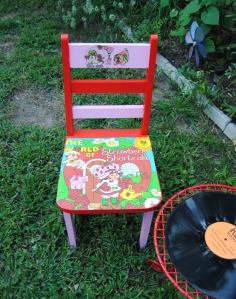
Strawberry Shortcake Kids Chair:

Upcycled Strawberry Shortcake Kids Record Chair

Kids School Desk:
Upcycled Kids School Desk

Happy Earth day to all of my friends!! How are you celebrating today? Do any of you have experience with Flea Market sales? I would love to hear from you! Any tricks of the trade or friendly advice?

On The Upcycle Revival: Vintage 1934 Lane Waterfall Art Deco Hope Chest

Every once in a while that special piece of furniture falls into your lap unexpectedly and without warning.  Now that the word is out and friends and family are aware of my blog, I have had interesting items rescued and brought to me to experiment on.  That was the case with this next project which also proved to be my most challenging yet. The same friend and co-worker who brought me my “You had me at half table” project approached me about a cedar chest she had sitting in her garage.  She needed to make room and could no longer keep it, and wanted to know if I would be interested in giving it a good home, and taking it off her hands. The outside of the chest was in rough shape, but the inside was still perfect.  After all these years, it managed to maintain its trademark cedar smell.  She inherited the hope chest from a neighbor who was about to place it out on the curbside. My friend rescued it, recognizing this diamond in the rough deserved a second chance at life. Adding to the excitement was the fact that I had always wanted a hope chest of my own.  I didn’t mind having to put some work into restoring one, and I graciously accepted the offer.  I was really excited and looking forward to working on a special piece like this.   Initially I was concerned about transport, but I was relieved when it fit in the backseat of my car.  I already had a spot for it in my bedroom. It seemed like it was fate.  For a while,  it sat untouched and the veneer began to peel, and I peeled it off little by little, while I figured out a plan to bring it back to life.

DSC_1002

I began researching the piece online. I opened the trunk and inside I found a card outlining the moth insurance policy.  The card also encouraged it’s customers to “buy victory war bonds.”  I knew from that moment on this was a vintage piece.

lane 2Lane Card

The tag also listed the maker of the piece.  The Lane Company Altavista, VA.  The name was also burned into the inside of the lid.

DSC_1058

Founded in 1912 by John and Ed Lane, The Lane Company of Virginia, became one of the leading makers of Hope chests in the United States during World War I and World War II.  During that time, it was tradition for young girls to have a hope chest to bring with them into a marriage.  The company launched a massive ad campaign which even included child star Shirley Temple  as a popular spokesperson for the company.

20c67b90a939d58165359ab106c7e366

Every piece was stamped with a unique serial number and style number. Reversing the serial numbers is what helped me determine its age. This one was manufactured on 8/18/1934.  The chest was waterfall design done in an art deco style which was also popular during this time.

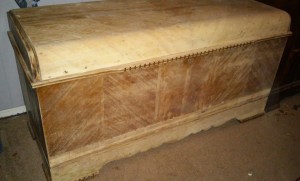
The chest itself was in good shape, but the veneer was not.  It was stored in a damp place for a long time,  and much of it was peeling or bubbling up. I knew removing this would take a lot of work.  I also discovered that the original lock had been recalled. Sadly there have been cases of children suffocating inside after becoming trapped as recently as 2014. The good news is Lane still has replacement locks available on their website.  Due to safety concerns, I went online to order one here.  The lock ships in 4-6 weeks.  It is important when purchasing vintage furniture to pay attention to recalls.  I was glad to have stumbled upon this fact during my research by pure accident.

With minor cracks in veneer, it is possible to buy wood filler/puddy and “patch” and sand the areas, but in this case the veneer would have to be removed entirely in some areas. I read a few articles online, and I tried various techniques for easily removing veneer.  Let me start off by saying there is no easy way to remove veneer. I found it to be a long, risky and tedious task.  The one technique  that worked best was using a hot iron and a damp towel. I soaked the towel in warm water and placed it on the area of veneer I wanted to remove.

DSC_1004

I then heated up the iron and placed it on the area allowing it to sit for several minutes.  This softened the glue enough to allow me to use a scraper to remove large pieces of the veneer.  unfortunately, smaller pieces broke off and I ended up repeating this process many times.  The biggest challenge was scraping and removing the veneer without damaging the wood underneath.

DSC_1000

Please also note that once you use your iron for this task, it becomes designated only for this task.  The glue from the veneer burns the iron permanently and it can never be used to iron clothing again. This process was completed during the course of a few days.  I would work on a small area nightly.  The veneer removal seemed to be taking forever until it was boosted by a snow day and some unexpected free time.

20150305_222555

I used a belt sander to even out the larger areas and hand sanded the more delicate and smaller areas. The areas on the piece that still had veneer I carefully hand sanded.  Using a belt sander can cause damage to the veneer.  Once the sanding was completed, The piece was ready to stain and seal.
20150305_225309-1

20150305_175139

I trudged up to Home Depot in the snowy slush and shopped for a suitable stain and polyurethane seal for the exterior.  The colors that I initially wanted they did not seem to have in stock.  This did not make the aisle look any less intimidating to me.

20150306_093046

I decided on a color called “Cognac” and a clear semi-gloss polyurethane sealer.  I already had a small can of Minwax Jacobean at home that I was planning on using for some of the trim.

20150306_112823

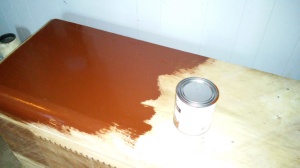
I began applying the stain and it was a little darker than I expected, but it closely matched our bedroom furniture like I had hoped.
20150306_113835

I then painted the entire piece.  I was happy with the Varathane brand stains as it dried quickly and had less odor compared to other stains I have used in the past.
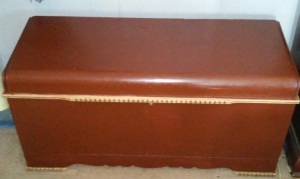
20150306_124502-1

I  used the Jacobean colored stain to paint the trim and highlight the grooves and detail in the lighter wood trim.  To me adding the darker color helped bring out some of the unique design qualities of the piece.  It took about two coats of stain to cover all the areas.  Once the stain was dry (It took about 24 hrs) I applied two coats of the clear semi gloss polyurethane to seal the chest.

DSC_1061

Although I could not restore the chest to its original state, I am pleased with how elegant the piece looks now.  It fits in beautifully in our bedroom and I look forward to storing special items inside it and treasuring it for years to come.
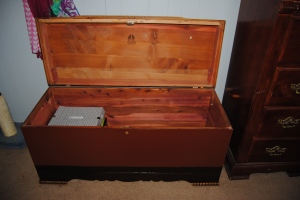
DSC_1060

Before and After

1934 Lane Hope Chest Before and After

Materials used:

Old Iron

Old Towel

Paint Scraper

Paint Brush Large and Small (for detail)

Wood Stain (color of choice) and Polyurethane Sealer

Sand Paper

Belt Sander (Optional)
Ghosts of Furniture Past: Refinished Drop Leaf Table

My husband has very few mementos from his childhood, so for this project the pressure was on.   This round, drop leaf table was used for just about every purpose in my husband’s family home.  It had seen better days.  It survived over 30 years of wear,  dirty hands, spilled drinks and more.  If only a little table could talk!  I could only imagine the stories it would tell!

I wanted to restore this table to its original state before all its scratches, and dings, but it would prove to be my most time-consuming project to date, and also the most rewarding.

Cleaning over 30 years of dirt and grime is not easy, but a necessary step when preparing a table for restoration.  I cleaned it throughly with a damp cloth and used a scrubber sponge for tough to clean areas.  Once clean and dry, it was time to sand it and I did so by hand with sandpaper!  This was very messy and time-consuming.  I suggest wearing a mask, and doing this in an area you don’t mind getting dirty. Completing this part of the project outside would be preferable.  All the more reason to invest in an electric sander having one would have accelerated this process.  In between other projects I worked tirelessly to get the table completely sanded and ready for staining.

Round Drop Leaf Table

I chose Minwax  Jacobean 2750 for the stain.  I wanted a dark rich color, which would contrast nicely with the sandstone colored walls.  While working with oil based paint be sure to have a proper solvent nearby for clean-up.  I use Safer Paint Thinner which is more environmentally friendly than traditional cleaners.  I applied the Minwax stain with a brush, following along with the wood grain.  Unfortunately, for me,  I applied too much stain and due to the humid summer weather, the table took over a week to dry!  At this point, I was in no rush, and it rested quietly in the craft room locked away and out of reach from curious toddler hands.

Once the table was completely dry, I sealed it with quick drying Minwax Semi-Gloss Polyurethane.  I applied two coats, for a smooth finish.

Restored Family table

Finally!  After many weeks and many more pieces of sandpaper, the family table was complete and ready for its permanent place of honor in our family home.

Before and After Drop Leaf Table:

Before and After Refinished Drop Leaf Table

Watching The Paint Dry: 50 Questions With “On The Upcycle”

It has been hectic to say the least behind the scenes.  I have several projects to share, but this week, I have been working on a family table re-finish.  It has been extremely humid in my area, and it is taking forever and a day for the oil based paint to dry.  Not to mention, I added a little too much stain, which made the table a nice dark color, but only added to the length of time it took for the piece to dry!  In the meantime, I have been catching up in between projects,  and an increasingly busy schedule on my WordPress reading.   

Last year, I was invited by Elise at  Cheeky Geeks  to take part in her blog’s annual Geek month.

In the spirit of Throw Back Thursday, and for those who missed the original post you may want to check it out (especially if you are an “1980’s geek” like I am.)  I upcycled an old kid’s chair using an old Strawberry Shortcake record.

Upcycled Strawberry Shortcake Kids Record Chair

Be sure and stop by Elise’s blog for this year’s geek month.  If you are anything like me and have a “Geeky” side you will enjoy following Elise on her Geek Month journey.

Cheeky Geeks : Geek Month Celebration

Elise also had a challenge for me if I was willing to accept:  Answer 50 questions about myself.   It would seem that she is interested to know a bit more about the women behind the Upcycle.  Seemed like a great time to accept this challenge, while I quite literally wait for the paint to dry….

  1. What are you wearing?-Yoga pants and a rock tee. I am all about comfort!
  2. Ever been in love? Yes, and I love, love!
  3. Ever had a terrible breakup? I went through a divorce, what do you think?
  4. How tall are you? 5 feet 4 inches
  5. How much do you weigh? It’s never polite to ask a lady her weight!
  6. Any tattoos? Two black animal paw prints on the top of my foot
  7. Any piercings? 3 piercings in one ear, two on the other
  8. OTP (one true pair, favorite fictional couple)? Kristoff and Anna from Frozen.  My daughter is into Disney at the moment!
  9. Favorite show? Game of Thrones
  10. Favorite bands? Too many to list, but Rock N Roll is my first love
  11. Something you miss?- My Grandfather Vincent
  12. Favorite song? Right now? “I Got A Name” Jim Croce
  13. How old are you? 39 and holding on for dear life!
  14. Zodiac sign? Aries
  15. Quality you look for in a partner? No question sense of humor!
  16. Favorite Quote? “Life is what happens while you are busy making other plans” John Lennon
  17. Favorite actor? Peter Dinklage I love, love him!
  18. Favorite color? Purple
  19. Loud music or soft? Loud
  20. Where do you go when you’re sad? Unfortunately, inside my head.
  21. How long does it take you to shower? 10 minutes I have to be quick I have a toddler!
  22. How long does it take you to get ready in the morning? 30 minutes
  23. Ever been in a physical fight? yes, but I was forced
  24. Turn on? Kindness
  25. Turn off? Elitism
  26. The reason I started blogging? I wanted to share my thriftiness with others, and I love to write!
  27. Fears? Not being able to see my daughter grow up
  28. Last thing that made you cry? My daughter
  29. Last time you said you loved someone? Today
  30. Meaning behind the name of your blog?It popped in my head one day. I kept thinking of the song “Little Suzi’s on the Up” by the band PhD.
  31. Last book you read? OMG embarrassing, All my reading is on the computer!
  32. The book you’re currently reading? Ummm refer to # 31
  33. Last show you watched? Big Bang Theory
  34. Last person you talked to?-My husband
  35. The relationship between you and the person you last texted? My sister
  36. Favorite food? Eggplant parm and Spaghetti
  37. Place you want to visit? Ireland
  38. Last place you were? At Work
  39. Do you have a crush? Do girl crushes count? Check out this awesome blog: AussaLorens.com
  40. Last time you kissed someone? Today
  41. Last time you were insulted? LOL probably every day, but most likely I don’t know about it!
  42. Favorite flavor of sweet? Sour Patch Kids
  43. What instruments do you play? I tried guitar, but could never catch on, I played the clarinet in elementary school
  44. Favorite piece of jewelry? My wedding ring
  45. Last song you sang? Heart “Magic Man”
  46. Favorite chat up line? I don’t have one! It’s whatever pops into my head at any given time.
  47. Have you ever used it? N/A
  48. Last time you hung out with anyone? Last weekend.
  49. Who should answer these questions next? I wanna know more about Daniela Joe If she’s willing to give it a go!
  50. LOL 50 Questions?  I think I am missing something here…

An Accident Waiting To Happen: Upcycled Pringles Can Lamp

              Decorative Decoupage Pringles Lamp

This project idea started out as a 99 cent purchase at Goodwill.  An adorable miniature ceramic lamp with a round base that would require a minor  fabric decoupage makeover to make the perfect table top night-light for our bedroom.   However; thanks to the toddler apprentice’s rather curious hands it was simply not to be.  She climbed up on the ottoman, reached out her arms, and knocked it off the shelf. It broke the ceramic base into a million pieces. More importantly, she was not hurt in the accident, just a bit startled and remorseful   Although I was initially upset,  my cross demeanor faded quickly as I thought of ways to reuse the unbroken pieces of the lamp and shade.  I searched the craft room for some recycled items I was saving for a crafting rainy day.   I searched and looked for what I thought would make great lamp bases. It then occurred to me…I had a fever for a Pringles can lamp!

Minimalist Pringles Lamp Upcycle

An Upcycled Pringles Can Lamp For The Minimalist

The Pringles can was a great choice because it didn’t require a glass cutter to feed the wire through like a glass bottle or jar would.  I used a box cutter knife to VERY carefully cut a cross through the plastic lid.  I popped the light in and it fit nicely.   Before I placed the lid back on the can I filled the bottom with a few decorative marbles I had lying around. This added some weight and stability to the lamp.  I cut a hole at the base of the can using the UPC on the can as a guide, so I could properly feed the wire through the bottom.  For those of you who are practical, and love Pringles, you may want to stop right here.  I call this the minimalist version.

How to Create An Upcycled Pringles Can Lamp That’s A Little More Decorative

Decorative Upcycled Pringles Lamp

For those who want to create a more decorative piece, You can use a little fabric decoupage to decorate the Pringles can and lamp shade.  I used some scrap Peacock inspired fabric I had lying around the craft room.  I used Mod Podge to apply the measured fabric to the can and cut out designs to place on either side of the lamp shade to add some symmetry.  Once dry, I applied more Mod Podge over the fabric to properly seal the lamp base.  I placed it in front of our fan to dry.   Now it was ready to be plugged in and illuminated.  The possibilities here are endless.  If you don’t have fabric handy you can also use scrapbook paper.  You can create seasonal cans and interchange them with the light and lid to transform the look of the lamp.

Upcycled Pringles Can Lamp

A lesson in life and living on the Upcycle, the greatest mistakes can have the greatest rewards!  That is how I feel about this project. If it wasn’t for my overly curious toddler, I would have never known the fun of this Pringles can craft.  Thank heaven for overly curious little girls!

Have you had any crafting disasters that turned into triumphs?  What was your favorite craft mishap?

Materials Used:

Broken miniature lamp

Pringles can with lid

Box Cutter Knife

Handful of marbles

Fabric or Scrapbook Paper Of Choice

Foam brush or Paint Brush

Scissors

Mod Podge

The Happy Card Project: Put A Little Love In Your Art

We all know how wonderful it feels when you have a chance to brighten someone’s day.  Sometimes, it is a simple gesture, lending a hand to someone in need, or a few words of encouragement when someone around us is feeling down.  Although many of us would like to contribute to those in need financially, there are times when this is not possible.  That doesn’t mean it is impossible to give.  One of the most precious gifts you can give is time.  This past July 4th weekend, the toddler apprentice and I put aside some time between bbq’s, fireworks and swimming, to sit down and make cards together.  I recently reconnected with an old friend on Facebook who brought a positive movement to my attention.   It was started by her daughter Corinne Mattia.  Corrinne is a psychology student and describes herself as an animal lover, and eternal optimist.  The idea is called  The Happy Card Project.

10426680_567028680074831_4640953951286492227_n

The Happy Card Project’s mission and message is simple:  We brighten our own lives through brightening the lives of others.  They aren’t looking for money or donated goods.  Their motto? Some pursue happiness while others create it.  The Happy Card Project want your homemade, or store-bought cards you may have around the house.  These cards can then be personalized with encouraging words, stories, or anything  intended to brighten someone’s day.   Donated cards are then delivered by the Happy Card Project Team to local hospitals, pediatric facilities, homeless shelters and senior living homes.  Their goal is to simply brighten the spirits of others.

The first 200 cards collected will be donated to the Homeless Bus a charity based in New York City.  The  Homeless Bus, Inc. has made over a 1000 trips to Manhattan providing immediate needs to the homeless from a passenger bus every Saturday night since 1992.  To learn more about this wonderful example of what just a few people can do to make the world a better place, and for ways you can help please visit: The Homelessbus.org

1001506_458858027542918_1251277114_n

Continuing to follow along with the “On The Upcycle” tradition, I decided to recycle some old greeting cards.   The little toddler apprentice and I sifted through an enormous amount of craft scraps, old cards, stickers and scrap-book paper.  She enjoyed going through these items, and chose a few cards that she liked.

DSC_0480

This was my first attempt at making handmade upcycled cards.  I have seen some beautiful examples of card making on the web and in the WordPress community.  One such artist resides at  The Cobweb Emporium.    These cards are well crafted, elegant and detailed.  Please be sure and stop by and pay Cob Webs a visit.  Trust me, my card crafting skills pale in comparison!

The apprentice and I worked together using the hand over hand technique. She helped me cut the images we planned to use from the old greeting cards with her safety scissors.  I had some unused card stock and it fit the envelopes I had perfectly.

DSC_0489

We then decorated each card and added the words Hope,  Cheer and Love. She especially enjoyed gluing the various pieces on the card stock and applying stickers.   Once the glue on the cards was dry we wrote notes of encouragement inside.  The more “adult” cards we signed from the family, and for the others we told a brief story from our three year-old’s point of view.  On the back of the cards we wrote “Made with love and little hands helped.”  We created a total of six cards using materials we already had available at home.  The cost was minimal and consisted of the postage needed to mail the cards.   I can’t think of a better way to spend an afternoon with your kids then doing crafts, and at the same time brighten someone’s else’s day!

DSC_0528

If you would like to spread some good cheer and encouragement to those in need, The Happy Card Project will continue to collect cards going forward for various charity organizations.

You can follow The Happy Card Project on Facebook Here.

If you would like to get involved and have cards you would like to donate to the cause, please send them to:

The Happy Card Project

PO Box 3802

Cherry Hill, NJ 08034

We mailed our cards today!

Car Part Art: Turning Scrap Into Sculpture

I am always intrigued when I  find art in unlikely places.   This past weekend I made an appointment to have front brakes installed on my car.  I planned my day accordingly and woke up bright and early. Meineke is currently having a sale on brakes, and although I had never gone there before for repairs, the allure of saving $50.00 compared to a previous quote I had received was too good to pass up.

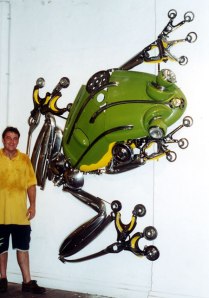
When I arrived at the shop I was greeted unexpectedly by a piece of upcycled art.  Of course I had to snap a picture of this pleasant little door greeter and his loyal pup.  This little man and his dog were made from recycled car parts, mufflers, brake parts and the like.  Of course I fell in love with them instantly.

20140628_095404

It seems that one or more of the mechanics has a creative side! Apparently, this is not a new concept as upcycling car parts into works of art is more common than one might think.  Roadside America an online guide to offbeat tourist attractions has a great article featuring some of these so-called “muffler men” who populate the auto shops and roadsides of America.  You may have already seen some of these sculptures on your travels already!

There are also some truly amazing upcycle artists in the world and they take this art form to a whole new level!  One such artist is Australia’s James Corbett.   He has been creating sculptures from spare auto parts and junk since 1999.  Below is an example of his work.  Look at all those spark plugs!

12353_997

Below is James, pictured with one of his many creations.  The eyes are made of headlights…genius!

other5b

To see more of his work visit the Crimson Reason Blog.  They feature several of Jame’s intricate creations.

Another talented scrap artist is Frenchman  Edouard Martinet.  As a young student he became somewhat “obsessed” with insects.  Later, he chose to incorporate his love of insects and other animals in sculpture.  The detail and artistry here is off the charts!

wasp

pigeon

Check out this interview with Edouard Martinet below.

“Art is not what you see, but what you make others see.”
― Edgar Degas


Crib Rail Repurpose: Children’s Book Wall Rack

Recently, we began preparation to move my daughter from her crib to a toddler bed.  When we chose a crib for our registry, we made sure it was a convertible style crib that would grow with her.  We were looking for what most consumers want, quality at a reasonable price.  We chose   the Graco convertible crib in espresso finish.

Graco Crib

It appeared sturdy on the showroom floor and was priced right.  Initially, I was happy with the crib.  Then 18 months later, I notice a few of the metal springs had broken off the frame they were welded on.  One by one the springs broke off.  The crib needed to be reinforced with bungee cords.  We knew this bed would not last like we had previously anticipated. We were forced to come up with an alternative and purchased a new mattress and a toddler bed.  The original mattress was torn by sharp edges left where the springs used to reside.  This was a big disappointment.  We were expecting to use this convertible through her toddler years, but it was not to be.  The crib finally gave way and it was obvious it was no longer safe.  Luckily, the new bed was purchased and was on standby and we were able to quickly make the switch.

I am happy to report that the toddler apprentice loves her new “big girl” bed and the toddler bed experiment has gone surprisingly well!  She lays down and falls right to sleep! We were surprised how quickly she has adjusted.

Toddler Bed

When I dismantled the crib, most of it was broken and not salvageable.  The rail was still in decent shape.  I had seen some ideas online upcycling old cribs ranging from Repurposed crib benches  to crib rail Garden Trellis’s.  I wanted to keep this project simple.  I was preoccupied by a much larger, more daunting, task cleaning my daughter’s messy playroom!  I filled one trash bag with broken items and another with items to donate to those in need. This emptied one toy box for additional storage which reduced clutter.

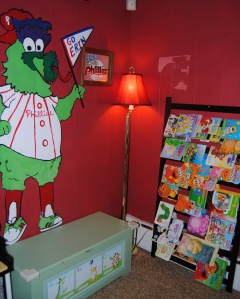
My daughter has a large book collection she acquired before she was even born.  At my baby shower, the guests brought a signed book instead of a card. I loved this idea, but I did not have an ideal way to store all the books we received.  They basically sat in a wooden box on the playroom floor.

I thought the crib rail would be a great alternative way to display her books, and keep them off the floor.  Since I was struggling to get her room organized, and did not have the time,  I decided to leave the crib rail in its original finish.  It also matched the playroom well.

crib rail

If you would like to change the original color, a can of white latex primer works well.  Once dry, paint as desired.    I also suggest using longer screws to anchor each side of the crib rail to the wall. When doing this, lean the crib against the wall on a slight angle so the books can hang over the rails.  I did not have the proper screws handy, so I had to improvise and use one smaller screw through the first rail.  This worked, but the trade-off  is that the first rail cannot be used for display.

Repurposed Crib Rail Book Rack

I love it!   Being the sentimental fool that I am, it also is nice to keep a piece of the crib for nostalgia!  I also repurposed her changing table into a kitchen shelf.  If you missed it,   You can view that project here.


DSC_0440


Repurposed Crib into a children's book rack