A Blizzard of Ideas: Basket Makeover

Getting snowed in has its privileges.  The family and I had a great weekend, despite being completely snowed in, during the East Coast blizzard of 2016. When mother nature gives you lemons, what else can you do but make some lemonade?  It was a perfect time for cooking, baking, and crafting, and the toddler apprentice and I did just that!

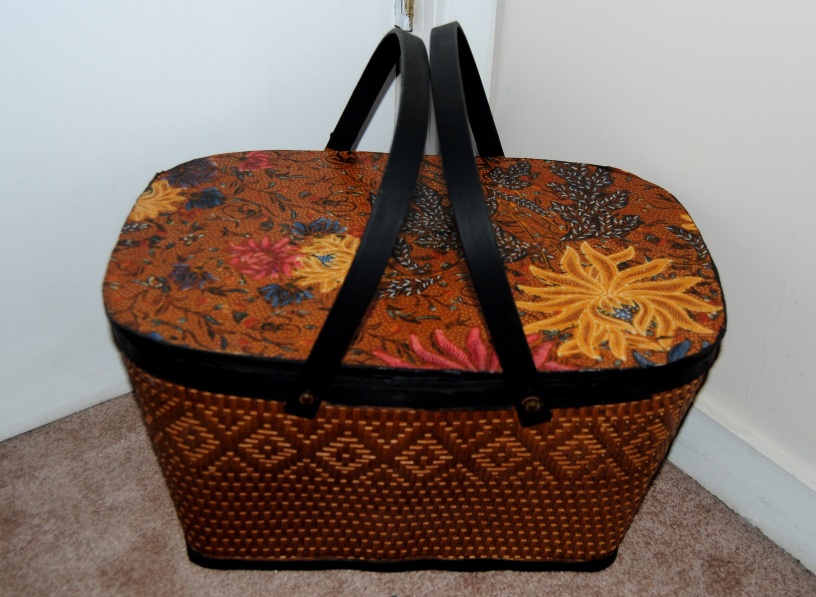
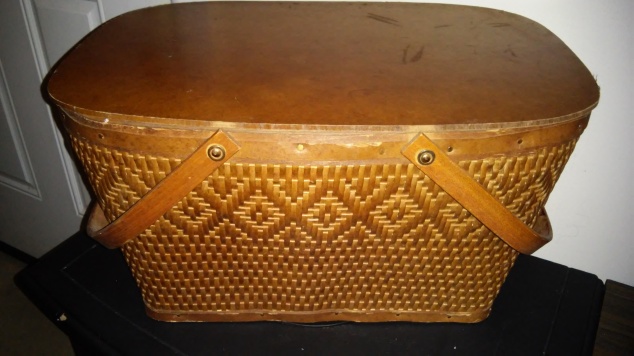
I picked up a lovely wooden basket at Goodwill about two weeks ago.  When I made my purchase, I was unsure on what I was going to do with it.  Some items I pick up are best left alone, while others benefit from a bit of “sprucing up.”

I decided to find a middle ground.  The lid needed quite a bit of TLC, but the inter woven wood on the basket looked great, so I did not want to alter this part in anyway, only try and compliment it.
20160114_192050

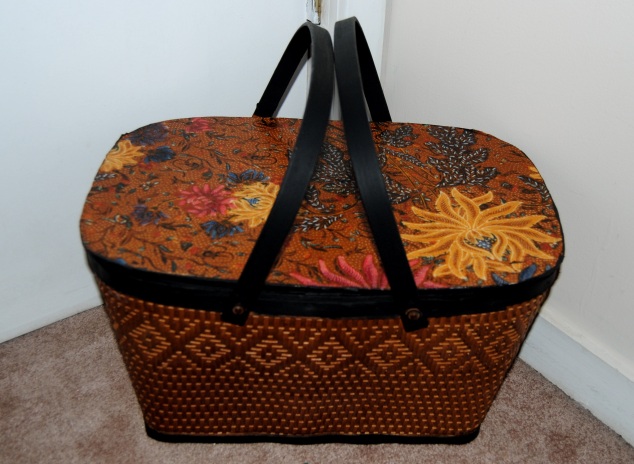
I decided to decoupage the lid, and accent the handles with black paint.  I struggled a bit with choosing a fabric that I thought would go well with the caramel colored wood.  I finally decided on a swatch of fabric that I purchased some time ago at a thrift shop.  It had earthy tones that I felt would mesh well with the original design elements on the basket.

I turned the basket upside down and used a black, fine tipped market to trace the lid on to the back of the fabric.  I then cut fabric tracing out with a pair of scissors. I painted the lid with white paint.  Once dry,  I generously applied the Mod Podge to the lid surface with a paint brush.  I applied the fabric, and smoothed it out with both hands.  This helps minimize wrinkles and air bubbles.  Once dry, I applied three more layers of Mod Podge on the top of the piece, and allowed it to dry between coats.

Once the lid was dry, I lightly sanded the areas I planned on painting.

I took a narrow bristled paint brush and painted the handles, and some of the detailing with black acrylic paint.  I applied three coats of paint total.  Once the paint was dry, I applied a layer of Mod Podge to the painted areas to seal it.
DSC_0333

In the winter, this basket will be a perfect place to store hats, scarves and gloves, and in summer it will be the perfect picinic basket or an accent piece with storage.

Materials:

Wooden Basket

White and Black Acrylic Paint

Mod Podge

Fabric of choice

Scissors/Sharpie marker/Paint Brushes (various)


Hot Summer Nights: Paradise By The Back Porch Light

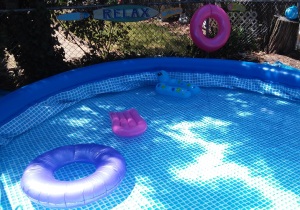
This past memorial day weekend, my husband and I were determined to get the yard ready for summer.  My daughter received an Easy Set Intex Pool from her Uncle and Aunt for Christmas and we could not wait to get the pool setup and operational.  My daughter’s 4th birthday this year will have a pool party theme, and the date for the party is quickly approaching.  My husband and I leveled out the ground in the area the pool would be placed.  We laid down a tarp and spread the pool out.  These inflatable Easy Set’s are great starter pools, and in our case the simpler the better since this is our first attempt at putting up a pool.

20150523_141004

We inflated the ring with a pump, and from the inside smoothed out the lining.  It took all day to fill.  The next day, we hooked up the filter, placed chlorine tabs in the floater, and assembled the ladder.  The water was very cold, so I hopped in to the pool for a test run.  For the most part everything went great and the set up was easy.  I was disappointed to find some parts in the lining that were not as smooth as we had wanted.  I can’t stress enough the importance of making sure the ground is clear of any debris and level.  Even after all our careful work, what seemed smooth at the surface was not always the case.  Once the weight of the water pressed the ground flat, some rocks and roots underground seemed to appear out of nowhere through the lining.  That being said the only way to remedy this would be to drain the pool and remove the debris from the area to smooth it out.  Until it is necessary to do so, we are going to take our chances.  I would feel guilty wasting all that water!  Luckily the pool came with plenty of patches if needed.

20150524_131400[1]

We purchased a few fun summer signs from Dollar Tree and lined the fence with them for added decoration.

I  also accomplished a few smaller projects.  I had a decorative metal star that I picked up at Christmas Tree Shop.  It was on clearance and I was never happy with the tan color.  I surmised that this was most likely the reason why it was on clearance.

20141108_172420[1]

Since it was Memorial day and the house was decorated in Americana….

20150509_132943-1[1]

I had some extra Rust-Oleum red spray paint, and I sprayed on a quick coat.  I like the star better now that it is red and I purchased it for half the price!

20141108_201050[1]

The other area I wanted to address was the corner of the yard by the pool. There is a rather large tree stump in this area.  Some time ago, I blogged about ideas here.

I struggled with what to do with this stump for some time.  This weekend that changed.  I decided to make it a fun project for my daughter and I to do together.  I had an old broken wooden TV tray.  I removed the table top from the legs and screwed it on to the tree stump surface.  My neighbor had given me some decorative, shells, glass pebbles and decorative rock. I thought it would be fun for us to create a mosaic table top for it.  I used some old tile grout and glue in one and spread it onto the table surface evenly.  The toddler apprentice and I then applied the rocks and glass pebbles.  We wiped off any excess grout and allowed it to dry overnight.  I used the unused legs of the TV tray as a garden trellis, another great re-purpose!  My goal was to use as much of the table as possible. Mission accomplished!

20150525_172623[1]

I placed the shells around for decoration.   Now Mommy has a place to put “her” sippy cup and relax by the pool, while my daughter has fun exploring and playing with the various sea shells.

20150525_173659[1]

20150525_172714[1]

Since this spring has been a bit sparse in the rain department, our grass took a hit and much of it died.  Once all the yard work was done, we raked the yard and spread out grass seed in the hopes of bringing our lawn back to life!  Once the grass grows under our feet, our little backyard oasis will be complete!

What do you have planned for your backyard oasis?  Do you have any summer projects you are eager to complete?  How do you like to kick off summer?

Ghosts of Furniture Past: Refinished Drop Leaf Table

My husband has very few mementos from his childhood, so for this project the pressure was on.   This round, drop leaf table was used for just about every purpose in my husband’s family home.  It had seen better days.  It survived over 30 years of wear,  dirty hands, spilled drinks and more.  If only a little table could talk!  I could only imagine the stories it would tell!

I wanted to restore this table to its original state before all its scratches, and dings, but it would prove to be my most time-consuming project to date, and also the most rewarding.

Cleaning over 30 years of dirt and grime is not easy, but a necessary step when preparing a table for restoration.  I cleaned it throughly with a damp cloth and used a scrubber sponge for tough to clean areas.  Once clean and dry, it was time to sand it and I did so by hand with sandpaper!  This was very messy and time-consuming.  I suggest wearing a mask, and doing this in an area you don’t mind getting dirty. Completing this part of the project outside would be preferable.  All the more reason to invest in an electric sander having one would have accelerated this process.  In between other projects I worked tirelessly to get the table completely sanded and ready for staining.

Round Drop Leaf Table

I chose Minwax  Jacobean 2750 for the stain.  I wanted a dark rich color, which would contrast nicely with the sandstone colored walls.  While working with oil based paint be sure to have a proper solvent nearby for clean-up.  I use Safer Paint Thinner which is more environmentally friendly than traditional cleaners.  I applied the Minwax stain with a brush, following along with the wood grain.  Unfortunately, for me,  I applied too much stain and due to the humid summer weather, the table took over a week to dry!  At this point, I was in no rush, and it rested quietly in the craft room locked away and out of reach from curious toddler hands.

Once the table was completely dry, I sealed it with quick drying Minwax Semi-Gloss Polyurethane.  I applied two coats, for a smooth finish.

Restored Family table

Finally!  After many weeks and many more pieces of sandpaper, the family table was complete and ready for its permanent place of honor in our family home.

Before and After Drop Leaf Table:

Before and After Refinished Drop Leaf Table

Made in the Shade-Lamp Shade Fabric Restyle

Many years ago, my mom gifted me a stylish lamp that she no longer had a use for.  I am a big  fan of decorative lighting, so I was happy to have it.  The lamp attached directly to the wall, so it was also a wonderful space saver.  The decor of the lamp was fairly neutral, so it fit most of my living room design changes through the years.  The lamp shade was a cream color with hanging beads along the shade rim.

wall lamp

For a long time, I had wanted to try a lamp shade decoupage, and I felt this would be the perfect lamp for my first attempt.  I had some smaller pieces of black and white damask fabric left over from several previous projects.  These projects were:  The Broken Chair ChallengeYou Had Me At Half Table, and Vintage Sewing Box (Just to name a few)

Upcycled chair with half moon table

Keep in mind, if you plan on restyling a lamp shade it is important that the shade is light in color, and there are no dark designs on it.   Otherwise, when the shade is illuminated the previous pattern will show through the new fabric.

Before getting started, I removed the shade from the lamp and gently cleaned it with a damp cloth.  It is important to remove any dust and dirt from the shade before applying the Mod Podge.  Once this was complete and the shade was dry, I generously applied Mod Podge to the outside of the shade with a broad paint brush.


DSC_0721

I then placed a piece of the damask fabric over the lamp shade smoothing it out carefully with my hands to avoid wrinkles.  Since fabric is being applied to cloth, it is important to apply enough pressure so that the fabric adheres well to the shade.

DSC_0720

I placed the shade in front of the fan so that it would dry quickly.  Once this step was complete, I applied a generous amount of Mod Podge over top of the fabric.  I allowed it to dry thoroughly between coats, adding three coats of Mod Podge in total.

DSC_0726

Once the shade was completely dry, I carefully trimmed away the excess fabric with a pair of scissors, and added additional Mod Podge along the edges of the fabric.

Restyled Fabric Decoupage Lamp Shade

The lamp looks amazing, and now matches my current living room decor perfectly!  This entire project was a quick one too! Overall completion took about one hour!

Decorate a boring lampshade with fabric

Materials:

Light Colored Lamp Shade

Mod Podge

Paint Brush

Fabric Of Choice

Scissors

Vintage Wooden Wall Shelf Redesigned

Most of my recent trips to the thrift stores have been utterly disappointing.  It would seem that spring cleaning is the last thing on anyone’s mind.  It’s bitterly cold outside, yard sale season is long over, and the streets are blanketed in snow from our most recent weather event Hercules (Since when did we start naming snow storms??) Everyone seems to be walking around with a post holiday hangover causing many (myself included) to limp into the New Year. Luckily, I still have a few projects up my extremely bundled and layered sleeve to share with you.

Although most of my thrift store trips have been uneventful, Every once in a while I still manage to find something unique.  I came across a really lovely and unique vintage wall shelf with a drawer.  I especially loved the curved sides and the drawer for storage.  It was in rough shape, but that didn’t deter me from placing it inside my cart.

Vintage Wooden Wall Shelf

When I originally purchased the shelf I had every intention of keeping it.  A blunder made during another project intended as a Christmas gift changed that and I had shift the original intention of this piece.

I lightly sanded the item with sand paper, and used a white latex primer to cover the piece.  I left the inside of the drawer alone as it was still in very good condition.  I decided to paint the piece black. This shelf has the potential to be hung in any room, so I wanted the color to go with any decor, and black is neutral. I painted all of the piece except for the drawer and shelf.  I planned to decoupage these areas later and didn’t want the dark color to bleed through the fabric. I used two coats of black acrylic paint and once it was completely dry added a layer of Mod Podge over top to seal it. I had some left over black and white damask fabric from a previous project.  I applied Mod Podge to the front of the door and shelf with a foam craft brush, I cut the fabric to fit as best I could as I would trim away any excess fabric later.  I made sure to line up the fabric design so that the piece would appear symmetrical.  I applied Mod Podge over top of the fabric allowing my nail to work the fabric into any grooves and once it was dry, carefully trimmed any excess fabric with a box cutter knife.

Black and White Damask Decorative Wall Shelf

Decoupage Black and White Damask Wall Shelf with drawer

I love damask designs and this was a tough piece to part with. My favorite project is draped in damask and this would match it beautifully. In the end I was happy to gift it to my sister to go with the chair I made for her in her bedroom, or perhaps it will go in her kitchen?  We shall see, as I offered my services free of charge to help her hang it!

I am “Thankful” For My Readers: Decoupage Wooden Tray Giveaway: WINNER!

I hope everyone had a very Happy Thanksgiving day with their family and friends.

Image

Thanksgiving “On The Upcycle” Style

Now that the hubby, daughter and I are recovered from eating all the great food we were very blessed to have on our table yesterday, I wanted to take the time once again to thank you all for your continued readership.  This year to celebrate our readers, “On The Upcycle” is  giving away a Victorian art inspired wooden decoupage tray to one lucky reader who commented and liked “On The Upcycle on facebook” That winner is:

Image

Patricia from DanielaJoe’s blog Congratulations!  Please e-mail me your full name and address to ontheupcycle@gmail.com and I will ship your prize out to you!

Thanks to all of those who entered the giveaway:

Upshabby

Being Zhenya

Pillows A-La Mode

Roof Top Creations

Please be sure and stop by these amazing blogs.  You will be very “thankful” that you did!

From “Odd To Mod” Upcycled Thrift Store Mystery Wall Hanging

Recently, I have made quite a few thrift store walk throughs, without finding much of anything to stimulate my creativity.  My pockets are lighter, and even the amount of freebie finds have dwindled. Sure, my attic is filled with items all screaming “Repurpose me, me, meee!”, but our attic is a bit of an organizational nightmare I can’t seem to wake up from, not to mention it is unheated and freezing cold up there! When I go up there, I have to bundle up like I am going for a mile walk across the tundra!  I also feel the secret is out now and when I pull up to the Goodwill store, I am lucky if I can find a parking space!

Despite this, I always take a look for those unique items you can only find in a second-hand store and yard sales. Part of the fun is the thrill of the hunt, and coming up empty-handed is a part of it.   I am always interested in quirky little items even if I am not sure what its original use was.  My husband and the toddler apprentice were out with me one Saturday, and we couldn’t find much, but did spot this unique wooden wall hanging with a bit of storage.  It definitely screamed late 70’s early 80’s to me, and I thought it would look cute in our kitchen.

thrift store wooden wall storage thing

I wanted to re-style it to be more vibrant and colorful.  I thoroughly cleaned the piece with a damp cloth.  I had some leftover red spray paint from a previous project and decided to use it to brighten up the piece.  I took it outside and sprayed it red.

Spray painted piece

This particular spray paint required about 9-24 hours to completely dry.  Once it was dry enough for me to pick up, I brought it inside to my craft room and allowed it to dry in front of the fan.  Later in the evening the piece seemed dry enough, so I placed the front of the piece down upon the back of the fabric to trace it with a fine tipped black marker.  Probably better if I had traced the object on to the fabric before it was painted, but I was lucky and none of the marker made its way on the painted area.  I then applied Mod Podge with a foam craft brush on the front.

Apply Mod Podge

I then applied the cut fabric and smoothed it carefully out with my hands.  I picked a fun Mod fabric with a lot of bright colors.

Apply Fabric

I applied Mod Podge over the fabric and allowed it to dry overnight.  The next morning it was ready to hang.  I love the bright colors which go along perfectly in our yellow kitchen. Now, I just have to decide what I will use it for.  I am leaning toward a salt and pepper holder.

Upcycled Kitchen Wall Hanging and Storage

Before and After: 

From Odd To Mod-Upcycled Thrift Store Wooden Wall Hanging Restyled with Mod Podge, Paint, and Fabric

You had me at “Half Table” Yard Sale Table Rescue

I was excited when a friend of mine from work approached me about a table she had spotted at a yard sale.  She had arrived toward the end of the sale and the family was packing things up that hadn’t sold.  She informed my friend that she was taking most of what didn’t sell and was placing it out on the curb for the trash collectors.  She was nice and asked my co-worker if she wanted to take anything at no charge since it would end up in the trash anyway.  This is the part of the story I am truly thankful for!  She spotted a little half-moon table and thought of me and how much I love to upcycle.  She thought it would be a perfect candidate and that I could “do something” with it.  I was so excited when she brought the table to me. She had no idea the love I have for these little tables!  I had come across a half table previously at a thrift store and snatched it up! That post was called Crazy for Half Tables! so you can see she had me at half table!  I snatched this table up happily and decided to use the table in our living room.  I decided to match the table design to our damask black and white chair which is one of my favorite upcycled chairs to date.

Yard Sale Half Table Before

The table finish was rough and ready for priming.  I cleaned the table and placed it upside down on to the fabric I was going to use.  I traced the table surface with a black felt tipped marker.

DSC_0942

I carefully cut out the tracing and placed the fabric aside.  I primed the table with a white latex primer and allowed the table to dry,  If you are working with a dark piece of furniture and lighter fabric  it is especially important to prime it because the darker color will bleed through the fabric from underneath and may appear darker than desired.  I learned this myself in the past the hard way!

Apply fabric and Mod Podge

I applied Mod Podge to the surface of the table, applying the fabric slowly to avoid and wrinkles or air bubbles.  Once the fabric was smoothed out, I applied Mod Podge over it with a foam craft brush.  Allowing it to dry.

Painted legs

While the Mod Podge was drying,  I used acrylic paint going with the black and white alternating theme.  Once the piece was completely dry I used a coat of polyurethane sealer to “seal the deal”  Now the piece was allowed to dry overnight.

Restyled Half Moon Table using Mod Podge and Fabric

Thanks again to my awesome like-minded friend who saw the possibilities in this piece! Someone’s trash truly is to another a treasure!  Now my damask chair has a friend and my living room is all the better for it!

Upcycled chair with half moon table

Fredrika Fabric Corner Shelf Makeover: A Final Farewell

I was a bit sad when I realized I was running out of one of my favorite thrift store finds,  Fredrika Fabric from Ikea. It is amazing when I think of all the great projects restyled with this fabric, most of which currently reside in our daughter’s playroom.  Ahh the upcycling memories.  First it was a little wooden step stool, then many more followed, lost basement table, 1960’s Coffee Table, Repurposed Umbrella Holder/Toybox and even a Garden Pig Makeover!

We needed a shelf in the playroom out of our daughter’s reach.  We had a great baseball lamp my sister gave to us as a gift, and we needed a place to display it on. The playroom still has a sporty theme coupled with a girly mod look.  I found this great corner shelf at Goodwill for $2.99 and I snatched it up!

DSC_0649

I had just enough fabric to cover the surface with a few scrap pieces to spare. I traced the shelf on the fabric and cut the tracing with a pair of scissors.  I applied Mod Podge to the shelf surface and carefully placed the fabric on top.  Once dry, I applied Mod Podge over it to seal it.

DSC_0650

The most difficult part of this project was hanging the shelf!  It had 3 slots which required three screws hung on the wall precisely.

DSC_0653

I love how this turned out and so simple to make!  You can “jazz” up ordinary furniture and decor and make it a unique expression of your own personal home style!  This project was certainly bitter-sweet.  I will miss you.  Farewell Fredrika!

Pretty As A Peacock: Side Table Redesign

I picked up this side table at Goodwill.  I loved the design qualities it had, but this piece was in poor shape.  Most of the finish was worn off, and it had issues with sturdiness.  Due to these shortcomings, this table was priced right at only $3.99.

DSC_0655


It sat for a while collecting dust.  I wanted to do something really special with it, but my vision was stifled.  I used it to work on projects, but this table certainly deserved a more dignified life, A trip to Jo Ann Fabrics changed everything.  They have a new super store less than a mile from home and it stocks row upon row of fabric.  I came across a beautiful peacock inspired fabric.  It made me think of the side table and I decided to buy about a yard of it.  I liked it so much I wanted to have extra to use in a future project or two. It felt nice to treat myself a little, plus I had a 40% off coupon!

I took the table outside cleaned it, and tightened it up as best I could. I used a can of white spray primer to prepare the table for painting.

DSC_0659

Once dry I brought it  back inside the house to the craft room.  I flipped the table over tracing the table on the back of the fabric with a black fine tipped marker twice, once for the top surface and once for the middle shelf.  I cut the fabric with scissors.  I applied the Mod Podge on both shelves and carefully place the fabric down, smoothing it out with my hands,  I applied Mod Podge over top and allowed it to dry,  Any excess fabric, I trimmed with a box cutter knife.  I also applied extra Mod Podge to the corners where the fabric meets the table .

DSC_0684

I used two coats of black and white acrylic paint to paint the remaining areas of the table. Once the paint was dry, I used a Polyurethane clear gloss to seal the table and give it a shiny appearance.

DSC_0707


Before and After:

peacock table before and after


Want to strut your stuff and make a peacock inspired table?  Here is what you will need:

Table

Peacock inspired fabric (From Jo ann Fabric)

Mod Podge

Acrylic Paint

Spray on Primer

Polyurethane clear sealer

Box Cutter, Scissors, Fine tipped marker

Paint Brushes