What’s Old Is New Again: Decoupage TV Trays Are Back!!!

The wooden TV tray.  A functional piece of furniture.  Although I think we can all agree these tables are useful, but they lack the design qualities seen in other pieces of furniture.

TV Tray before

Way back in 2013, I came up with an idea to turn these boring tables into something fun.  My first tutorial Decoupage Team Sports Trays explored the option of decoupaging these trays with Mod Podge.  It was a huge success and since then, It remains one of my most requested items.

dsc_0097

They also make wonderful gifts for the sports fan in your life! Recently I made two new tables. Both were gifts, one for a friend’s birthday, and the other was presented as a Christmas present.   Nothing new here, but thought I would share the new additions so you know what I have been up too!

20141217_212059

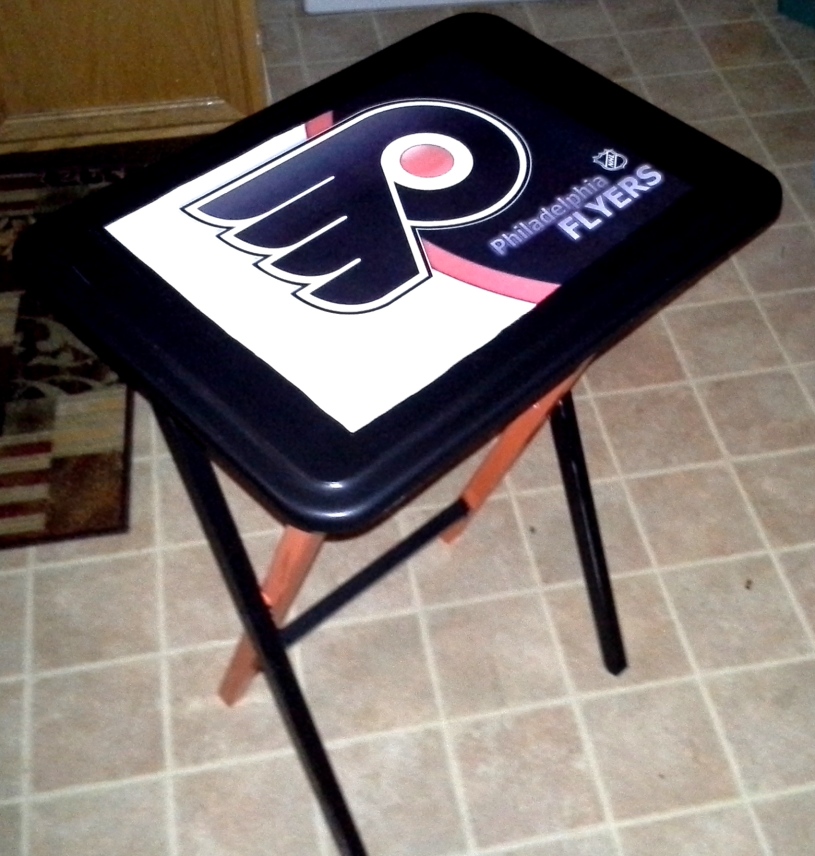
Philadelphia Flyers TV Tray

20150715_223709

New York Giants TV Tray

Want to See more?  Check out these past blog entries on Decoupage TV Trays!

Have a special someone on your gift list that is a sports fan?  Then this is the table for you…

Sports Trays…Revisited!

Yankees Decoupage Sports TV Tray

Washington Redskins Decoupage TV Tray

Want to show off your school pride?  TV trays are great for doing homework too!

Smells Like Team Spirit! 

DSC_0841

20140601_191920 (1)

Not a sports fan? No school spirit?  No Problem!  There are many other themes you can use to create a personalized tray table.  LP liner notes make great decoupage and are unique!

Rescued Vinyl TV Tray Decoupage

DSC_1270

Crazy for Corduroy: Girls Flower Power Decoupage Side Table

It has been a very hectic week in the “On The Upcycle” household.  I have been working late into the night to prepare for my first flea market this Saturday.  I am happy to report, that my crafting area is looking more like a usable work space, and less like a storage closet!  My hope is clearing out some older items will make way for new projects.

I have also been working on a few projects specifically to use in the sale.  I picked up this nice, wooden side table at Goodwill for a couple of dollars.

20150419_200300

The original idea, was to use a black and white scarf I had for the decoupage and then paint the table with neutral colors.  It is amazing how quickly a plan can change!  I used a white, spray on primer to prepare the table.  I applied the scarf and instantly was not all that impressed with the result.  Scarves can be tricky because the fabric is very thin, and once it is glued to the table top, it has a tendency to show any imperfections on the wood underneath.  That is exactly what happened in this case.  Once the Mod Podge was dry, I removed the fabric and decided to start over.  Then it hit me:  I had this great flower power corduroy fabric from an old dress that looked very cute on my daughter but no longer fit her.  I saved it in the hopes that I would find a use for it someday.  That time was now!

20150421_175548

I cut the fabric and measured out a large enough piece to cover the top of the table.  I applied a generous amount of Mod Podge to the table surface.  The general rule is the thicker the material the more Mod Podge you will need to use to achieve the desired effect.

20150421_180715

Once the glue was dry, I hand painted the table with pink, purple and white acrylic paint.  This was turning out to be a much different table then I had originally anticipated.  After a few more coats of paint,  I added generous amounts of Mod Podge to the table top to seal the fabric.  I repeated this process three times allowing it to dry between coats. I also applied Mod Podge to the painted surfaces, to seal the entire piece.

20150421_195011

Once dry, I trimmed off the excess fabric on the edges and applied more Mod Podge to seal those edges.

20150422_074658

This is a side table with a lot of flower power and 1960’s appeal.  I am hoping this table makes some little girl very happy!  It will be just one of the items for sale this weekend.  I also loved working with corduroy!  Because of the thickness of the fabric, I was unsure as to how it would turn out and was more than pleased with the end result!

Before:

2015-04-28 (1)

After:

Materials Used:

Old kids Garment

Mod Podge

Spray or brush on white primer

Acrylic Paint

Paint Brushes (Various sizes)

Scissors and Box Cutter knife (to trim edges)

My Neighbor Let it Go: Disney’s Frozen Wooden Toy Chest and Bench

My neighbor approached me one Saturday morning last spring. He was cleaning out his garage and asked if I wanted to look at a few items before he put them out on the curb. One of these items was an unfinished toy chest/bench that had been sitting in the back of his garage taking up precious space.  It had been purchased with good intentions, but he had never gotten around to finishing it. I immediately jumped at the chance to own such a wonderful piece of furniture.  It was unfinished wood, so this meant no scraping, stripping or priming.  My kind of project!

20150329_132009

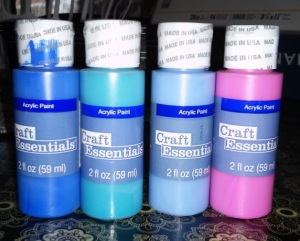
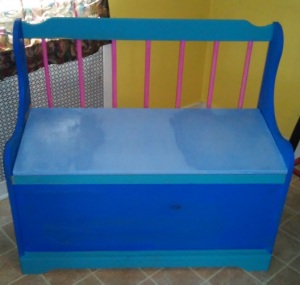
I am always amazed at the generosity of people.  When it comes to neighbors, I am truly blessed.  I thanked him profusely and happily took in the unfinished item. It immediately filled a dire need. My daughter had accumulated many toys, and this was a great way to store and organize them.  So, there it sat unfinished and full of toys for almost a year in our daughters playroom.  I had no idea how I would finish it. I entertained various ideas that went nowhere.  Sports themes, traditional refinishing, Disney Princesses, just to name a few.  Then it hit me one day after my daughter had viewed the movie Frozen for the 50th time!  Why didn’t I think about it until now?  I emptied her toys out and placed them in bags.  I went online and looked up a Frozen color palate.  I chose 4 colors from Joann Fabric and Craft Stores Craft Essentials acrylic paint collection. I ended up using three bottles of each color, except for the pink (I only used 2) I went online and printed out some Frozen graphics that I wanted to use.  I set my printer to the largest setting possible.

20150329_145754

20150329_151745

The toy box needed about 2 coats with some minor touch ups after drying. Once the final coat was applied, I allowed the piece to dry thoroughly overnight.

20150329_144245

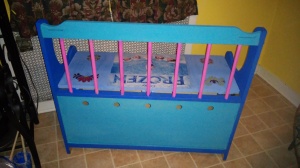
The next day, I applied Mod Podge to the front and lid with a foam brush, and carefully applied the prints.

20150329_150645

20150329_194011

The piece needed some “pop” so I decided to purchase some wall decals from Babies R Us to use as accents.  If you do not have access to a printer some of these images would also work great for decoupage.  I decided to apply the left over decals to my daughters bedroom wall.

pTRU1-19067669enh-z6

I then applied Mod Podge to the entire piece to seal it. For the majority of the toy box I used a foam brush to apply the Mod Podge, on the lid I used a “fluffy” mini paint roller which gave a snowy effect when the Mod Podge dried.

DSC_1095

I was happy how the piece turned out, and it looks great in the playroom!  When my daughter saw it finished the smile on her face said it all!

DSC_1086

DSC_1096

Materials:

Wooden toy box

Mod Podge

Paint/Brushes large and small

Foam craft brush, scissors

Frozen Prints Or Decals

(Colors used from Craft Essentials sold by Joann Fabric)

Mediterranean Blue

Panic Pink

Caribbean Coast

Sailing Sky

Length of project: 2 days (total)

The Broken Chair Challenge: Upcycled Black and White Damask Chair

I spotted this chair in the back of a Goodwill store.  There were various miscellanies items piled on top of it, and It involved quite a bit of work to break this chair free. I was attracted to the chair design  ( The chair featured a fleur de lys) and I loved the detail.  The chair seat was in very rough shape and it would require re-upholstering.  The overall chair frame seemed like it was in ok shape, and I thought enough of this chair to assume the risk.  The chair was priced to sell at $3.99.

When I got it home,  I ripped the blue material off the seat and discovered the seat was broken and could not be repaired.  Now, I had to salvage another chair in order to repair this one!  My husband and I kept our eyes open for any “curbside” or “free” chairs, I prefered to use  a free chair and not purchase one, but months went by until I found a freebie chair that would be perfect, A lucky find at a thrift store. The chair seat would turn out to be a perfect replacement, and I have future plans to upcycle what’s left of the chair frame.  Stay tuned!

First, I cleaned the chair, and primed the chair frame with 2 coats of a white latex primer.  Once the chair was dry, I began to paint it in a white and black color scheme.  I used black and white acrylic paints to paint the entire chair.

This chair was quite a challenge to paint. The chair had a lot of cut-ins, and detail, and required a lot of patience when it came to the paint brush. I sat the chair in front of the fan until it was dry, and then added a layer of Mod Podge overtop to seal the chair.  It dried nicely.  Now I was ready to re- upholster the chair seat. The original fabric I chose was a black fabric with white roses.  When I placed it up against the chair, I despised how it looked!  So, It was back to the fabric store to pick out another style and I went with the Elegant look of Damask.  I used less than a yard of material and cut and traced it to fit the new seat, leaving extra material for underneath the seat.  I used an upholstery stapler and carefully stapled the material to the back of the chair seat.  Once I was done I screwed the seat back on to the chair.

This chair was not short in challenges, but in the end it was worth it. Looking at the finished chair,  I would say this chair turned out to be worth the risk, and a broken piece received an elegant new lease on life!

Upcycled Black and White Damask Chair

Back of B&W Damask Chair

Rear View of Black and White Chair

Before and After Chair Made with aint,cloth and Mod Podge

Before and After

Black and White Demask Upcycled Chair

Materials:

Roughed up chair

White Latex Primer

Black and White acrylic paint

Mod Podge

Damask Fabric

Brushes/Scissors

Upholstery stapler and staples

Screwdriver

Black Marker to trace seat to fabric

Restyled Side Table

100_6249

Their is nothing I love more then a good side table.  They can add so much to a room if you can find one with the right look.  I purchased this side table at Walmart for under 20 dollars more than 6 years ago.  Sure, the table served it’s purpose well, but was far from anything special. I decided to give it a new look, but what to do?  These days, I find myself looking at things differently.  When I am out and about,  I am always looking for fabric, textiles that stand out in the crowd.  Mod Podge and fabric are great for revamping furniture.

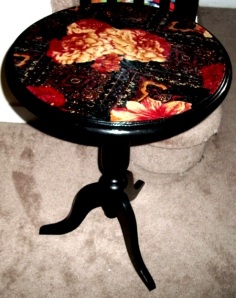
On this day I found a really nice woman’s scarf for 99 cents at the thrift store. It was perfect to cover the table top of a smaller piece of furniture.  I primed the table using my trusty latex primer.  Once the table was dry, I painted the entire table with black acrylic paint.  Several coats were required.  I turned the table upside down and carefully traced with a black sharpie marker, onto the scarf material.  I used scissors to cut the fabric.  Now I was ready for Mod Podge!  I covered the table top with Mod Podge and glued down the material.  Through experience I find different materials are better in this process than others.  This scarf because of it’s texture was difficult to smooth out the air bubbles.  I wish I could tell you the materials make up , but the tag was cut off the item.

Once the piece was dry, I coated the entire table with 4 coats of Mod Podge. The result is what you see here and I love it especially the splash of colors (Did I mention I LOVE COLOR)

In the end, The table top had a rougher finish than I preferred so you may want to try using the gloss finish to add a bit more sheen. I generally use Matte finish in most of my projects and it is fine, but sometimes the material you use makes a difference.

side table made with Modge Podge

Trash to Treasure~ Upcycled Decoupage Bedroom Nightstands

In early 2002 My husband and I were just starting out, and like most people just starting out you tend to be a little light when it comes to home decor and home furnishings. I will admit that not only do I like frequenting Good Will and various other thrift stores, I also like trash night. I always keep my eyes open for curbside furniture finds. I feel a little like a hero- I am keeping one more piece of garbage out of the landfill. So, it was on this fateful night that I spotted two bedroom nightstands beside the apartment dumpster no diving required LOL! The hubby and I were desperate to simply have a place to put a drink, or a book beside our bed. They were functional yes, but I secretly hated them and dreamed of getting new nightstands someday. Flash forward to 2013 and we still have the nightstands! We never got around to replacing them, and they were inching ever closer to fulfilling their original destiny when I discovered… Decoupage! There was no question these tables needed a serious makeover, but thanks to my other addiction Pinterest, the ideas were flowing and I decided to give it a try, besides they were going to end up in the trash anyway!

Materials I used:

One very old and beat up nightstand
Mod Podge Matte Finish
Black Acrylic Paint
Scrapbook Paper

These tables were so beat up not much sanding was required. I painted the entire piece and cut the scrapbook paper to fit the various areas of the table I wanted to cover. I used the Mod Podge to glue down the paper to the wood. I then sealed the entire table with Mod Podge covering the painted areas to give it a sheen and seal the paint so it wouldn’t chip. You see the final result below came out better than I imagined it would and once again these tables avoided the trash heap! They are holding up very well too although I would suggest using a coaster for that drink! : 0 )

DSC_1126h    Black and white decoupage tables  DSC_0032