A Blizzard of Ideas: Basket Makeover

Getting snowed in has its privileges.  The family and I had a great weekend, despite being completely snowed in, during the East Coast blizzard of 2016. When mother nature gives you lemons, what else can you do but make some lemonade?  It was a perfect time for cooking, baking, and crafting, and the toddler apprentice and I did just that!

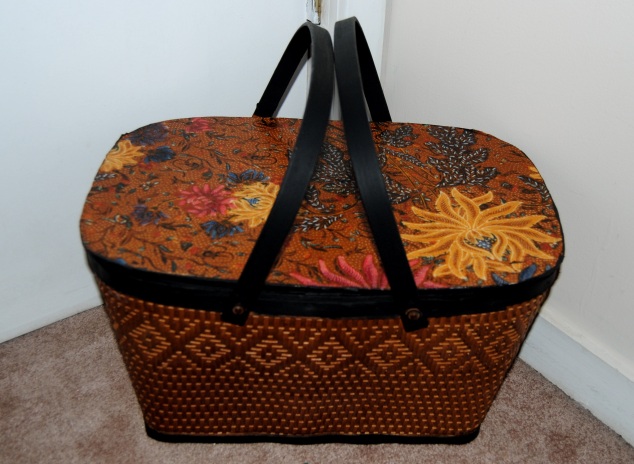
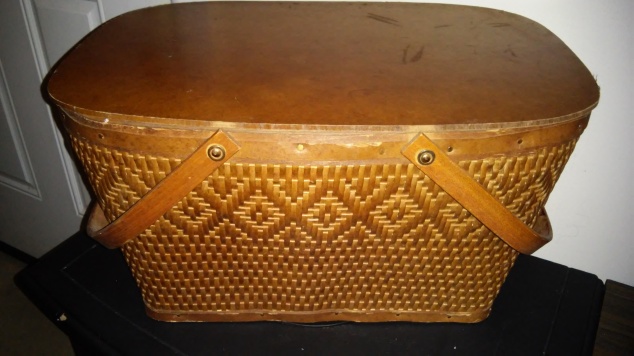
I picked up a lovely wooden basket at Goodwill about two weeks ago.  When I made my purchase, I was unsure on what I was going to do with it.  Some items I pick up are best left alone, while others benefit from a bit of “sprucing up.”

I decided to find a middle ground.  The lid needed quite a bit of TLC, but the inter woven wood on the basket looked great, so I did not want to alter this part in anyway, only try and compliment it.

20160114_192050

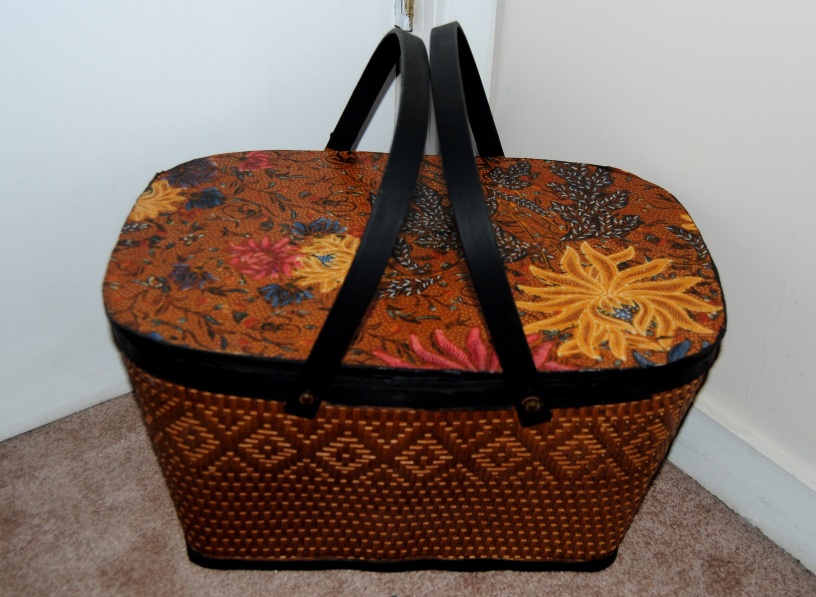
I decided to decoupage the lid, and accent the handles with black paint.  I struggled a bit with choosing a fabric that I thought would go well with the caramel colored wood.  I finally decided on a swatch of fabric that I purchased some time ago at a thrift shop.  It had earthy tones that I felt would mesh well with the original design elements on the basket.

I turned the basket upside down and used a black, fine tipped market to trace the lid on to the back of the fabric.  I then cut fabric tracing out with a pair of scissors. I painted the lid with white paint.  Once dry,  I generously applied the Mod Podge to the lid surface with a paint brush.  I applied the fabric, and smoothed it out with both hands.  This helps minimize wrinkles and air bubbles.  Once dry, I applied three more layers of Mod Podge on the top of the piece, and allowed it to dry between coats.

Once the lid was dry, I lightly sanded the areas I planned on painting.

I took a narrow bristled paint brush and painted the handles, and some of the detailing with black acrylic paint.  I applied three coats of paint total.  Once the paint was dry, I applied a layer of Mod Podge to the painted areas to seal it.

DSC_0333

In the winter, this basket will be a perfect place to store hats, scarves and gloves, and in summer it will be the perfect picinic basket or an accent piece with storage.

Materials:

Wooden Basket

White and Black Acrylic Paint

Mod Podge

Fabric of choice

Scissors/Sharpie marker/Paint Brushes (various)


On The Upcycle Revival: Vintage 1934 Lane Waterfall Art Deco Hope Chest

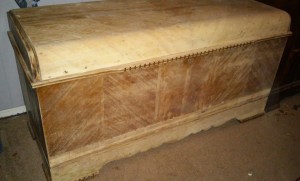
Every once in a while that special piece of furniture falls into your lap unexpectedly and without warning.  Now that the word is out and friends and family are aware of my blog, I have had interesting items rescued and brought to me to experiment on.  That was the case with this next project which also proved to be my most challenging yet. The same friend and co-worker who brought me my “You had me at half table” project approached me about a cedar chest she had sitting in her garage.  She needed to make room and could no longer keep it, and wanted to know if I would be interested in giving it a good home, and taking it off her hands. The outside of the chest was in rough shape, but the inside was still perfect.  After all these years, it managed to maintain its trademark cedar smell.  She inherited the hope chest from a neighbor who was about to place it out on the curbside. My friend rescued it, recognizing this diamond in the rough deserved a second chance at life. Adding to the excitement was the fact that I had always wanted a hope chest of my own.  I didn’t mind having to put some work into restoring one, and I graciously accepted the offer.  I was really excited and looking forward to working on a special piece like this.   Initially I was concerned about transport, but I was relieved when it fit in the backseat of my car.  I already had a spot for it in my bedroom. It seemed like it was fate.  For a while,  it sat untouched and the veneer began to peel, and I peeled it off little by little, while I figured out a plan to bring it back to life.

DSC_1002

I began researching the piece online. I opened the trunk and inside I found a card outlining the moth insurance policy.  The card also encouraged it’s customers to “buy victory war bonds.”  I knew from that moment on this was a vintage piece.

lane 2Lane Card

The tag also listed the maker of the piece.  The Lane Company Altavista, VA.  The name was also burned into the inside of the lid.

DSC_1058

Founded in 1912 by John and Ed Lane, The Lane Company of Virginia, became one of the leading makers of Hope chests in the United States during World War I and World War II.  During that time, it was tradition for young girls to have a hope chest to bring with them into a marriage.  The company launched a massive ad campaign which even included child star Shirley Temple  as a popular spokesperson for the company.

20c67b90a939d58165359ab106c7e366

Every piece was stamped with a unique serial number and style number. Reversing the serial numbers is what helped me determine its age. This one was manufactured on 8/18/1934.  The chest was waterfall design done in an art deco style which was also popular during this time.

The chest itself was in good shape, but the veneer was not.  It was stored in a damp place for a long time,  and much of it was peeling or bubbling up. I knew removing this would take a lot of work.  I also discovered that the original lock had been recalled. Sadly there have been cases of children suffocating inside after becoming trapped as recently as 2014. The good news is Lane still has replacement locks available on their website.  Due to safety concerns, I went online to order one here.  The lock ships in 4-6 weeks.  It is important when purchasing vintage furniture to pay attention to recalls.  I was glad to have stumbled upon this fact during my research by pure accident.

With minor cracks in veneer, it is possible to buy wood filler/puddy and “patch” and sand the areas, but in this case the veneer would have to be removed entirely in some areas. I read a few articles online, and I tried various techniques for easily removing veneer.  Let me start off by saying there is no easy way to remove veneer. I found it to be a long, risky and tedious task.  The one technique  that worked best was using a hot iron and a damp towel. I soaked the towel in warm water and placed it on the area of veneer I wanted to remove.

DSC_1004

I then heated up the iron and placed it on the area allowing it to sit for several minutes.  This softened the glue enough to allow me to use a scraper to remove large pieces of the veneer.  unfortunately, smaller pieces broke off and I ended up repeating this process many times.  The biggest challenge was scraping and removing the veneer without damaging the wood underneath.

DSC_1000

Please also note that once you use your iron for this task, it becomes designated only for this task.  The glue from the veneer burns the iron permanently and it can never be used to iron clothing again. This process was completed during the course of a few days.  I would work on a small area nightly.  The veneer removal seemed to be taking forever until it was boosted by a snow day and some unexpected free time.

20150305_222555

I used a belt sander to even out the larger areas and hand sanded the more delicate and smaller areas. The areas on the piece that still had veneer I carefully hand sanded.  Using a belt sander can cause damage to the veneer.  Once the sanding was completed, The piece was ready to stain and seal.
20150305_225309-1

20150305_175139

I trudged up to Home Depot in the snowy slush and shopped for a suitable stain and polyurethane seal for the exterior.  The colors that I initially wanted they did not seem to have in stock.  This did not make the aisle look any less intimidating to me.

20150306_093046

I decided on a color called “Cognac” and a clear semi-gloss polyurethane sealer.  I already had a small can of Minwax Jacobean at home that I was planning on using for some of the trim.

20150306_112823

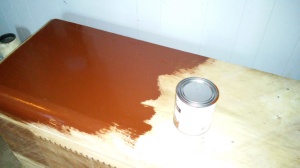
I began applying the stain and it was a little darker than I expected, but it closely matched our bedroom furniture like I had hoped.
20150306_113835

I then painted the entire piece.  I was happy with the Varathane brand stains as it dried quickly and had less odor compared to other stains I have used in the past.
20150306_124502-1

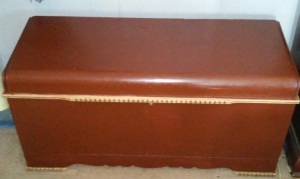
I  used the Jacobean colored stain to paint the trim and highlight the grooves and detail in the lighter wood trim.  To me adding the darker color helped bring out some of the unique design qualities of the piece.  It took about two coats of stain to cover all the areas.  Once the stain was dry (It took about 24 hrs) I applied two coats of the clear semi gloss polyurethane to seal the chest.

DSC_1061

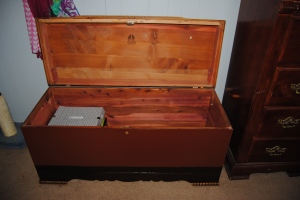
Although I could not restore the chest to its original state, I am pleased with how elegant the piece looks now.  It fits in beautifully in our bedroom and I look forward to storing special items inside it and treasuring it for years to come.
DSC_1060

Before and After

1934 Lane Hope Chest Before and After

Materials used:

Old Iron

Old Towel

Paint Scraper

Paint Brush Large and Small (for detail)

Wood Stain (color of choice) and Polyurethane Sealer

Sand Paper

Belt Sander (Optional)
Notre Dame Fighting Irish Decoupage College Football Chair

This Saturday, two impressive college football teams will square off in what proves to be an epic battle.  # 2 Florida State is favored over the 6-0 5th ranked Notre Dame.  The Fighting Irish are clear underdogs in this matchup, and the history behind these two teams and prior matchups, seem to support this fact.  Looking for the upset, Notre Dame coach Brian Kelly will surly be put to the test.  They will need to play their best football yet. They will need to…..

Play_like_a_champion_sign

My husband grew up watching Notre Dame and rooting for the Irish along with his father.  Like many teams Notre Dame has had its share of ups and downs through the years, but despite this my father in law’s love for his Irish never waned. Every game win or lose.. it didn’t matter, It was a celebration. It was Notre Dame Saturday!  If you root for and follow a team you know that it becomes a part of your life and present during many important memories.  My husband and I often think of our father fondly, and though he passed many years ago, Watching the games and following his favorite team brings us closer to him.  I wanted to make my husband a special gift, and it never seemed like a better time than for one of their biggest games. I picked up a lovely solid maple ladder back chair at Goodwill that had seen better days.  It was priced under five dollars, and I was drawn to its design immediately.  The chair has a stamp from a furniture company under the seat: Louis Albert and Company, Philadelphia PA.

Thrift Store Ladder Back Maple Chair

It seemed the perfect project chair, and with that the Fighting Irish Notre Dame chair, was born.  If you have followed my blog, you know I have a special place in my crafty heart for chairs.  I am drawn to functional pieces of art and to me a chair embodies both these elements nicely.  I printed out the college decal of choice on my printer. I then cleaned and prepped the chair with a white spray on primer.

Primed Chair

I applied Mod Podge to the seat with a foam craft brush.  I then added the print, gently smoothing out any air bubbles with my hands.

Apply Mod Podge

DSC_0827

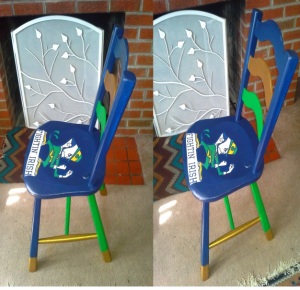
I added a thin layer of Mod Podge over the top of the print to seal it.  Once dry, I began the lengthy process of painting the chair.  I used the team colors, gold, blue and green for the color scheme.  It took several coats to obtain proper coverage.  I carefully painted the area around the image, and although time-consuming, it made the image appear to flow with the seat. Because of the small areas, I decided to paint rather than to cut the image out.  Adding Mod Podge before painting the paper prevented damage and curling.  Two coats of Mod Podge over the painted area, properly sealed it. I decided to give the feet of the chair some character by adding the gold dipped legs. Once the paint was dry over the span of about two nights, I covered the entire chair in Mod Podge to seal the acrylic paint.

Decoupage Notre Dame Fighting Irish College Sports Chair

Notre Dame College Football Chair

Now my husband has a special chair to sit upon and watch the game this weekend.  Another Notre Dame Saturday of family memories with our own daughter, and a Fighting Irish college football chair to enjoy for many years and games to come!

notre dame chair

Before and After:

before after

Not a fan of the Irish?  Make your own college football chair:

Materials:

Decal or Team Print Of Choice

Old Wooden Chair

White Spray On Primer

Mod Podge

Acrylic Paint (Team Colors of Choice)
Craft Brush, Paint Brushes

Scissors

The Past Called… And It’s For You

There is nothing I love more than nostalgia!  As a child of the 1980’s I remember talking on the phone for hours with my best friend. Our phone was attached to the wall with a rather long cord that I could never seem to get untangled.   Answering machines were also becoming popular around this time, but not everyone had one.  If the phone rang (That loud distinct ring we all know and love) you had to answer it!  Oh and by the way you had to answer it without knowing who was on the other end,  no caller id yet either!  This is before cell phones, texting, Skype and the internet, when people actually had to pick up the phone when it rang, and..well actually talk to each other!

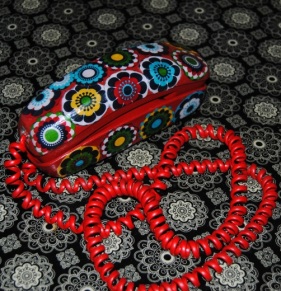
In a  recent post, I mentioned my quest to find the rather elusive vintage, rotary phone.  I had seen some really great examples of vintage phones restyled with decoupage on the web,  and I was eager to try a project myself. In my area, rotary phones are rare.  During many trips to thrift stores, it was always on my mental wish list, but I never seemed to come across one.  Then one day my luck started to change.  First, I was able to find a vintage  red, Trimline desk phone, with tone dialing.  It was not the rotary dialer I was looking for, but still a great find.  At least I was getting warmer! Then about two weeks later I wandered into the same Goodwill.  I quickly scanned the electronics aisle as I always do during my walk throughs.  As I was about to turn around and leave, my eyes dropped and their it was in all it’s splendor a black 1950’s Western Electric Rotary Phone in excellent condition.  I couldn’t hold back my excitement and squealed out loud.  The lady next to me smiled and we struck up a conversation.  I had been looking for this for a long time.  It was priced right too, only $5.99!  Now, I had two great vintage phones that would make great projects!

Western Electric  and Trimline Phones

Both phones function well, and are in excellent condition.   Although due to my digital line, my rotary phone rings and receives calls, but cannot dial out without a special filter attachment which costs about 50 dollars.  This apparatus converts rotary pulses into tones modern digital lines can recognize.  The black rotary phone works well and rings loudly; Unlike my current, modern cordless phone.  I have not yet decided what I am going to do with the rotary phone.  I did decide however; that the red phone would make a great first attempt at decoupage.  A phone of this type which has many more angles and curves to work with I anticipated, would be more difficult than a previous cell phone decoupage.  project I had tried.

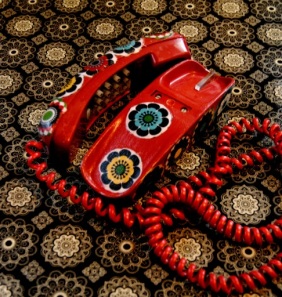
I chose a 1960’s inspired fabric I had used in previous projects that I thought would go well with the red color and fit in nicely with the phone’s vintage flare. I decided to cut out the circular shapes with a pair of sharp scissors.

Groovy Fabric

I applied Mod Podge to the back of the fabric with a paint brush.

DSC_0571

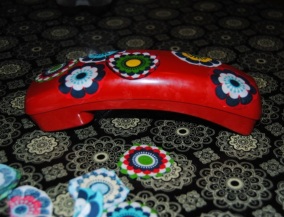
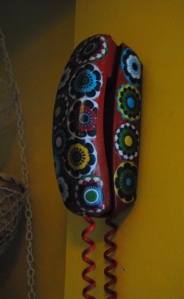
One by one, I placed them on the surface of the phone receiver gently smoothing out any wrinkles with my fingers. I also applied them on various other parts of the phone such as the base, and phone cradle.

decoupage phone

DSC_0575

I then added a few coats of Mod Podge over top the fabric to seal it allowing it to dry between coats.

Decoupage Vintage Trimline Phone Made With Fabric

Now we have a groovy vintage landline phone popping with color!  Look for a  rotary re-do coming soon once I build up enough courage of course!

DSC_0591DSC_0587

Materials:

Fabric of choice

Scissors

Mod Podge

Paint brush with coarse bristles

Old Phone

A Decoupage Trilogy: Vintage Suitcase Number Three

I love vintage suitcases!  That may seem surprising coming from someone like me who doesn’t travel much.  The truth is suitcases aren’t just for “packing your bags”  They are also a wonderful way to store keepsakes and other items.  I was lucky enough to find three vintage blue suitcases for $5.99 at Goodwill.  This was an incredible deal, and I have not seen a suitcase purchase worthy since. My first attempt at restyling a suitcase, Travel The Old Fashioned Way I used fabric I purchased from Joann Fabric.  I chose a blue and white floral pattern, and it turned out great for a first attempt.   For the second suitcase,  Pack My Bags Fun And Easy Decoupage Vintage Suitcases I found a great pillow case with a floral red, white and blue color scheme that was perfect.  That left the smallest of the three.

decoupage vintage suitcases with fabric and Mod Podge

This suitcase is special, because inside the lid it has a built-in mirror.  The lining inside is also in perfect condition, another plus! (Please excuse the reflection of the mirror in the photograph)

DSC_0548

For this suitcase I decided to use blue and purple floral sheet that I found in a thrift shop.  I initially wanted to use a scarf, but the material was too thin and I was afraid the blue color of the suitcase would show through the material.

DSC_0533

To see a full tutorial on how to decoupage a suitcase Click Here

Now I have a wonderful set to use for travel or a decorative storage option.

DSC_0542

The search for more luggage continues….

On The Upcycle Restyle

on-the-upcycle.jpg

This weekend I decided to give “On The Upcycle” a much-needed reboot.  I felt the old blog layout was getting a bit stale. Last night I experienced an evening of insomnia, and decided it was the perfect time to explore new ideas. I hope you all like the new look!  Happy 4th of July weekend everyone!


Thrift Store Surprise: Vintage Wood Sewing Box Upcycle

When I see something at a thrift shop that is unique and catches my attention, I will often purchase it even when I am unsure of what it is.  As was with the case of this little wooden box with legs. I imagined what it could have been used for. Perhaps it was intended to hold hats, gloves and scarves, or it simply sat by the door and was used to sort daily mail.  To me it didn’t matter, it was intriguing and best of all, priced right at $3.99!

DSC_0485

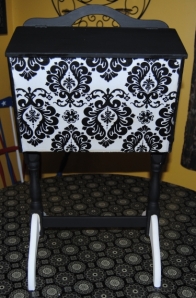
Sure, I had my smart phone handy, I could have googled the item and had my answer right away, but for some strange reason,  I didn’t.  I simply brought it home and stored it in my craft room.  It patiently waited its turn to learn its crafting fate until this weekend, I blew the dust off and decided to come up with a plan of attack.  I like to utilize materials I have handy as much as can. I tend to accumulate unused fabric scraps from previous projects and I prefer to use this fabric to the last thread.  One of my favorite designs was the black and white damask fabric I purchased at Joann Fabric.  I used this fabric on previous projects including The Broken Chair Challenge, and You had me at “Half Table” Yard Sale Rescue. I still had a rather large scrap piece left and decided to use it to upcycle this item.  I began by cleaning the item thoroughly.  Once the dust and dirt had been removed, I used a latex spray on primer and spray painted it white.

DSC_0496

I cut the fabric to fit both sides of the piece. I generously applied Mod Podge to the area with a foam craft brush.

DSC_0497

I then applied the fabric and repeated this step for both sides of the box.

DSC_0498

Once this dried, I applied three total coats of Mod Podge over top allowing each side to dry thoroughly between coats.

DSC_0499

I then painted the entire piece in a black and white scheme using acrylic paint.  The piece took about three coats of paint. I allowed the piece to dry over night and applied a final layer of Mod Podge to the entire piece to seal it.

DSC_0502

I am very happy with the final result;  However, I also want to share with you my mistake during this process.  Halfway through the project, I finally did what I should have done in the very beginning, research the piece online before you upcycle!  What you discover may alter your plans.  Granted in this case, I do not believe I would have done anything differently, but it really got me thinking about these pieces and how research plays an important, but often unspoken role in crafting.  A few pieces along the way, I decided to keep in their natural state, and some purists may have done the same in the case of this vintage box.  Turns out this little box with legs is a Priscilla style sewing box most likely from the depression era 1930’s to 1940’s. I saw a few online in various states, some painted and upcycled and others in their original condition range in price between $35 and $80 dollars on Etsy. My antique radar must have been working that day!  Despite having no clue about what this items’ purpose was I sensed it was something special.

What would you have done with this piece?  Have you ever had something special, but didn’t know it? Do you have crafting regrets? I would love to hear from you!

DSC_0509

Materials:

Vintage Sewing Box Stand

Fabric Of Choice

Mod Podge

Acrylic Paint/White Latex Primer

Scissors, Paint Brushes, Foam Craft Brush


Play it again, Kid: Upcycled Vintage Jaymar Kids Piano

When I take a trip to an antique shop or thrift store, the thing I enjoy the most is the element of surprise.  Sometimes I come away with nothing and other times when I least expect it I find something rare.  Speaking from experience antique shops tend to have pieces that are in better physical condition. Thrift stores such as Goodwill often times are stocked with basement throw aways and estate sale clean-ups.  Many of these items are not well cared for and in some cases downright abused.  I have come across items that I wanted to rescue, but I felt with my skill level I could not save them.  It always leaves me with mixed emotions.  On this day I was about to leave the store.  The husband and I have been regularly stopping in searching for a vintage rotary phone.  Not only have I always wanted to upcycle one of these phones, My husband and I love the loud ring it produced from our childhood memories.  We have missed many calls at home unable to hear our landline phone ring if we are in a certain part of our house. Upon taking one last stroll through the cluttered furniture aisle, my eyes wandered and there it was staring back at me! It seemed too good to be true: a vintage Jaymar Kids Piano. The toddler apprentice and I had been out shopping last year around Christmas at The Christmas Tree Shop, and stumbled upon an adorable kids baby grand piano.  She loved playing it and I could barely peel her off it at the store.  The price tag was a bit hefty weighing in at $89.99.  When we left the store without it,   I couldn’t get that little piano out of my mind and finding the vintage Jaymar at Goodwill seemed a bit like the product of fate. As with any upcycling story there are challenges to be faced and this adorable piano was no different.  The wood in many places was peeled away, It had its share of loose nails, and a large crack spreading across the base and back of the piano.  Incredibly, all the white keys worked perfectly and all, but one of the black keys worked perfectly.  The plastic keys were more yellow than white as is what happens to plastic stored under certain conditions with age.  It did not have a price tag so I took it up to the associate at the register. Even in rough shape I was surprised it was priced at a mere $5.99!

Vintage Kids Jaymar Piano Est 1960's

I snatched it up and brought it home.  I may not have found the rotary phone that I was searching  for that day, but I was surprised and delighted to find the piano.

Despite its charms, I knew very little about the toy.  I grabbed my laptop and did some research.  Thanks to Old Wood Toys.com  I was able to read about the history of the Jaymar company.  The toy company produced wooden novelty trinket toy through World War II.  After the war the company exclusively produced kids pianos and puzzles.  The company officially closed it’s doors in 1990. When I searched on Ebay, there were a few for sale, many of them in rough shape with price tags ranging from $39.99-$89.99.  On most, keys were broken. I concluded I had gotten a very good deal on this toy!

Jaymar Kids Piano

Since the piano did not come with a bench, I had a kids unfinished step stool that I thought would repurpose and stand in nicely as a piano seat.

Unfinished Step  Stool

I decided the cracked area of the piano would benefit from decoupage.  I believed the Mod Podge and fabric would reinforce the cracked wood and prevent it from spitting further.  I chose black and white music note fabric from Joann Fabric.  I used a white brush on acrylic primer to paint the entire piano after cleaning it thoroughly with a damp cloth.  I measured the area I wanted to decoupage and cut a piece of fabric to fit.  Once the paint was dry, I applied Mod Podge generously to the cracked area underneath with a foam craft brush, and carefully applied the fabric smoothing it put with my hands.  Once dry, I applied three more coats of Mod Podge over top of the fabric allowing it to dry between coats.  I then painted the entire piano with several coats of black acrylic paint with an appropriate sized paint brush.  I painted parts of the piano white for emphasis.  While the piano dried between coats, I worked on repurposing the step stool into a piano seat.  I traced the seat surface on to the back of the music note fabric with a pencil.  I cut out the fabric with scissors and placed it aside.  I painted the entire chair black except for the seat which I planned to decoupage with fabric. Once dry, I applied Mod Podge to the seat and applied the traced fabric.  I applied three coats over top of it to seal it.  Once the Mod Podge was dry I used a Polyurethane clear semi-gloss sealer to add a final protective coat over the piano and the piano chair.

Upcycled Vintage Kid's Piano

The one frustration with this project was the yellowed plastic piano keys.  I would have preferred a method to whiten them, but after doing some research decided not to mess with the patina on the keys.  I have read everything from sanding the keys with fine sandpaper or cleaning them white toothpaste.  In the end, I decided the risk of damaging the function of the piano was too great and simply used the corner of a Magic Erasure pad to throughly clean the keys.

Play it again kid, restyled kids piano


Have any safe plastic whitening tips?  I would love to hear them!

Materials used:

Black and White Acrylic Paint

White Acrylic Primer

Large and Small Paint Brushes/Foam Craft Brush

Mod Podge

Polyurethane Clear Sealer

Fabric Of Choice

Scissors

Wet Cloth or Magic Erasure Pad for cleaning

Kids Piano/Kid Step Stool (for seat)


The Craft Must Go On: Upcycled Rock N’ Roll Bar Stool

A few months back, I came across a wooden bar stool at Goodwill for $5.99. I liked the size and design of the stool, and thought it would make a great decoupage piece.

DSC_0884

I decided to upcycle the stool with a Rock N’ Roll theme,  and since it was to be a gift for my husband, I chose the Irish Rock band Thin Lizzy as a subject. The band is one of our favorites and have a vast catalog of great music.  This initial vision took a back seat to the holidays, and various other projects. The idea seemed doomed afer one mishap after another involving this project.  I abused this stool, and used it to allow smaller painted projects to dry.  When I attempted to prime it, the spray can malfunctioned splattering the primer.  (I believe the can may have been too cold) After the bar stool was dry, I sanded off the “lumpy” paint by hand.  Creating yet more work for myself, while attempting to smooth out an air bubble on the initial decoupage print, I tore a hole in it and had to scrape it off only to start all over again.  Despite all of these blunders,  the project managed to come together.  Turns out I found a much nicer print, based on the album cover for “Nightlife” The print featured a black panther on the prowl like the one featured on the cover below.

Thin Lizzy Night Life

I painted the entire chair in black and red alternating the colors.  It took several coats to obtain good coverage.  Once dry I applied Mod Podge to the seat with a foam brush.  I carefully applied the printed logo and smoothed it out carefully with my hands doing my best to avoid tearing or wrinkling.  I painted the area not covered by the print red, creating a bull’s eye effect on the seat.  Once all the paint was dry, I used Mod Podge to cover the entire bar stool.

DSC_1581

Finally, my crafting nightmare showed some “Nightlife” after much adversity.  More importantly my husband seems happy with the result. Now we just need the bar..

Wanna see more chair restyles from “On The Upcycle?  Click Here

DSC_1583

Best Foot Forward: Upcycled Dress Shoe Repair

When I was young, I remember my mom taking me to the mall to visit the Shoemaker.  It was much more common back then to have your shoes repaired.  I remember my mom getting Taps on her shoes to protect the heel and make the shoes last longer.  I did a bit of internet research and was surprised to find that Shoemakers still exist, although not in quite as large numbers as thirty years ago.

Everyone has that pair of shoes that they love.  It is hard to part with a pair that fit well and are comfortable.  Recently, my employer  adopted a casual business attire policy.  After five years of being able to come to work dressed in t-shirts and sneakers, this left me scrambling for an appropriate work wardrobe.   I went to thrift stores mostly, and picked up a wonderful pair of shoes.  They have a block heel and were extremely comfortable for a dress shoe.  One of the problems I encountered was getting used to walking in dress shoes.  I scuffed up the back of the heel pretty badly and the sole began to separate from the shoe.  I was not ready to give them up, so I share with you my first pair of “Upcycled” shoes.

Shoes


This was a total experiment, but I figured I had nothing to lose since I could not wear them in their present condition.  The first repair made was to the sole.  I used a high temperature hot glue gun to adhere the sole back on the shoe.  I used two sticks and applied generously.  I put my hand inside the shoe to apply pressure, while the glue dried.  I then painted the heels with black acrylic paint.  Once the heels and soles were dry I applied a layer of Mod Podge with a paint brush,  I then added another layer of polyurethane for added protection.

DSC_1578


DSC_1572


So far they are holding up well despite the repairs.  The true test will be the hot glue and every day wear.