The Shirt That Didn’t Fit: Clothing Repurpose

I was up late shopping one night when I came across a lovely shirt on Ebay.  I usually don’t purchase clothes unless I can try them on first, but I had recently ordered something and it worked out perfectly, so I was feeling braver than usual.

I received the item, and to my dismay it did not fit.  The seller had a no refund policy, so I attempted to relist the item for sale. Unfortunately, I didn’t have any luck reselling the item,  so I decided to utilize the shirt in a different way.  I loved the pattern and material, so I decided to re-purpose the item and use the fabric for decoupage.

20160114_191835

I carefully cut out the gold star pattern, and used a little Mod Podge to apply these to my kitchen back splash.  This added a much needed “pop” of color, and matched the kitchen decor perfectly.

Before:

DIY Kitchen Back Splash

After:

20160131_113806

I had some fabric left over, so I decided to use it to make an accent lamp for my office.  I had an empty spaghetti jar which would work perfectly for this project.  I applied Mod Podge to the exterior of the jar and used some twine to add a decorative quality to the base. I applied the twine with hot glue.

20160216_074721

20160218_215538

For more details on how to create a decoupage jar lamp, check out some previous On The Upcycle decorative lighting projects…

Spaghetti Jar Lamp

Pickle Jar Lamp


What’s Old Is New Again: Decoupage TV Trays Are Back!!!

The wooden TV tray.  A functional piece of furniture.  Although I think we can all agree these tables are useful, but they lack the design qualities seen in other pieces of furniture.

TV Tray before

Way back in 2013, I came up with an idea to turn these boring tables into something fun.  My first tutorial Decoupage Team Sports Trays explored the option of decoupaging these trays with Mod Podge.  It was a huge success and since then, It remains one of my most requested items.

dsc_0097

They also make wonderful gifts for the sports fan in your life! Recently I made two new tables. Both were gifts, one for a friend’s birthday, and the other was presented as a Christmas present.   Nothing new here, but thought I would share the new additions so you know what I have been up too!

20141217_212059

Philadelphia Flyers TV Tray

20150715_223709

New York Giants TV Tray

Want to See more?  Check out these past blog entries on Decoupage TV Trays!

Have a special someone on your gift list that is a sports fan?  Then this is the table for you…

Sports Trays…Revisited!

Yankees Decoupage Sports TV Tray

Washington Redskins Decoupage TV Tray

Want to show off your school pride?  TV trays are great for doing homework too!

Smells Like Team Spirit! 

DSC_0841

20140601_191920 (1)

Not a sports fan? No school spirit?  No Problem!  There are many other themes you can use to create a personalized tray table.  LP liner notes make great decoupage and are unique!

Rescued Vinyl TV Tray Decoupage

DSC_1270

Where is Summer? The Birds Are Angry: Decoupage Kids Craft Bird House

It hasn’t felt much like summer over here.  The pool is up, the flowers are planted and beginning to blossom, but it is 52 degrees and the rain is cold! I am left to ponder the question, where is summer?

The good news: Rainy days are a great time for kids crafts.  All the more reason to plan a project the toddler apprentice and I could accomplish together.  The little one loves to watch The Disney Collector on You Tube. The DC Collector has become a bit of an internet phenomenon among the five and under crowd, and my daughter is no exception.  She enjoys watching those carefully manicured hands opening and revealing various toys and treasures. It was while watching these videos my daughter discovered her love of Angry Birds.  The birds must be angry that the weather has not been cooperating!  They could sure use a house I thought to myself!

I also thought decorating a bird house would be fun project to do together. I purchased an unfinished,  wooden bird house at Joann Fabric.  They were on sale for .99 cents.

20150514_225726

I then went online and downloaded some Angry Bird images.  You can use character stickers if a printer is not available.

20150514_224224[1]

I cut the images out with a pair of scissors and placed them aside.

20150514_225456[1]

We painted the bird house together using red and blue acrylic paint.  It required two coats.  We then placed the painted bird house aside to dry.

20150514_232054[1]

Once it was dry, I used Outdoor Mod Podge to apply the images to the bird house.  I then added a layer of Mod Podge over top of the image. Although Outdoor Mod Podge provides added protection from the elements, if left out it will eventually weather.  I added a coat of polyurethane to provide additional protection and prolong the life of the bird house.

20150518_185404[1]

Once the bird house was dry we used a “C” Shaped hook like this one to hang it.  Lets hope that now that our little backyard friends have a place to call home, they won’t be such “Angry” little birds anymore….

Materials Needed:

Unfinished Wooden Bird House

Angry Birds, images or stickers

Outdoor Mod Podge

Red and Blue Acrylic Paint

Clear Polyurethane (optional)

Paint Brushes/Scissors

C Shaped Hook (For Hanging)

Hot Summer Nights: Paradise By The Back Porch Light

This past memorial day weekend, my husband and I were determined to get the yard ready for summer.  My daughter received an Easy Set Intex Pool from her Uncle and Aunt for Christmas and we could not wait to get the pool setup and operational.  My daughter’s 4th birthday this year will have a pool party theme, and the date for the party is quickly approaching.  My husband and I leveled out the ground in the area the pool would be placed.  We laid down a tarp and spread the pool out.  These inflatable Easy Set’s are great starter pools, and in our case the simpler the better since this is our first attempt at putting up a pool.

20150523_141004

We inflated the ring with a pump, and from the inside smoothed out the lining.  It took all day to fill.  The next day, we hooked up the filter, placed chlorine tabs in the floater, and assembled the ladder.  The water was very cold, so I hopped in to the pool for a test run.  For the most part everything went great and the set up was easy.  I was disappointed to find some parts in the lining that were not as smooth as we had wanted.  I can’t stress enough the importance of making sure the ground is clear of any debris and level.  Even after all our careful work, what seemed smooth at the surface was not always the case.  Once the weight of the water pressed the ground flat, some rocks and roots underground seemed to appear out of nowhere through the lining.  That being said the only way to remedy this would be to drain the pool and remove the debris from the area to smooth it out.  Until it is necessary to do so, we are going to take our chances.  I would feel guilty wasting all that water!  Luckily the pool came with plenty of patches if needed.

20150524_131400[1]

We purchased a few fun summer signs from Dollar Tree and lined the fence with them for added decoration.

I  also accomplished a few smaller projects.  I had a decorative metal star that I picked up at Christmas Tree Shop.  It was on clearance and I was never happy with the tan color.  I surmised that this was most likely the reason why it was on clearance.

20141108_172420[1]

Since it was Memorial day and the house was decorated in Americana….

20150509_132943-1[1]

I had some extra Rust-Oleum red spray paint, and I sprayed on a quick coat.  I like the star better now that it is red and I purchased it for half the price!

20141108_201050[1]

The other area I wanted to address was the corner of the yard by the pool. There is a rather large tree stump in this area.  Some time ago, I blogged about ideas here.

I struggled with what to do with this stump for some time.  This weekend that changed.  I decided to make it a fun project for my daughter and I to do together.  I had an old broken wooden TV tray.  I removed the table top from the legs and screwed it on to the tree stump surface.  My neighbor had given me some decorative, shells, glass pebbles and decorative rock. I thought it would be fun for us to create a mosaic table top for it.  I used some old tile grout and glue in one and spread it onto the table surface evenly.  The toddler apprentice and I then applied the rocks and glass pebbles.  We wiped off any excess grout and allowed it to dry overnight.  I used the unused legs of the TV tray as a garden trellis, another great re-purpose!  My goal was to use as much of the table as possible. Mission accomplished!

20150525_172623[1]

I placed the shells around for decoration.   Now Mommy has a place to put “her” sippy cup and relax by the pool, while my daughter has fun exploring and playing with the various sea shells.

20150525_173659[1]

20150525_172714[1]

Since this spring has been a bit sparse in the rain department, our grass took a hit and much of it died.  Once all the yard work was done, we raked the yard and spread out grass seed in the hopes of bringing our lawn back to life!  Once the grass grows under our feet, our little backyard oasis will be complete!

What do you have planned for your backyard oasis?  Do you have any summer projects you are eager to complete?  How do you like to kick off summer?

Sultans of Swap: Flea Market Fun In The Sun

This past Saturday, I had the opportunity to participate in my first ever Flea Market.  The sale of spaces benefited my daughter’s school, so of course I jumped at the chance to get involved.  I was a bit nervous.  It was the first time I have attempted to sell my projects.  I also had some additional spring cleaning items to sell as well and anything I can do to create additional space in my overloaded craft room is a definite plus.

Let me start off by saying, I have been to a lot of swap meets, yard sales and flea markets as a buyer, but never as a seller.  It is hard work preparing, pricing and hauling your goods to the sale location.  I have a new respect for those who can make a living at it and participate in sales on a regular basis.

I am in no way an expert at this, but I thought I would share with you all what I learned from this experience.

So, How did the modern flea market get its name?

The first flea markets were in Paris and they were called marché aux puces which translates to ‘market with fleas’. Flea market first appeared in English in 1922 as a translation of the French market’s name.

When Preparing, Take Care of as much as you can the night before

Since most flea markets start bright and early, and I am a night owl by nature,  I loaded the car and any other items needed for my sale the previous night.  This allowed me to get a good night sleep and wake up and leave the next day without scrambling at the last-minute.

Show up on time or early for set up

This was the fun part.  Setting it all up so it is pleasing to the eye.  Leave yourself enough time so as to not feel rushed.

20150502_080200

Mark all prices clearly and have a backup plan

I devised a color coding system.  Also when marking your prices, keep a mental note of how low you are willing to go with price.  I marked my prices a little higher so that I had some “wiggle” room.

Plan for a long day in the hot sun

If you have a canopy or beach umbrella, it is a good idea to bring it.  Make sure to bring plenty of sun block, dress accordingly (avoid dark colors that attract the sun) Wear a hat and sunglasses and bring plenty of fluids and a snack.

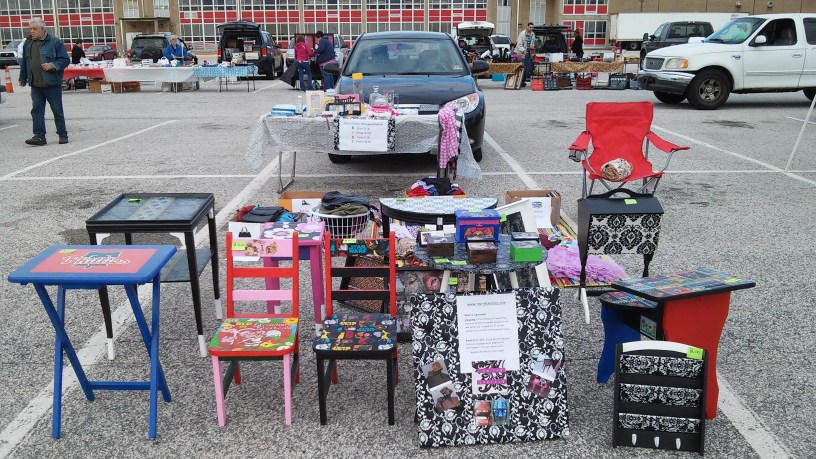
Bring tables or other items to properly display your merchandise

I found that items more visible, and that didn’t require a lot of effort to look through sold better.  A clothes rack, table or even a sheet or mat placed on the ground is essential when displaying your items.  If people have too put a lot of effort in they will move on quickly to a competitor’s table.

20150502_080152

Don’t Just Sit There… Get up and Sell!!

I found I gained more interest in my items when I talked to people and said “Hi”  Sitting their idle watching people come and go doesn’t sell stuff, but being a social butterfly DOES even when the turn out is low.

Talk about what you do and PROMOTE

I created plenty of business cards, and even sign explaining what Upcycling is.  People’s curiosity would get the better of them and they would stop to read the sign.  It was a great conversation starter!

20150502_075927

Bring Singles and 5 dollar bills to make change and wear a fanny pack!

I brought about $40 dollars in cash.  I used 25 singles and four 5 dollar bills and found this to be enough to make change.  It is better to wear a fanny pack or apron to keep change, pens and tape in.  Leaving money unsupervised in a box even for a minute, creates a potential for theft.

Make Friends and Connections!

Even though the turn out was less than spectacular, I still managed to socialize with other vendors and make personal connections.  I met a really nice woman who runs a local consignment shop, and my flea market neighbor and I helped each other when the other had to take a bathroom break.  The nice lady next to me even helped complete a sale while I walked away for a moment!

20150502_081633

Oh and Don’t Forget to take a Flea Market Selfie!

What are you doing to prepare for this Flea Market Season? Do you have any tips for sellers not mentioned here?  Do you have willpower when it comes to buying things at a flea market when you are there to sell?

Crazy for Corduroy: Girls Flower Power Decoupage Side Table

It has been a very hectic week in the “On The Upcycle” household.  I have been working late into the night to prepare for my first flea market this Saturday.  I am happy to report, that my crafting area is looking more like a usable work space, and less like a storage closet!  My hope is clearing out some older items will make way for new projects.

I have also been working on a few projects specifically to use in the sale.  I picked up this nice, wooden side table at Goodwill for a couple of dollars.

20150419_200300

The original idea, was to use a black and white scarf I had for the decoupage and then paint the table with neutral colors.  It is amazing how quickly a plan can change!  I used a white, spray on primer to prepare the table.  I applied the scarf and instantly was not all that impressed with the result.  Scarves can be tricky because the fabric is very thin, and once it is glued to the table top, it has a tendency to show any imperfections on the wood underneath.  That is exactly what happened in this case.  Once the Mod Podge was dry, I removed the fabric and decided to start over.  Then it hit me:  I had this great flower power corduroy fabric from an old dress that looked very cute on my daughter but no longer fit her.  I saved it in the hopes that I would find a use for it someday.  That time was now!

20150421_175548

I cut the fabric and measured out a large enough piece to cover the top of the table.  I applied a generous amount of Mod Podge to the table surface.  The general rule is the thicker the material the more Mod Podge you will need to use to achieve the desired effect.

20150421_180715

Once the glue was dry, I hand painted the table with pink, purple and white acrylic paint.  This was turning out to be a much different table then I had originally anticipated.  After a few more coats of paint,  I added generous amounts of Mod Podge to the table top to seal the fabric.  I repeated this process three times allowing it to dry between coats. I also applied Mod Podge to the painted surfaces, to seal the entire piece.

20150421_195011

Once dry, I trimmed off the excess fabric on the edges and applied more Mod Podge to seal those edges.

20150422_074658

This is a side table with a lot of flower power and 1960’s appeal.  I am hoping this table makes some little girl very happy!  It will be just one of the items for sale this weekend.  I also loved working with corduroy!  Because of the thickness of the fabric, I was unsure as to how it would turn out and was more than pleased with the end result!

Before:

2015-04-28 (1)

After:

Materials Used:

Old kids Garment

Mod Podge

Spray or brush on white primer

Acrylic Paint

Paint Brushes (Various sizes)

Scissors and Box Cutter knife (to trim edges)

Two Years, One Sale- On The Upcycle

This April 27th 2015 marks the two-year anniversary of this blog and my creative mission to reuse, re-purpose and restyle.

2-years-old

For me, Upcycling is all about having fun and being creative with items that would otherwise be discarded.  The biggest challenge for me has been the writing. I love to craft, but I struggle with writer’s block from time to time.  The ideas for projects often come but the words to adequately describe them do not. Although I am not blogging with quite the same frequency as I once was, I am still happy that I was able to continue and complete a few larger and more challenging projects this past year, like my Lane Cedar Hope Chest. After two years of creating I am inevitably left with too many items and not enough room to keep them all. I was excited to hear that my daughter’s school is sponsoring a flea market in early May.  This seemed like a great oppurtunity to have my first “flea market experience.” I have never tried to sell my projects before, so this is a huge first step for me.  What better way to re-energize and make room for new projects?

It’s spring cleaning time for On The Upcycle. That being said, it’s also a fun time to squeeze in a few smaller projects in the days leading up to the sale.

I love wooden boxes and picked this one up for 99 cents at Goodwill.  I didn’t care for the boxes original design, but the box itself was in great shape.

20150419_201455[1]

I used a spray on white primer to properly cover the previous design on the box.

20150419_212220[1]

I had a nice celestial print.  I have been in a colorful mood lately and wanted to utilize a design with a lot of color

20150419_212452[1]

I applied Mod Podge with a brush, and placed the print on the box top and front.

20150419_212639[1]

I painted the box blue and pink to match colors contained within the print

20150420_212842[1]

This whimsical celestial themed box is one of the items crafted specifically for the sale.

20150420_212650[1]

Here are a few photo’s of previous projects I have agreed to part with for the upcoming sale:

Peacock Table
peacock table before and after

Star Wars Kid Chair:

Star Wars Themed Fabric Decoupage Chair

Strawberry Shortcake Kids Chair:

Upcycled Strawberry Shortcake Kids Record Chair

Kids School Desk:
Upcycled Kids School Desk

Happy Earth day to all of my friends!! How are you celebrating today? Do any of you have experience with Flea Market sales? I would love to hear from you! Any tricks of the trade or friendly advice?

On The Upcycle Revival: Vintage 1934 Lane Waterfall Art Deco Hope Chest

Every once in a while that special piece of furniture falls into your lap unexpectedly and without warning.  Now that the word is out and friends and family are aware of my blog, I have had interesting items rescued and brought to me to experiment on.  That was the case with this next project which also proved to be my most challenging yet. The same friend and co-worker who brought me my “You had me at half table” project approached me about a cedar chest she had sitting in her garage.  She needed to make room and could no longer keep it, and wanted to know if I would be interested in giving it a good home, and taking it off her hands. The outside of the chest was in rough shape, but the inside was still perfect.  After all these years, it managed to maintain its trademark cedar smell.  She inherited the hope chest from a neighbor who was about to place it out on the curbside. My friend rescued it, recognizing this diamond in the rough deserved a second chance at life. Adding to the excitement was the fact that I had always wanted a hope chest of my own.  I didn’t mind having to put some work into restoring one, and I graciously accepted the offer.  I was really excited and looking forward to working on a special piece like this.   Initially I was concerned about transport, but I was relieved when it fit in the backseat of my car.  I already had a spot for it in my bedroom. It seemed like it was fate.  For a while,  it sat untouched and the veneer began to peel, and I peeled it off little by little, while I figured out a plan to bring it back to life.

DSC_1002

I began researching the piece online. I opened the trunk and inside I found a card outlining the moth insurance policy.  The card also encouraged it’s customers to “buy victory war bonds.”  I knew from that moment on this was a vintage piece.

lane 2Lane Card

The tag also listed the maker of the piece.  The Lane Company Altavista, VA.  The name was also burned into the inside of the lid.

DSC_1058

Founded in 1912 by John and Ed Lane, The Lane Company of Virginia, became one of the leading makers of Hope chests in the United States during World War I and World War II.  During that time, it was tradition for young girls to have a hope chest to bring with them into a marriage.  The company launched a massive ad campaign which even included child star Shirley Temple  as a popular spokesperson for the company.

20c67b90a939d58165359ab106c7e366

Every piece was stamped with a unique serial number and style number. Reversing the serial numbers is what helped me determine its age. This one was manufactured on 8/18/1934.  The chest was waterfall design done in an art deco style which was also popular during this time.

The chest itself was in good shape, but the veneer was not.  It was stored in a damp place for a long time,  and much of it was peeling or bubbling up. I knew removing this would take a lot of work.  I also discovered that the original lock had been recalled. Sadly there have been cases of children suffocating inside after becoming trapped as recently as 2014. The good news is Lane still has replacement locks available on their website.  Due to safety concerns, I went online to order one here.  The lock ships in 4-6 weeks.  It is important when purchasing vintage furniture to pay attention to recalls.  I was glad to have stumbled upon this fact during my research by pure accident.

With minor cracks in veneer, it is possible to buy wood filler/puddy and “patch” and sand the areas, but in this case the veneer would have to be removed entirely in some areas. I read a few articles online, and I tried various techniques for easily removing veneer.  Let me start off by saying there is no easy way to remove veneer. I found it to be a long, risky and tedious task.  The one technique  that worked best was using a hot iron and a damp towel. I soaked the towel in warm water and placed it on the area of veneer I wanted to remove.

DSC_1004

I then heated up the iron and placed it on the area allowing it to sit for several minutes.  This softened the glue enough to allow me to use a scraper to remove large pieces of the veneer.  unfortunately, smaller pieces broke off and I ended up repeating this process many times.  The biggest challenge was scraping and removing the veneer without damaging the wood underneath.

DSC_1000

Please also note that once you use your iron for this task, it becomes designated only for this task.  The glue from the veneer burns the iron permanently and it can never be used to iron clothing again. This process was completed during the course of a few days.  I would work on a small area nightly.  The veneer removal seemed to be taking forever until it was boosted by a snow day and some unexpected free time.

20150305_222555

I used a belt sander to even out the larger areas and hand sanded the more delicate and smaller areas. The areas on the piece that still had veneer I carefully hand sanded.  Using a belt sander can cause damage to the veneer.  Once the sanding was completed, The piece was ready to stain and seal.

20150305_225309-1

20150305_175139

I trudged up to Home Depot in the snowy slush and shopped for a suitable stain and polyurethane seal for the exterior.  The colors that I initially wanted they did not seem to have in stock.  This did not make the aisle look any less intimidating to me.

20150306_093046

I decided on a color called “Cognac” and a clear semi-gloss polyurethane sealer.  I already had a small can of Minwax Jacobean at home that I was planning on using for some of the trim.

20150306_112823

I began applying the stain and it was a little darker than I expected, but it closely matched our bedroom furniture like I had hoped.

20150306_113835

I then painted the entire piece.  I was happy with the Varathane brand stains as it dried quickly and had less odor compared to other stains I have used in the past.

20150306_124502-1

I  used the Jacobean colored stain to paint the trim and highlight the grooves and detail in the lighter wood trim.  To me adding the darker color helped bring out some of the unique design qualities of the piece.  It took about two coats of stain to cover all the areas.  Once the stain was dry (It took about 24 hrs) I applied two coats of the clear semi gloss polyurethane to seal the chest.

DSC_1061

Although I could not restore the chest to its original state, I am pleased with how elegant the piece looks now.  It fits in beautifully in our bedroom and I look forward to storing special items inside it and treasuring it for years to come.

DSC_1060

Before and After

1934 Lane Hope Chest Before and After

Materials used:

Old Iron

Old Towel

Paint Scraper

Paint Brush Large and Small (for detail)

Wood Stain (color of choice) and Polyurethane Sealer

Sand Paper

Belt Sander (Optional)

A Pre-Christmas Miracle: Altered Upcycling’s Holiday Giveaway!

I couldn’t wait to share the news with all of you! The very talented Mahe Zehra Husain (MZ) from Altered Upcycling fame is at it again!  This year she is organizing the biggest holiday giveaway EVER! From the 15th of November to the 25th of December.  Altered Upcycling is giving away different e-books and products weekly.  All you have to do is visit: http://www.alteredupcycling.com/christmas-giveaway join Altered Upcycling’s Facebook Page and sign up on the right to have the links sent to your inbox.  It’s that simple!

1451464_674360959264580_1206827235_n

The Green Craft Lifestyle Christmas Addition available November 15th through the 21st of November features an “On The Upcycle” Project Pickled Lamp: “On The Upcycle” Christmas Craft

DSC_1088

Other Freebies include:

ALICE IN WONDERLAND DIGITAL DIORAMA KIT
THE MIXED MEDIA COOKBOOK
PAPER DOLL BONANZA
PLANNERS

Be sure and check it out!  I can’t think of a better way to treat yourself for the holidays!

Notre Dame Fighting Irish Decoupage College Football Chair

This Saturday, two impressive college football teams will square off in what proves to be an epic battle.  # 2 Florida State is favored over the 6-0 5th ranked Notre Dame.  The Fighting Irish are clear underdogs in this matchup, and the history behind these two teams and prior matchups, seem to support this fact.  Looking for the upset, Notre Dame coach Brian Kelly will surly be put to the test.  They will need to play their best football yet. They will need to…..

Play_like_a_champion_sign

My husband grew up watching Notre Dame and rooting for the Irish along with his father.  Like many teams Notre Dame has had its share of ups and downs through the years, but despite this my father in law’s love for his Irish never waned. Every game win or lose.. it didn’t matter, It was a celebration. It was Notre Dame Saturday!  If you root for and follow a team you know that it becomes a part of your life and present during many important memories.  My husband and I often think of our father fondly, and though he passed many years ago, Watching the games and following his favorite team brings us closer to him.  I wanted to make my husband a special gift, and it never seemed like a better time than for one of their biggest games. I picked up a lovely solid maple ladder back chair at Goodwill that had seen better days.  It was priced under five dollars, and I was drawn to its design immediately.  The chair has a stamp from a furniture company under the seat: Louis Albert and Company, Philadelphia PA.

Thrift Store Ladder Back Maple Chair

It seemed the perfect project chair, and with that the Fighting Irish Notre Dame chair, was born.  If you have followed my blog, you know I have a special place in my crafty heart for chairs.  I am drawn to functional pieces of art and to me a chair embodies both these elements nicely.  I printed out the college decal of choice on my printer. I then cleaned and prepped the chair with a white spray on primer.

Primed Chair

I applied Mod Podge to the seat with a foam craft brush.  I then added the print, gently smoothing out any air bubbles with my hands.

Apply Mod Podge

DSC_0827

I added a thin layer of Mod Podge over the top of the print to seal it.  Once dry, I began the lengthy process of painting the chair.  I used the team colors, gold, blue and green for the color scheme.  It took several coats to obtain proper coverage.  I carefully painted the area around the image, and although time-consuming, it made the image appear to flow with the seat. Because of the small areas, I decided to paint rather than to cut the image out.  Adding Mod Podge before painting the paper prevented damage and curling.  Two coats of Mod Podge over the painted area, properly sealed it. I decided to give the feet of the chair some character by adding the gold dipped legs. Once the paint was dry over the span of about two nights, I covered the entire chair in Mod Podge to seal the acrylic paint.

Decoupage Notre Dame Fighting Irish College Sports Chair

Notre Dame College Football Chair

Now my husband has a special chair to sit upon and watch the game this weekend.  Another Notre Dame Saturday of family memories with our own daughter, and a Fighting Irish college football chair to enjoy for many years and games to come!

notre dame chair

Before and After:

before after

Not a fan of the Irish?  Make your own college football chair:

Materials:

Decal or Team Print Of Choice

Old Wooden Chair

White Spray On Primer

Mod Podge

Acrylic Paint (Team Colors of Choice)

Craft Brush, Paint Brushes

Scissors