From “Odd To Mod” Upcycled Thrift Store Mystery Wall Hanging

Recently, I have made quite a few thrift store walk throughs, without finding much of anything to stimulate my creativity.  My pockets are lighter, and even the amount of freebie finds have dwindled. Sure, my attic is filled with items all screaming “Repurpose me, me, meee!”, but our attic is a bit of an organizational nightmare I can’t seem to wake up from, not to mention it is unheated and freezing cold up there! When I go up there, I have to bundle up like I am going for a mile walk across the tundra!  I also feel the secret is out now and when I pull up to the Goodwill store, I am lucky if I can find a parking space!

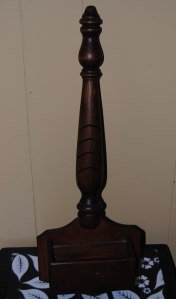
Despite this, I always take a look for those unique items you can only find in a second-hand store and yard sales. Part of the fun is the thrill of the hunt, and coming up empty-handed is a part of it.   I am always interested in quirky little items even if I am not sure what its original use was.  My husband and the toddler apprentice were out with me one Saturday, and we couldn’t find much, but did spot this unique wooden wall hanging with a bit of storage.  It definitely screamed late 70’s early 80’s to me, and I thought it would look cute in our kitchen.

thrift store wooden wall storage thing

I wanted to re-style it to be more vibrant and colorful.  I thoroughly cleaned the piece with a damp cloth.  I had some leftover red spray paint from a previous project and decided to use it to brighten up the piece.  I took it outside and sprayed it red.

Spray painted piece

This particular spray paint required about 9-24 hours to completely dry.  Once it was dry enough for me to pick up, I brought it inside to my craft room and allowed it to dry in front of the fan.  Later in the evening the piece seemed dry enough, so I placed the front of the piece down upon the back of the fabric to trace it with a fine tipped black marker.  Probably better if I had traced the object on to the fabric before it was painted, but I was lucky and none of the marker made its way on the painted area.  I then applied Mod Podge with a foam craft brush on the front.

Apply Mod Podge

I then applied the cut fabric and smoothed it carefully out with my hands.  I picked a fun Mod fabric with a lot of bright colors.

Apply Fabric

I applied Mod Podge over the fabric and allowed it to dry overnight.  The next morning it was ready to hang.  I love the bright colors which go along perfectly in our yellow kitchen. Now, I just have to decide what I will use it for.  I am leaning toward a salt and pepper holder.

Upcycled Kitchen Wall Hanging and Storage

Before and After: 

From Odd To Mod-Upcycled Thrift Store Wooden Wall Hanging Restyled with Mod Podge, Paint, and Fabric

“Me Want Cookie!!!” Cookie Monster Decoupage Cookie Jar

Family Proclamation: We really need a cookie jar!  Every time me or my husband open a bag of vanilla wafers for our little one, the bag rips and the box won’t stay closed. The cookies also don’t stay fresh for very long under these conditions.  Often times, I end up cramming all the cookies into one sandwich bag, not very attractive!  So, I just so happened to be in the thrift store last week, when I  came across a large glass jar with a lid for only $1.99!  This I thought to myself, would make a perfect cookie jar so into my cart it went.

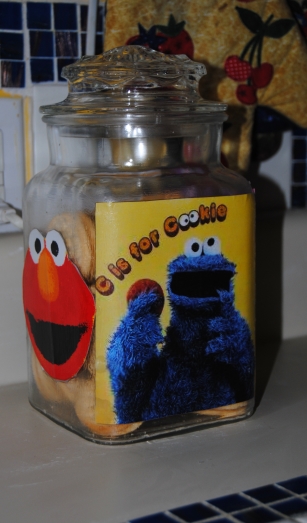
As most of my readers already know my daughter is a HUGE Sesame Street fan.  Her favorite doll is her Ernie doll which she carries with her everywhere she goes and takes with her to bed at night. Her other favorites are Elmo and Cookie Monster.  It just seemed like a no brainer that a Cookie Monster/Sesame Street Cookie Jar was in order.  I printed out 5×7 Cookie Monster image from online, and for the sides of the jar I decided to recycle an old Sesame Street Birthday Party Decoration.

Materials:ImageImage

I cut out all of the images I wanted to decoupage to the jar.  The birthday decorations were a bit larger than needed so I carefully trimmed them up so they would fit. The great thing about using the birthday decorations you ask?  They are double-sided and reflected the same image on the inside of the  jar as well as the outside-Awesome.

Image

Next step was to  apply the Mod Podge with a medium-sized artist’s brush.  I carefully glued the images on the glass.  I did this slowly, smoothing out the paper with my hand as to capture as little air between the paper and the glass as possible. Once dry, I applied two coats of Mod Podge over each image to seal it permanently to the glass.

Now, we have a fun and decorative place to keep our cookies fresh without dealing with those frustrating bags!

Image

Image

Repurposing Glass Bottles: Celestial Dish Soap Dispenser

While at the new Joann Fabric Store the other day, I found this great little glass bottle with a liquid dispenser top.  It was a bargain at only .99 cents!  Seeing the dispenser, reminded me of a wine bottle re-purpose I saw on Pinterest from the  Mom 4 Real Blog.  It took a wine bottle and restyled it into a liquid dish soap dispenser.  I thought this was pure genius and it looked great!  The only problem for  me was counter top space, so rather than use a wine bottle for my attempt at the project, I decided to use this smaller square glass bottle. A simple decoupage restyle was in order! I gathered up the items I would need to make this project happen.  I decided to go with a celestial themed print I loved, and it matched the colors in my kitchen perfectly!

Image

I decided to use Outdoor Mod Podge for this project.  My reasoning behind this was the close proximity  this bottle would be to the sink.  I thought it might hold up better with the added protection.  I simply printed the image, cut it out, and glued it to the glass with the Mod Podge.  Once dry, I then added 2 more coats over the image to seal it.  I believe the liquid/stopper/dispensers are sold separately so any glass bottle in which one of these stoppers would fit the opening would work for this project, a wine bottle is a fine example of that. I posted a photo below of the finished product.  This was an easy project and I am loving the whimsical celestial imagery!

Image

Breaking Bread: Decoupage Bread Box Restyle

Decoupage Bread Box

When I was growing up, the one thing I remember we always had in our house was a bread box. So, naturally, when I moved out and acquired a home of my own, I immediatly bought this breadbox. Yes, this ACTUAL bread box! That would make this breadbox over 18 years-old! As far as bread boxes go it was typical, a wooden box and that was it.  No color, no style.  For years I thought of doing away with a bread box all together.  It took up a lot of counter space and it was nothing special, but where would I put the bread? When I started experimenting with Mod Podge and decoupage, This bread box was on my to do list.  Many projects have come and gone and it was finally time to decoupage the box!

This project was not as easy as it looks.  First, I measured the scrapbook paper I wanted to decoupage to the door,  I only had one piece in this style and in order to make it work, I had to trim, line up the design,  and fit it together in a few spots.  After the bread box  was cleaned, and primed, I glued the paper down with Mod Podge, and let dry.  I then painted most of the Bread box blue with acrylic paint and let it dry.  Next challenge was the number of coats of paint!  Cleaning it only helped so much after many years in the kitchen there was still a bit of grease on it.  I applied as many coats as it needed about 4 in all.Once the entire piece was dry, I applied the Mod Podge Matte to seal it.  I find the more layers of Mod Podge the better.  Yet another challenge was the door and not leaving enough room between the paper and the opening.  I had to carefully trim this with an X Acto knife.  Despite all this, I am glad this project is finally finished and the bread has a restyled box to call home

Decoupage Bread Box Mod Podge

Retro Monday-Craft an EAT sign for the kitchen

Retro Style EAT sign

I am definitely what you would call “old school”.   I love retro, and throwback items.  I always say to my husband that if I ever won the lottery I would buy an old Victorian house and fix it up instead of buying a brand spanking new mansion!

One of those throwback items I have seen all over the internet are the “Eat” signs.  These signs were popular beginning in the 1930’s and continued being used into the 1950’s.  Many of these signs were posted along the famous Route 66 advertising popular diners along the route.  I just think they are cute and thought the iconic letters would look nice in our kitchen.  I purchased the wooden letters from Michael’s.  I went to several different craft stores to find the letters.  A little frustrating because none of the stores had all three letters I needed!  Once I purchased the letters I simply painted them using acrylics.  You can also decoupage the letters if painting them is simply too boring for you.  I was looking for the simple red and blue letters.  I wanted them to “pop” in our bright yellow kitchen.  I thought it would be cute to add the napkin with the fork and spoon.  I used an old placemat and my upholstery stapler and stapled the material to the wall.  The hardest part was hanging the letters!  I have a level, but was still having difficulty.  Not sure they are completely straight but I can live with it!

Materials used:

Wooden Letters

Acrylic Paint

Old Kitchen Placemat

Upholstery staple

Old Fork and Spoon.

Adding a little Spice in the Kitchen~Skinny kitchen cabinet decoupage Re-do

This is a little skinny kitchen cabinet I picked up through ABC Distributing.  It added much needed cabinet space in our kitchen.  I was never thrilled with the finish, but it functioned great as it does not take up much space in our kitchen.  I am not sure how she managed to do it, but my active little 2 year-old decided one day to do a little modification herself and ripped a huge piece off the side leaving it scarred.  It was very noticeable and I didn’t have the funds to go out and buy another cabinet.   So, I decided to re-style it.

Materials used:

Mod Podge Matte Finish

Electric Blue and Black Acrylic Paint

Scrapbook Paper

Sandpaper

ruler

My kitchen is a bright yellow and even though I originally wanted to paint it black, I was compelled to pick a color a bit out of the ordinary, so I decided to go with blue.  I thought it would really “pop” against the yellow walls.  I did a light sanding on it, and skipped the priming this time.  I painted the entire piece blue and let it dry.  I then outlined the door in black.  I  measured out the scrap paper, paying close attention to  line the flower pattern up as best I could.  I had to glue it in pieces, so by matching it up, it made the pattern seem more seamless.  I used the Mod Podge to glue down the scrapbook paper on the door surface and the top surface of the cabinet.  I let dry and then covered with three coats of  Mod Podge to seal the piece.  I like this piece because it is unique and it actually looks better in person than in the picture.  It is holding up well and so far appears to be toddler proof!

Skinny kitchen cabinet decoupage