Lighten Up: DIY Painted Fireplace Screen

Winter is quickly approaching, and now is the time to prepare and accomplish last-minute projects around the house before the frigid air takes hold. One such project on my fall to do list was preparing our fireplace for another possible harsh winter.

When my husband and I saw our house for the first time for me it was love at first sight, and this fireplace had me at “Hello.”  Some would, consider red brick outdated, but I loved its throwback flare and vowed never to change it. Fast forward years later, and my proclamation proved true. I managed to do absolutely nothing with the fireplace! We even had the same boring black fireplace screen we purchased at Target on clearance in 2007. The depth of our hearth made the unlit fireplace appear as if it were a “black hole.”  The dark screen blended in with the background and it’s vine detailing was lost in the fray.  As beautiful as the red brick was, it was missing something.  It is surprising that it took all this time to come to the realization that the fireplace needed some “pop”, after all it was the focal point of our living room.   Of course, a redo of the red brick was out of the question, so the hubby and I decided the screen needed a change. Instead of buying a new more exciting fireplace screen we vowed to do something to upcycle the old one!

Old Black Fireplace screen

I immediately took it outside and before I even bought the paint cleaned it thoroughly with the garden hose and allowed it to dry.  Since the screen would experience the extreme heat coming off the fireplace I decided to stop by Lowes and pick up 2 cans of white Rust-Oleum high heat paint.

High Heat Paint

According to the paint specs, it is intended for use in temperatures up to 1,200 degrees fahrenheit. The paint is also rust and corrosion resistant for durability.   I applied one can allowed it to dry overnight and then applied the other.  This DIY project is about as simple as it gets.  For me,  it made a dramatic difference. Painting the screen white, succesfully brought out the detail and added an extra dimension. Is their anything a fresh coat of paint can’t fix?

Repaint an old fireplace screen with high heat paint

The screen also went well with the neutral sandstone walls, and former upcycle project black and white damask chair which currently resides as extra seating in our living room.

Lighten up up your fireplace

A special thank you to Nikkimarie at My People in History.  She is a family historian and genealogy buff like me, and if you are a lover of history, family stories and vintage photo’s stop by her blog and say hello!  Thank you for nominating “On The Upcycle” for the One Lovely Blog Award, and a big thank you to all my readers for the continued support and encouragement!

Wanna see more white fireplace screens?  Click Here

Repurposed Decoupage Photograph Shadow Box

I was very excited recently, when I received my prize in the mail from Ray’s Sew Crafty‘s Labor day giveaway.  A lovely book filled with different designed scrapbook paper. I was eager to use this paper on a project and share it with all of you.  Once again I want to send a big thank you to Diana at Ray’s Sew Crafty. Be sure and stop by and check out her blog!

Labor Day Giveaway


I had a set of three different sized black shadow box shelves that I wasn’t sure what to do with.  I decided to repurpose the medium-sized shelf into a photo shadow box.  I gathered my materials:

Shelf

Scrapbook paper

Photo

Mod Podge/Foam craft brush

Hot Glue Gun

Black Fine Tipped Marker and Scissors

I traced the four sides of the shelf with a black marker.  I cut the tracings out with a pair of scissors and placed them aside.  I applied Mod Podge to the outside of the shelf with a foam brush, and carefully applied the scrapbook paper to the outside.  Once dry, I applied Mod Podge over the top of the paper to seal it.  I used the hot glue gun to carefully glue the photo to the back, leaving a small space at the top if I decided to hang it on the wall.

Photo Shadow Box


I wish the edges had come out better, as I accidentally touched them before they were dry! Overall I loved the project and what a wonderful way to display a favorite photograph!

Bringing the Fall Indoors

Tonight, In the spirit of Fall, I share with you a wonderful blog called Embrace My Space. Sara has a genuine talent for home decorating and I love her autumn decorations both inside and out!

embrace my space

LAST WEEK I gave you a glimpse of the outside of our home as we transition into the cooler months.

Embrace My Space: Fall Front Porch

Halloween soon will take over our household so I wanted to give you a peek of the fall decor I incorporated inside before it’s too late!  Essentially all of my indoor fall decorating happened in the living room since it’s the space where we spend the most time and the space guests see when they come to visit. Here’s what I did, along with a few tips for transitioning your living room into fall with minimal clean up when it comes time to break out the skulls, jack o’ lanterns and spider webs.

Change up the mantel.  Typically I display a combination of shells, sea glass and other natural elements on our mantel, but for fall it’s all about wheat, acorns and pumpkins!

Embrace My Space: Fall Mantel

Since our TV is above the mantel I try to keep the…

View original post 491 more words

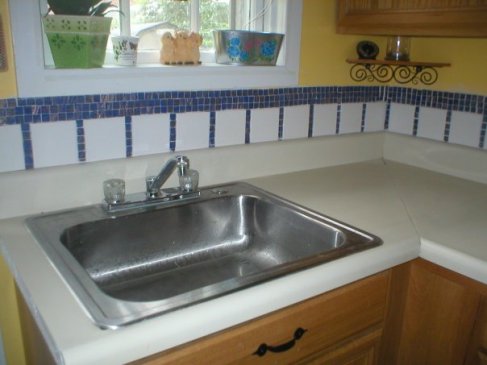
DIY Kitchen Sink Backsplash

Image

One day, my neighbor (gotta love him) offered me some free tiles.  He had just finished a project of his own and had extra tile he didn’t plan on using.  Of course I can never turn anything “free” down, so I happily accepted them and thanked him graciously.  Of course at the time, I had no idea what I was going to do with them.  I always wanted a kitchen backsplash, but I had never worked with tile before.  He had more faith I could do it than I had in myself.  He told me it was a relatively easy project to do.  My neighbor had suggested that I buy the adhesive and grout in one.  It worked out great and was simple to use.  The tiles my neighbor gifted to me were plain white.  I wanted to add more color, so I went to Home Depot, and purchased smaller blue mosaic tiles.  I laugh at this now, but I had no idea I could cut and glue and apply them on the mesh sheet they come on.  So, yes (are you ready to laugh at me and learn from my rookie mistake?)  I took every tile off and applied them individually!  This took forever and I wish I knew then what I knew now… It would have cut the project time in half!  It also would have been easier to measure and keep the tile from being applied crooked.  I had to fight to keep it straight.  You live and you learn!  I used a tiling trowel to spread out the grout adhesive.  I them applied the tiles.  I used the same mixture to grout the tiles and fill in the spaces in between.  Luckily, I didn’t need a tile cutter, which was a good thing, because I didn’t buy one!  Did it come out perfect? No, but it wasn’t terrible and gave me the confidence to try other things.  So I would say overall it was a success and cost under $50.00.

Since discovering Mod Podge I am thinking about decoupaging a few of the tiles to add more pop, but I just haven’t gotten around to it yet!  If I do, I will be sure and share.

Philadelphia Phillies Phanatic Painted Wall Mural

Before our daughter was born, my husband had the ultimate sports man room.  It was filled with sports memorabilia, and a fully stocked bar.  We hung out in there regularly  watched movies laughed and joked and even kicked back a few drinks.  Now, a new kind of laughter fills this room. It is no longer the ultimate man room, but it IS the ultimate little girl’s playroom.  My husband and I discussed doing something special in the family room for our daughter Erin. We both liked the nursery wall mural and how it turned out.   Sure, we could have decided on a mural of  princess’s and castles, but I wanted to do something different and also keep true to the original theme of  the room which was sports.  One of her favorite toys is her Phillie Phanatic Pillow Pet, which ultimately gave me the idea.  I also wanted to do something for the hubby.  He was more than happy to give up his room for his daughter, but I wanted to thank him too, after all he is a huge Phillies fan!

I searched the internet for a good example of a Phanatic image I wanted to use as a visual.  I often draw through visually studying a picture before I begin.  I usually use a pencil to outline where I am going to paint.  I found it easier this time to simply draw the lines with a fine brush and black paint onto the wall.  If I made a mistake, I used a magic eraser to wipe away the paint.  (Magic Eraser does not work on a flat painted wall) I thought it would be cute to have him holding a pennant with ” Go Erin” on it.  I used acrylic paints and applied about 3 coats total.    The mural measures a little over 5 feet tall.  Hopefully, it will be a good luck charm this season and beyond!

Some Phillie Phanatic trivia:

The Phanatic replaced “Philadelphia Phil” and “Philadelphia Phillis”, a pair of siblings dressed in 18th-century dress.

During the winter after the 1977 season, Dennis Lehman, thought that the team needed a mascot similar to San Diego’s Famous Chicken created the Phanatic with the help of Acme Mascots

The Phanatic debuted on April 25, 1978, at The Veterans Stadium, when the Phillies played the Chicago Cubs.

His mother, Phoebe Phanatic, occasionally appears with the Phanatic.

Phillie Phanatic Painted Wall Mural

Full lengths shot of Phillie Phanatic Wall mural