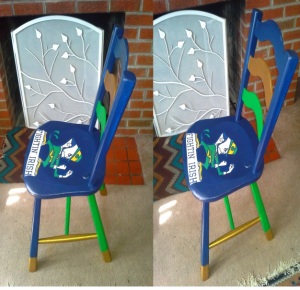
Notre Dame Fighting Irish Decoupage College Football Chair

This Saturday, two impressive college football teams will square off in what proves to be an epic battle.  # 2 Florida State is favored over the 6-0 5th ranked Notre Dame.  The Fighting Irish are clear underdogs in this matchup, and the history behind these two teams and prior matchups, seem to support this fact.  Looking for the upset, Notre Dame coach Brian Kelly will surly be put to the test.  They will need to play their best football yet. They will need to…..

Play_like_a_champion_sign

My husband grew up watching Notre Dame and rooting for the Irish along with his father.  Like many teams Notre Dame has had its share of ups and downs through the years, but despite this my father in law’s love for his Irish never waned. Every game win or lose.. it didn’t matter, It was a celebration. It was Notre Dame Saturday!  If you root for and follow a team you know that it becomes a part of your life and present during many important memories.  My husband and I often think of our father fondly, and though he passed many years ago, Watching the games and following his favorite team brings us closer to him.  I wanted to make my husband a special gift, and it never seemed like a better time than for one of their biggest games. I picked up a lovely solid maple ladder back chair at Goodwill that had seen better days.  It was priced under five dollars, and I was drawn to its design immediately.  The chair has a stamp from a furniture company under the seat: Louis Albert and Company, Philadelphia PA.

Thrift Store Ladder Back Maple Chair

It seemed the perfect project chair, and with that the Fighting Irish Notre Dame chair, was born.  If you have followed my blog, you know I have a special place in my crafty heart for chairs.  I am drawn to functional pieces of art and to me a chair embodies both these elements nicely.  I printed out the college decal of choice on my printer. I then cleaned and prepped the chair with a white spray on primer.

Primed Chair

I applied Mod Podge to the seat with a foam craft brush.  I then added the print, gently smoothing out any air bubbles with my hands.

Apply Mod Podge

DSC_0827

I added a thin layer of Mod Podge over the top of the print to seal it.  Once dry, I began the lengthy process of painting the chair.  I used the team colors, gold, blue and green for the color scheme.  It took several coats to obtain proper coverage.  I carefully painted the area around the image, and although time-consuming, it made the image appear to flow with the seat. Because of the small areas, I decided to paint rather than to cut the image out.  Adding Mod Podge before painting the paper prevented damage and curling.  Two coats of Mod Podge over the painted area, properly sealed it. I decided to give the feet of the chair some character by adding the gold dipped legs. Once the paint was dry over the span of about two nights, I covered the entire chair in Mod Podge to seal the acrylic paint.

Decoupage Notre Dame Fighting Irish College Sports Chair

Notre Dame College Football Chair

Now my husband has a special chair to sit upon and watch the game this weekend.  Another Notre Dame Saturday of family memories with our own daughter, and a Fighting Irish college football chair to enjoy for many years and games to come!

notre dame chair

Before and After:

before after

Not a fan of the Irish?  Make your own college football chair:

Materials:

Decal or Team Print Of Choice

Old Wooden Chair

White Spray On Primer

Mod Podge

Acrylic Paint (Team Colors of Choice)

Craft Brush, Paint Brushes

Scissors

Completely Stumped: Upcycled Tree Stump Ideas

Recently, my backyard neighbor approached me about cutting one of our trees down.  I have wonderful neighbors, and since it was her idea to remove the tree she also offered to pay for it.  She has a huge vegetable garden in the summer and the tree was a bit of a nuisance to her garden.  The tree was leaning and didn’t seem particularly healthy. Not to mention,  little saplings would appear everywhere in our yards and grew like weeds. Due to such factors, it seemed like a good idea to have it removed.  Unfortunately, we are now left with a bit of an ugly tree stump, and the guilt of removing a tree from nature, but the truth is our yards are too small and too close for such forestry.  I began doing research on ideas when it comes to upcycling tree stumps. I am still unsure as to what I am going to do with ours, but found some inventive ideas online I wanted to share.  After a long winter, it seems appropriate to welcome spring in such a way!

1. Interior Holic 

old-tree-stumps-in-garden

Who wouldn’t love a tree table!  Just one of many ideas on this site!  Tree stump natural flower planters, Tree stump side tables covered in polyurethane you name it this site has it!

2.  A Cultivated Nest

A DIY site dedicated to crafts is home to the unique idea of a tree stump chair!  I love this idea!  It not only recycles an old broken chair, but saves the old tree stump creating a unique piece of furniture in the process!

3. And… there is always HGTV ! Lets not forget our other backyard neighbors, birds!  This link will show you all the ways to greet and care for birds in a natural garden setting. This lovely idea uses a tree stump with a basin resting on top for a natural looking bird bath.

Bird Bath Tree Stump

Do you have any creative ways of  recycling tree stumps?  Are you as excited as I am to get outside and do a little spring cleanup?

Hello Kitty Themed Kids Surfboard Bench

It has been an especially harsh Northeast winter and many of my usual thrifting haunts have been light on stock especially when it comes to furniture pieces.  Despite this, I certainly don’t mind the thrill of the hunt. You never know when you will find something unique.  On such a trip, I came across an interesting kids bench (At least that’s what I think it was!) at a local Goodwill store.    It appeared to be a surfboard and the painted design was hideous!  Despite all of the negatives with this piece, I felt this would be a fun redesign, and I loved the detachable legs.  This feature made the legs easier to paint.  Nothing conjures up images of summer like a surfboard, and that is just the kind of project I needed!

DSC_0112

I cleaned the entire piece with a Magic Eraser. It had an unidentifiable sticky substance all over it and the Eraser worked well to remove it.  I used a white spray primer to cover the brightly colored design.  I was planning on using a fabric decoupage, but felt the bright colors may bleed through the fabric.  Using a primer first prevents this, and gives me a clean slate to work with.  Once the primer dried, I used a foam craft brush to apply Mod Podge to the bench surface.

DSC_0114

My daughter and I stopped by the craft store and I let her look through the aisle filled with different character fabrics.  She seemed to like this Hello Kitty print and I happily obliged, being a Ms. Hello Kitty fan myself. When I was young the local mall had a store called Sanrio and they sold Hello Kitty and all her “friends” merchandise. It was one of my favorite stores to visit in the mall.  I bought a half yard, and roughly traced the fabric to cover the table surface. Once the Mod Podge dries, any excess fabric left over around the edges and handles I trim with a box cutting knife.  The glue stiffens the fabric and makes it easier to cut.  I placed the fabric down on the Mod Podge soaked surface carefully smoothing out any wrinkles with my hands.

DSC_0115

I placed it aside to dry, eventually I would add a total of three full coats of Mod Podge on the fabric table surface.  I painted the legs with two coats of pink and white acrylic paint.  Once the legs were dry I covered them in a Mod Podge layer.   I then reassembled the table legs by screwing them easily back in to place.

DSC_0122

My daughter loves sitting on it.  It looks great in her room and it is a nice piece of kids furniture to use while helping her get dressed for her day.


Hello Kitty Girls Surfboard Bench

Before and After

Untitled


The Craft Must Go On: Upcycled Rock N’ Roll Bar Stool

A few months back, I came across a wooden bar stool at Goodwill for $5.99. I liked the size and design of the stool, and thought it would make a great decoupage piece.

DSC_0884

I decided to upcycle the stool with a Rock N’ Roll theme,  and since it was to be a gift for my husband, I chose the Irish Rock band Thin Lizzy as a subject. The band is one of our favorites and have a vast catalog of great music.  This initial vision took a back seat to the holidays, and various other projects. The idea seemed doomed afer one mishap after another involving this project.  I abused this stool, and used it to allow smaller painted projects to dry.  When I attempted to prime it, the spray can malfunctioned splattering the primer.  (I believe the can may have been too cold) After the bar stool was dry, I sanded off the “lumpy” paint by hand.  Creating yet more work for myself, while attempting to smooth out an air bubble on the initial decoupage print, I tore a hole in it and had to scrape it off only to start all over again.  Despite all of these blunders,  the project managed to come together.  Turns out I found a much nicer print, based on the album cover for “Nightlife” The print featured a black panther on the prowl like the one featured on the cover below.

Thin Lizzy Night Life

I painted the entire chair in black and red alternating the colors.  It took several coats to obtain good coverage.  Once dry I applied Mod Podge to the seat with a foam brush.  I carefully applied the printed logo and smoothed it out carefully with my hands doing my best to avoid tearing or wrinkling.  I painted the area not covered by the print red, creating a bull’s eye effect on the seat.  Once all the paint was dry, I used Mod Podge to cover the entire bar stool.

DSC_1581

Finally, my crafting nightmare showed some “Nightlife” after much adversity.  More importantly my husband seems happy with the result. Now we just need the bar..

Wanna see more chair restyles from “On The Upcycle?  Click Here

DSC_1583

For The Kid In All Of Us: Upcycled Justice League Of America Adult Fan Chair

Poor abused dinner table chair!  I managed to spill paint on it,  drip hot glue on it, and just made a general mess out of it.  It became a place to craft on with the intention that one day, I would give it a new life.  I have a set of four that belonged to the kitchen table we owned previously.  The table was broken, but we kept the chairs.  They are about as basic as it gets, similar to the one picture below.

Windsor ChairWhen I finished the Kids Justice League Of America Chair a few people including the hubby, suggested I create an adult version for all the “grown up” Justice League fans out there. This chair seemed like a good candidate for a super hero makeover.  The chair was heavily lacquered so a white latex primer was a must! Once primed, I trimmed and applied the print to the seat surface.  I found a great image featuring The Justice League Of America characters.  These characters had a more adult feel.  I used Mod Podge to adhere the image to the seat with a coat of Mod Podge applied over top to seal.  I then painted the entire chair with Red, White and Blue acrylic paint. This was the most labor intensive part of this project and required multiple applications of paint, but proved therapeutic after another stressful week.   I applied Mod Podge to the entire painted area of the chair to seal it.

Decoupage Justice League Chair

Super Hero Fan Chair

Upcycled Super Hero Chair

To make a “Super” Chair you will need:

Old chair

Comic book pages or printed image

Acrylic paint

White latex primer spray or brush on

brushes, scissors

Mod Podge

Super Hero Seat: Decoupage Justice League Of America Kids Chair

My husband and I are kids at heart, and when I told him my plans to creat a “super heroes” decoupage kids chair, he was excited to see the final result. After a trying week and a busy weekend, I figured it was a good idea to jump right back on the “crafting horse”, and keep the upcycle going.

I passed this chair up many times.  I stop by the Goodwill right down the street from our house periodically.  It is usually a quick walk through,  and this chair sat, un purchased through several of these “walk throughs”,  The chair was in very rough shape and was doused in a heavy lacquer finish, that I suspected, would not be easy to apply paint to. It is difficult for me to pass up kids furniture because I love it so much, so during this particular walk through with my daughter in tow, I finally decided to buy it.

Old Beat Up Kids Chair

First, I tightened the chair and legs,  and used sand paper to smooth any rough edges on the chair.  I cleaned it with a damp cloth to remove any dust and dirt, and boy this chair was very dirty!  Once that was done, I used a white, latex primer to paint the chair from top to bottom. This was essential and even with the chair’s lacquered finish, it covered nicely.

After the primed chair was completely dry,  I painted the chair with a red and blue color scheme to mimic the Justice League of America colors. The Justice league of America is great because it incorporates the best superhero characters from DC, Comics.

I applied Mod Podge to the chair seat with a large paint brush. I then placed the prints onto the chair seat, slowly smoothing it out with my hands to avoid wrinkles. I repeated the same process for the chair back,  I decoupaged the Justice League symbol and two additional characters I could not fit onto the chair seat, These characters were The flash and The Green Lantern. I cut them out with scissors and applied them so they would appear as though they were “leaping” off the chair seat.  I made three white, printer paper stars to add some “pop” to the top of the chair back.

I placed the chair in front of a stand up fan to dry.  The next day, I applied Mod Podge to the entire piece to seal it and repeated this process twice, allowing the chair to dry in between coats.

My husband loved how it turned out, and it was nice to complete a strictly “just for fun” project.  I hope you enjoy it too!

Justice League Of America Decoupage Kids Chair

Materials:

Kids Chair

Comic books,or Comic Prints

Mod Podge

Red and Blue Acrylic Paint

White Latex Primer

brushes, scissors, pen

sandpaper

A Piece Of Americana: Upcycled Windsor Back Chair

Since I began upcycling, crafting, and decoupaging, I have wanted to make an Americana art piece.  I was uncertain as to what the object would be.  I was waiting to see what life, or thrifting was going to place in my path.  Then one day, I spotted this chair in a Goodwill Store.  The chair needed a bit of TLC, and had some issues.  Most of the finish was worn off the chair, and the spindles and legs were loose.  The chair passed “the sit test” I sat on it and I didn’t end up on the floor! Nothing I thought a little love and wood glue wouldn’t fix. Despite it’s problems, I knew this chair was something special.  The chair displayed several design elements I found intriguing, and the chair style looked very “American” to me.  I will be honest, I  didn’t actually know anything about this chair, but I knew one thing- I liked it.

A woman behind me saw me looking at it ,and said “That’s a Windsor Back Chair.”  She was from New England and these chairs are popular in that area. Then she simply walked away.  She was eyeing it up, but I had a tight grip on it.  By now the chair was in my cart and rolling with me out of the store.  The chair cost $5.99, but for this I think I would have paid a little more, so it was a great deal!

Windsor Chair

When I got home, I did some research on the chair and It had several of the Windsor Chair Design elements.  I found this great website for a company that makes these chairs Gummel Chair works and they feature an interesting history of these Windsor Chairs Beginning with their origins during the reign of King George in England to the shores of New England and the Early American Colonies.  It also states it became “preferred” in some circles to paint these chairs to bring out their unique design qualities.   This made me feel better about painting the chair, and since I did not have the space to keep the chair out year round, I thought it would be a nice to showcase the chair during the patriotic holidays.  Having a reproduction in need of some work seemed exciting and the “perfect” Americana project candidate,  It also happened to come along at the perfect time.  The July 4th holiday was quickly approaching, and I had to submit an original project for the new Green Crafting Book The Green Crafts Lifestyle .

Materials Used:

Red, White and Blue Acrylic paint

Decal, Print, Patriotic decorations for decoupage

Foam Brush to apply Mod Podge

Paint Brushes of various sizes

Scissors

I cleaned the chair before I got started with a damp cloth.

I primed the chair with two coats of a white latex primer.

Chair Materials

I applied the Mod Podge with a foam brush to the seat surface generously.  I took the patriotic image I was using and carefully glued the image to the seat.  I used my hand to smooth out any wrinkles or air bubbles.  If you have one available, you can also use the rubber Mod Podge, or roller tool to do this as well. Once dry, I applied a layer of Mod Podge with a foam brush over the image to seal it.  Now it was time to paint the chair.  I used a red white and blue color scheme and continued the pattern featured on the patriotic image for the chair seat.  Once the visible parts of the chair were dry, I flipped the chair over and painted underneath.  I then cut out some small white stars I wanted to decoupage to the top of the chair to add some additional flare.  I applied Mod Podge to the top of the chair with a smaller paint brush and applied the stars to the chair.

Once the chair was dry, I carefully inspected the chair for any painted areas that needed touching up, and added additional paint needed to these areas.  I allowed the chair to dry thoroughly overnight in front of a stand up fan. The next day,  I applied 2 coats of Mod Podge over the entire piece using the foam brush for larger surfaces, and a smaller paint brush on the smaller areas and chair legs.

An Upcycled Windsor Chair draped in Americana Decoupage:

Patriotic Windsor Style Chair:

Before and After:

Patriotic decopage Painted chair before and after

It’s Sunday, Have a Seat: Upcycled, Hand Painted Decoupage Football Lover’s Chair

I can assure you this will not be the last chair upcycle you will see on this blog.  I have really grown fond of Upcycling old chairs.  Not only do they look great when finished, They are a manageable pieces of furniture that fit easily in my smaller car. (I dream of someday having a truck or van to go for the bigger pieces) They also tend to be priced right.  Many of them are chair orphans separated from their original set.  On this day of thrifty shopping I came across two chairs priced very reasonably at $5.99 each. My husband had suggested since the Sports Team TV Trays turned out great, to do a matching sports themed chair.  Of course me being me I said sure!  I had picked up a perfect X back chair that would work well  for this latest project.

First, I cleaned the chair removing any dust or dirt.  I then painted the entire chair with a white latex primer.  I applied two coats of primer total. This was important since I did not sand the chair and it had a bit of a lacquer finish.  The Latex primer helps the paint to adhere to the chair better.  While the chair dried I prepared The Philadelphia Eagles logo I had printed.  I cut out the image.  Once the seat was dry I used Mod Podge Matte to glue the decal to the seat carefully smoothing out any air bubbles. I then added a few layers of Mod Podge over top of the decal.  When you hand paint using brushes sometimes the paint will splatter.  Protect your decal by covering it with Mod Podge (Once dry any paint can be wiped away with a wet cloth.) Or cover it with a plastic shopping bag.

Image

Now it was time to paint the chair.  The Philadelphia Eagles colors are Hunter Green, Black and White and those are the colors I wanted to use for this chair. I used about 2 coats of Acrylic paint allowing to dry thoroughly between coats in front of a stand up fan.

The next day, I used the Mod Podge Matte to completely cover the chair to seal it to prevent chipping.  I covered the chair in 2 coats of Mod Podge and the seat received 4 coats. I always add a bit of extra protection in areas I know will get the most use.

Before and After:

Image

Recap of Materials Used:

Chair

Mod Podge Matte

Sponge Brush to apply Mod Podge

Print Sports Team Decal of your choice

Scissors

Acrylic Paint/Various sized brushes

Image

Sports ChairSports Fan Chair Made with Mod Podge-On The Upcycle

The Pillow Case Makeover: Upcycled, Pink and Brown Hand Painted Decoupage Chair

Image

I am always attracted furniture bargains.  On this day, as I often do, I took a quick look around the local Goodwill on my lunch break. It just so happened that all red tagged items were 50% off.  In the corner, toward the back of the store,  I noticed a wooden chair with a ladder back, red sticker taped on the front.  It was a little diamond in the rough.  I was surprised the original price was only $4.99, and with the discount this chair would only cost $2.50!  I had been wanting to try a full-sized chair project for a while, and this chair seemed like the perfect candidate.

It just so happened my sister had noticed some of my furniture projects the last time she was over the house. She asked me to make her something, but was not sure what she wanted.  When she saw this chair among the other furniture candidates, she thought perhaps I could design it based on her bedroom which is pink and brown.  It was then I came across a pink and brown flowered pillow case while looking through used textile bin and I thought it would be perfect for this project.  I texted her a picture of it to see if she liked it, and she did. I then began to plan…

Image

Fast forward to today…I went to JoAnn fabrics and bought some Apple Barrel Acrylic paint.  I matched the pink and brown pretty well against the pillow case.   The pink appears slightly darker in person than in the photos and matched it nicely.  My daughter managed to open one of the bottles of pink paint with the plastic still intact!  Thank goodness the store had wipes handy!  It was some sort of miracle she only managed to get it on her hands and avoided her clothes entirely!

When we got home, I put the princess down for a nap, and got to work.  I traced the chair seat onto the fabric with a black marker.  I carefully cut the tracing with a sharp pair of scissors.  I then applied Mod Podge, using a medium-sized paint brush to the seat.  I spread the fabric out over the seat stretching and smoothing out any creases with my hands.  Once dry, I applied another coat of Mod Podge over the top of the fabric.  While this dried, I used a white latex primer to paint the chair so that I could apply the acrylic paint onto a good base.    I then carefully hand painted the chair and used several coats until I achieved my desired result.

I sat the chair in front of a fan to dry and waited.  Once the paint was dry, I could apply the Mod Podge.  I  allowed it to dry between coats.  This chair needed about three coats over the entire piece to seal it.  I am hoping my sister likes the result!  I had seen the color dipped legs online, on other crafted chairs and I  love this design! I decided to incorporate it into this chair.  Now she has a stylish place to sit and read or put on a favorite pair of shoes, and it perfectly matches her bedroom decor!

$2.50 chair Before and after:

Image

Upcycled chair

Materials:

Wooden Chair

Pillow Case for decoupage

Mod Podge Matte Finish

Scissors/Fine Tipped Marker

Pink and Brown Acrylic Paint

Paint brushes various sizes

DSC_0555