On The Upcycle Revival: Vintage 1934 Lane Waterfall Art Deco Hope Chest

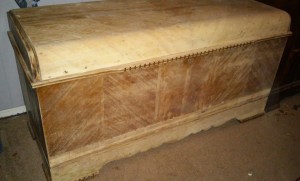
Every once in a while that special piece of furniture falls into your lap unexpectedly and without warning.  Now that the word is out and friends and family are aware of my blog, I have had interesting items rescued and brought to me to experiment on.  That was the case with this next project which also proved to be my most challenging yet. The same friend and co-worker who brought me my “You had me at half table” project approached me about a cedar chest she had sitting in her garage.  She needed to make room and could no longer keep it, and wanted to know if I would be interested in giving it a good home, and taking it off her hands. The outside of the chest was in rough shape, but the inside was still perfect.  After all these years, it managed to maintain its trademark cedar smell.  She inherited the hope chest from a neighbor who was about to place it out on the curbside. My friend rescued it, recognizing this diamond in the rough deserved a second chance at life. Adding to the excitement was the fact that I had always wanted a hope chest of my own.  I didn’t mind having to put some work into restoring one, and I graciously accepted the offer.  I was really excited and looking forward to working on a special piece like this.   Initially I was concerned about transport, but I was relieved when it fit in the backseat of my car.  I already had a spot for it in my bedroom. It seemed like it was fate.  For a while,  it sat untouched and the veneer began to peel, and I peeled it off little by little, while I figured out a plan to bring it back to life.

DSC_1002

I began researching the piece online. I opened the trunk and inside I found a card outlining the moth insurance policy.  The card also encouraged it’s customers to “buy victory war bonds.”  I knew from that moment on this was a vintage piece.

lane 2Lane Card

The tag also listed the maker of the piece.  The Lane Company Altavista, VA.  The name was also burned into the inside of the lid.

DSC_1058

Founded in 1912 by John and Ed Lane, The Lane Company of Virginia, became one of the leading makers of Hope chests in the United States during World War I and World War II.  During that time, it was tradition for young girls to have a hope chest to bring with them into a marriage.  The company launched a massive ad campaign which even included child star Shirley Temple  as a popular spokesperson for the company.

20c67b90a939d58165359ab106c7e366

Every piece was stamped with a unique serial number and style number. Reversing the serial numbers is what helped me determine its age. This one was manufactured on 8/18/1934.  The chest was waterfall design done in an art deco style which was also popular during this time.

The chest itself was in good shape, but the veneer was not.  It was stored in a damp place for a long time,  and much of it was peeling or bubbling up. I knew removing this would take a lot of work.  I also discovered that the original lock had been recalled. Sadly there have been cases of children suffocating inside after becoming trapped as recently as 2014. The good news is Lane still has replacement locks available on their website.  Due to safety concerns, I went online to order one here.  The lock ships in 4-6 weeks.  It is important when purchasing vintage furniture to pay attention to recalls.  I was glad to have stumbled upon this fact during my research by pure accident.

With minor cracks in veneer, it is possible to buy wood filler/puddy and “patch” and sand the areas, but in this case the veneer would have to be removed entirely in some areas. I read a few articles online, and I tried various techniques for easily removing veneer.  Let me start off by saying there is no easy way to remove veneer. I found it to be a long, risky and tedious task.  The one technique  that worked best was using a hot iron and a damp towel. I soaked the towel in warm water and placed it on the area of veneer I wanted to remove.

DSC_1004

I then heated up the iron and placed it on the area allowing it to sit for several minutes.  This softened the glue enough to allow me to use a scraper to remove large pieces of the veneer.  unfortunately, smaller pieces broke off and I ended up repeating this process many times.  The biggest challenge was scraping and removing the veneer without damaging the wood underneath.

DSC_1000

Please also note that once you use your iron for this task, it becomes designated only for this task.  The glue from the veneer burns the iron permanently and it can never be used to iron clothing again. This process was completed during the course of a few days.  I would work on a small area nightly.  The veneer removal seemed to be taking forever until it was boosted by a snow day and some unexpected free time.

20150305_222555

I used a belt sander to even out the larger areas and hand sanded the more delicate and smaller areas. The areas on the piece that still had veneer I carefully hand sanded.  Using a belt sander can cause damage to the veneer.  Once the sanding was completed, The piece was ready to stain and seal.

20150305_225309-1

20150305_175139

I trudged up to Home Depot in the snowy slush and shopped for a suitable stain and polyurethane seal for the exterior.  The colors that I initially wanted they did not seem to have in stock.  This did not make the aisle look any less intimidating to me.

20150306_093046

I decided on a color called “Cognac” and a clear semi-gloss polyurethane sealer.  I already had a small can of Minwax Jacobean at home that I was planning on using for some of the trim.

20150306_112823

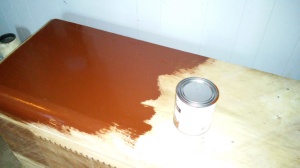
I began applying the stain and it was a little darker than I expected, but it closely matched our bedroom furniture like I had hoped.

20150306_113835

I then painted the entire piece.  I was happy with the Varathane brand stains as it dried quickly and had less odor compared to other stains I have used in the past.

20150306_124502-1

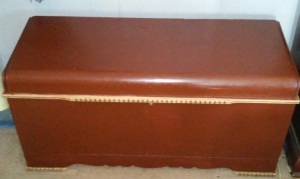
I  used the Jacobean colored stain to paint the trim and highlight the grooves and detail in the lighter wood trim.  To me adding the darker color helped bring out some of the unique design qualities of the piece.  It took about two coats of stain to cover all the areas.  Once the stain was dry (It took about 24 hrs) I applied two coats of the clear semi gloss polyurethane to seal the chest.

DSC_1061

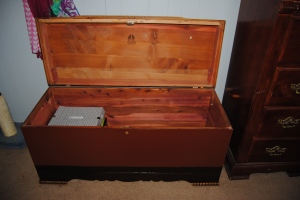
Although I could not restore the chest to its original state, I am pleased with how elegant the piece looks now.  It fits in beautifully in our bedroom and I look forward to storing special items inside it and treasuring it for years to come.

DSC_1060

Before and After

1934 Lane Hope Chest Before and After

Materials used:

Old Iron

Old Towel

Paint Scraper

Paint Brush Large and Small (for detail)

Wood Stain (color of choice) and Polyurethane Sealer

Sand Paper

Belt Sander (Optional)

Thrift Store Surprise: Vintage Wood Sewing Box Upcycle

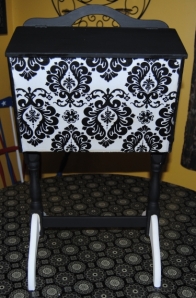
When I see something at a thrift shop that is unique and catches my attention, I will often purchase it even when I am unsure of what it is.  As was with the case of this little wooden box with legs. I imagined what it could have been used for. Perhaps it was intended to hold hats, gloves and scarves, or it simply sat by the door and was used to sort daily mail.  To me it didn’t matter, it was intriguing and best of all, priced right at $3.99!

DSC_0485

Sure, I had my smart phone handy, I could have googled the item and had my answer right away, but for some strange reason,  I didn’t.  I simply brought it home and stored it in my craft room.  It patiently waited its turn to learn its crafting fate until this weekend, I blew the dust off and decided to come up with a plan of attack.  I like to utilize materials I have handy as much as can. I tend to accumulate unused fabric scraps from previous projects and I prefer to use this fabric to the last thread.  One of my favorite designs was the black and white damask fabric I purchased at Joann Fabric.  I used this fabric on previous projects including The Broken Chair Challenge, and You had me at “Half Table” Yard Sale Rescue. I still had a rather large scrap piece left and decided to use it to upcycle this item.  I began by cleaning the item thoroughly.  Once the dust and dirt had been removed, I used a latex spray on primer and spray painted it white.

DSC_0496

I cut the fabric to fit both sides of the piece. I generously applied Mod Podge to the area with a foam craft brush.

DSC_0497

I then applied the fabric and repeated this step for both sides of the box.

DSC_0498

Once this dried, I applied three total coats of Mod Podge over top allowing each side to dry thoroughly between coats.

DSC_0499

I then painted the entire piece in a black and white scheme using acrylic paint.  The piece took about three coats of paint. I allowed the piece to dry over night and applied a final layer of Mod Podge to the entire piece to seal it.

DSC_0502

I am very happy with the final result;  However, I also want to share with you my mistake during this process.  Halfway through the project, I finally did what I should have done in the very beginning, research the piece online before you upcycle!  What you discover may alter your plans.  Granted in this case, I do not believe I would have done anything differently, but it really got me thinking about these pieces and how research plays an important, but often unspoken role in crafting.  A few pieces along the way, I decided to keep in their natural state, and some purists may have done the same in the case of this vintage box.  Turns out this little box with legs is a Priscilla style sewing box most likely from the depression era 1930’s to 1940’s. I saw a few online in various states, some painted and upcycled and others in their original condition range in price between $35 and $80 dollars on Etsy. My antique radar must have been working that day!  Despite having no clue about what this items’ purpose was I sensed it was something special.

What would you have done with this piece?  Have you ever had something special, but didn’t know it? Do you have crafting regrets? I would love to hear from you!

DSC_0509

Materials:

Vintage Sewing Box Stand

Fabric Of Choice

Mod Podge

Acrylic Paint/White Latex Primer

Scissors, Paint Brushes, Foam Craft Brush


More Brass in Pocket: Reuse Old Blue Jeans

I am hoping I am not the only one this has happened to.  You are at work walking around minding your own business, when someone whispers to you. “uhh you have a hole in your pants.” As embarrassing as it seems at first you are still thankful for this person telling you.  Unable to see it, you probably walked around all day like that, or even worse for weeks like that!

I wear my clothes until they are literally falling off my back.  Especially if I find clothes I like that I feel comfortable in (which for me is rare) I wish I was more of a fashionista.  I love fashion when it comes to others, but struggle when it comes to my wardrobe.

Since starting my upcycling mission I tend to think on the “green” side of things.  Before these jeans let me down in a big way, I loved them and the comfort they provided me.  Why not pay homage to them by allowing part of these pants to live on?  Why not turn my initial shame into a useful repurpose?

This is problematic when your weakest crafting skill is sewing.  So I decided to think simple.  I  repurposed the pockets. Separating them from the jeans was simple.  I used a pair of scissors to cut the thread connecting them to the jeans. These pockets when removed make stylish change purses and are great for storage of small electronics like USB storage devices.  The possibilities are endless!

IMG_20140312_202236

got storage anyone?

No worries my environmentally friendly crafters! Despite my shortcomings as a tailor I saved the left over denim.  Learning to properly sew is on my bucket list, so I am hoping this denim will come in handy in the future!

Can You Spare A Square? Repurposed Toilet Paper Roll.

Ok, so we have all been there.  Through the years, I have learned to look before I leap.  I always check the bathroom stall before I get down to business and make sure the toilet paper roll is full. I considered myself lucky on this day.  When I walked in the stall, I noticed right away all these empty cardboard toilet paper rolls. I did not spot any TP, so I moved on to the next stall, but I couldn’t get those cardboard rolls out of my mind. These rolls are larger than average and are made from a thick cardboard.  It got me thinking, these cardboard rolls could be useful and had repurpose potential.  I took one of them home as an experiment.

I am still in the process of organizing my craft space, and  I thought it would make a perfect pen/supplies holder.  I found an old pickle jar lid that fit the circumference of the roll perfectly.

DSC_1107

I used a hot glue gun to permanently adhere the lid to the bottom of the toilet paper roll.

DSC_1109


I had some left over fabric from a previous project that I thought would be perfect.  I traced the jar lid on the back of the fabric with a marker and cut it out with a pair of scissors.

DSC_1110


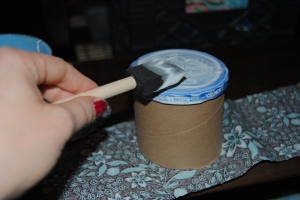
I applied Mod Podge to the lid with a foam craft brush, applying the fabric tracing over it.  I then applied Mod Podge to the entire outside of the roll.

DSC_1112

I  wrapped the fabric around to roll and carefully smoothed out any wrinkles and matching up the seam.  I overlapped the fabric where the base met the cardboard.

DSC_1113

I painted the inside with brown acrylic paint to match the fabric.  Once dry, I applied Mod Podge to the entire roll inside and out to seal it.

DSC_1122


Now the hamster wheel in my brain is turning!  I have a feeling this will not be the last project utilizing these rolls!

Stay tuned!

Inexpensive Storage Ideas: Repurposed Wooden Boxes

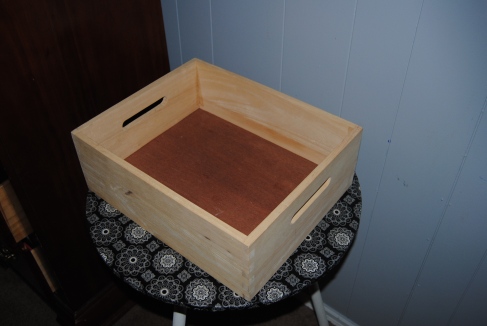
I am always on a mission to organize our family home, but with an active 2 year-old it is usually easier said then done.  When I come across wooden boxes, and any items I can upcycle into storage containers,  I jump at the chance to buy them.  Thrift Stores, or even items you already have in your home can be  altered to fit any style and repurposed into inexpensive storage containers.  Today, I chose to upcycle an ex Melissa and Doug Toy Box.  I believe at one time it housed an elaborate wooden puzzle, and somehow ended up a simple, empty,  wooden box on a thrift store shelf.  Our biggest storage issues at the moment are kids toys and books.  I decided to repurpose this into a kid’s toy storage/book box.  I had purchased this lettered scrapbook paper for a previous project, but decided not to use it. It was a perfect fit for this project.

Image

Materials:

Scrapbook paper

Box

Mod Podge

Scissors

Foam craft brush

Pink Acrylic paint/Brush

pen or pencil

I traced the bottom of the box onto the back of the scrapbook paper cutting it out with scissors.  I applied Mod Podge with a foam brush and glued the scrapbook paper to the wood. while it dried, I painted the remainder of the box pink. Once the piece is completely dry,  A final coat of Mod Podge is all that is needed to seal the entire piece

Image

Colorful and Bright storage options at a fraction of the cost!