My Neighbor Let it Go: Disney’s Frozen Wooden Toy Chest and Bench

My neighbor approached me one Saturday morning last spring. He was cleaning out his garage and asked if I wanted to look at a few items before he put them out on the curb. One of these items was an unfinished toy chest/bench that had been sitting in the back of his garage taking up precious space.  It had been purchased with good intentions, but he had never gotten around to finishing it. I immediately jumped at the chance to own such a wonderful piece of furniture.  It was unfinished wood, so this meant no scraping, stripping or priming.  My kind of project!

20150329_132009

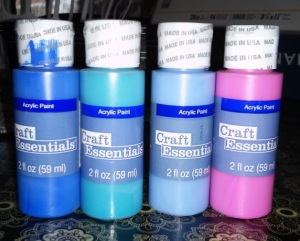
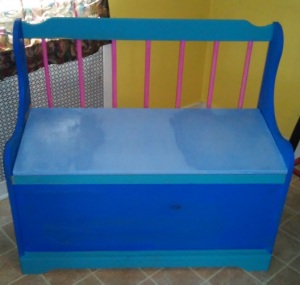
I am always amazed at the generosity of people.  When it comes to neighbors, I am truly blessed.  I thanked him profusely and happily took in the unfinished item. It immediately filled a dire need. My daughter had accumulated many toys, and this was a great way to store and organize them.  So, there it sat unfinished and full of toys for almost a year in our daughters playroom.  I had no idea how I would finish it. I entertained various ideas that went nowhere.  Sports themes, traditional refinishing, Disney Princesses, just to name a few.  Then it hit me one day after my daughter had viewed the movie Frozen for the 50th time!  Why didn’t I think about it until now?  I emptied her toys out and placed them in bags.  I went online and looked up a Frozen color palate.  I chose 4 colors from Joann Fabric and Craft Stores Craft Essentials acrylic paint collection. I ended up using three bottles of each color, except for the pink (I only used 2) I went online and printed out some Frozen graphics that I wanted to use.  I set my printer to the largest setting possible.

20150329_145754

20150329_151745

The toy box needed about 2 coats with some minor touch ups after drying. Once the final coat was applied, I allowed the piece to dry thoroughly overnight.

20150329_144245

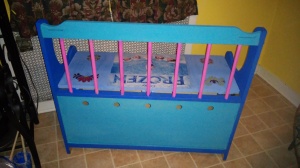
The next day, I applied Mod Podge to the front and lid with a foam brush, and carefully applied the prints.

20150329_150645

20150329_194011

The piece needed some “pop” so I decided to purchase some wall decals from Babies R Us to use as accents.  If you do not have access to a printer some of these images would also work great for decoupage.  I decided to apply the left over decals to my daughters bedroom wall.

pTRU1-19067669enh-z6

I then applied Mod Podge to the entire piece to seal it. For the majority of the toy box I used a foam brush to apply the Mod Podge, on the lid I used a “fluffy” mini paint roller which gave a snowy effect when the Mod Podge dried.

DSC_1095

I was happy how the piece turned out, and it looks great in the playroom!  When my daughter saw it finished the smile on her face said it all!

DSC_1086

DSC_1096

Materials:

Wooden toy box

Mod Podge

Paint/Brushes large and small

Foam craft brush, scissors

Frozen Prints Or Decals

(Colors used from Craft Essentials sold by Joann Fabric)

Mediterranean Blue

Panic Pink

Caribbean Coast

Sailing Sky

Length of project: 2 days (total)

Repurposed Umbrella Holder Made With Fabric and Mod Podge

I’ll admit even with all the rain lately, I never seem to have an umbrella handy. It was pouring when I left work earlier this evening and if it weren’t for the generosity of a friend, I would have been completely soaked! So, it would seem silly, that I would buy an umbrella holder.  It was sitting there mixed in with the lamps at a local thrift store.  I was at first, drawn to the shape of the item. Not to mention the price: Only $2.99!

I thought it would make a great toy holder.  Anyone with a little one knows  you can never have too much storage for toys and books. I also jumped at the chance to use the mod fabric I had left over from The 1960’s inspired Coffee Table Makeover , Step Stool Restyle, and Whimsical Garden Pig. When I purchased the fabric at Goodwill, I had no idea these textiles were created by artist and designer Helen Trast.  In 2007 she designed “Fredrika” line for Ikea.  I was originally attracted to the bright colors and retro feel of the fabric.  It would also match the coffee table in our playroom/family room.

First, I turned the piece on its side and traced the sides the fabric with a black marker. I repeated this step for all four sides.

DSC_1039

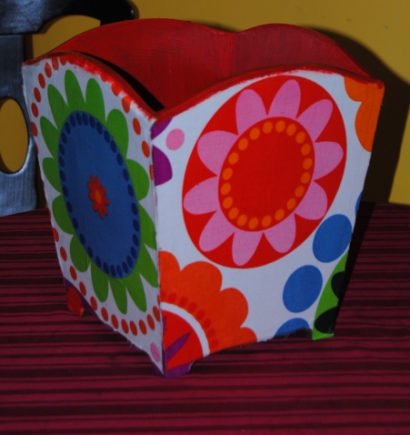
I cut the material with scissors and set aside.  I planned on painting the inside, so I used a white latex primer to prepare the item for painting.  While that was drying, I applied Mod Podge with a foam brush to each side of the piece applying the fabric panels, and smoothing out any wrinkles with my hands.

Decoupage with Mod Podge

I then painted the inside of the piece with three coats of red acrylic paint.  Once the entire piece was dry, It was time for more  Mod Podge.  Three full coats of it over the inside and outside of the piece.  After it was finished, I used an X-Acto knife to slice off any strings or fabric overlaps on the edges.

I then applied some additional Mod Podge to the areas where I trimmed away the excess fabric.

Repurposed umbrella holder

I may not be able to fill this box with umbrella’s but I have plenty of toddler toys to keep it full!

Toy Holder

To Upcycle or not to Upcycle. That is the question.

I’ll admit when I go thrifting I am attracted to certain items, but not for the reasons you may think.  Sure everyone dreams about finding the picture frame with a copy of the original US constitution in it resulting in the big “pay day”, but I am not always in it for what something is worth. I still have a lot to learn when it comes to determining what has the most value. More often than not, my choices are simply based on what I like.  I love anything retro, furniture, and fabric. I love to think outside the box when it comes to how I utilize these materials.

It was on one of many trips to the Goodwill that I came across this kids rocking chair:

Image

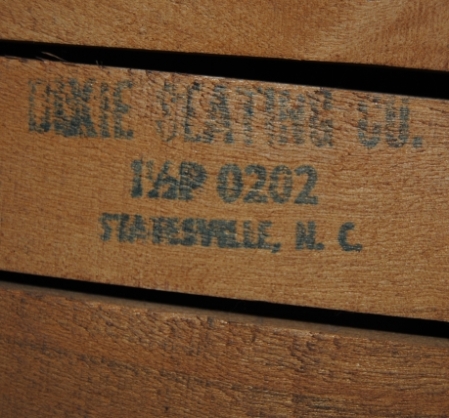
I saw it from a far and I didn’t waste anytime making my way over to it.  In my cart it went without hesitation. I didn’t even check the price at first.  Anytime I see kids furniture, I can restyle I buy it. Looking down at the tag I couldn’t believe my eyes.  I could tell it was a well made chair and it was only $5.99! I flipped the chair over and saw this:

Image

When I got the chair home, I did a little internet research on it and the company that made the chair. The Dixie Seating Company was founded in 1930’s and are known for making quality chairs and furniture for kids and adults. Most of these chairs are going for $76-$200 per chair online! I paid $5.99.  Except for some minor wear, the chair is in excellent condition.

After taking this all into consideration, I have put away the primer and I am instead taking out the Murphy’s oil soap. I am rethinking the upcycle and my decision is to leave the chair in it’s original state.

What do you think?  Have you ever decided not to upcycle an item because you were concerned  a redesign could effect value?  I would love to hear what others think on this.  Do you all think I made the right decision?

I e-mailed the company to try to gain more info on the chair including when the chair was made. They have not  have responded. The company started in 1934, but has changed owners a few times, and they had no information on this serial #.  They said best guess early 50’s. I believe the chair is at least  30 years old.  If anyone out there can offer any additional info on this chair, I would greatly appreciate and would love to hear from you!

Image

1960’s Inspired Decoupage Coffee Table

1960's Style Decoupage Coffee table

Impulsive.  That is the word I would used to describe this latest project.  This table was simply in the way.  I was storing it in my craft room and it was propped up against the wall taking up precious space.  I didn’t want to bring it up into the attic mainly because I didn’t want to have to drag it back down again.  After all, I had plans for this table what they were I wasn’t exactly sure.

I had purchased this great fabric at Goodwill, and to me it had a 1960’s style appeal. The material is made by Helen Trast Ikea of Sweden and appear originally to be drapes.  I was attracted to the bright colors.  There is nothing I love more than color.  I used this fabric for both the garden pig make over and step stool of my previous post.   I had an idea.  The coffee table was still in pretty good shape, accept for the table top.  In this case, I decided to give the paint brush a rest.  I thought the bright colored fabric would also go well in our family room/playroom. I went with it.  I flipped the table over onto the fabric and traced the table top with a black marker. I then carefully cut out trying to stay as close to the line as possible.  Once cut, I slathered the table with Mod Podge and glued the fabric carefully to the table top, spreading it out evenly. Once dry I did about 4 coats of Mod podge to the table top allowing to dry between coats.

I realize this fabric style may not be everyone’s cup of tea; However this simple coffee table makeover can be done to restore otherwise destroyed surfaces.  The fabric styles out there are endless and can be modified to a person’s individual taste. The free spirited 60’s and 70’s live on thanks to Mod Podge!

Decoupage Coffee Table