Pack my Bags! Fun and Easy Decoupage Vintage Suitcases

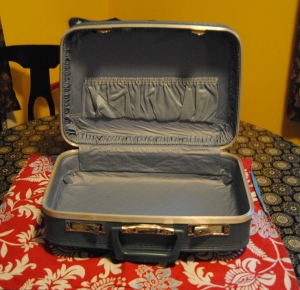
When shopping in thrift stores, I am always on the lookout for certain items on my personal wish list.   Many times I leave empty-handed as these items tend to be harder to find and that is why they remain on my list.  It is the search for these and other welcomed surprises that make thrifting so much fun.  Every now and again I get lucky, and it was truly my lucky day when I stumbled upon three lovely hard case, blue vintage suitcases reasonably priced at Goodwill.  I was also delighted to find the interiors of this cases in excellent condition.  For the larger case, I chose a blue and white fabric from Joann Fabrics, and decoupaged it onto the suitcase surface for my first ever restyled suitcase.  I wanted to make each suitcase unique, so I patiently waited for ideas to come along for cases two and three.

I was walking around Goodwill by my work the other day and stumbled upon a lovely pillow sham.  It was priced right at $1.99.  Usually when it comes to linens and fabrics at Goodwill, it is hit or miss.  This was a lovely pattern of white , red, and a touch of blue.  Whenever I see blue I think of those suitcases and thought this would be a perfect fit for one of them.  The question was if I would have enough fabric to complete the project. Unfortunately they only had one pillow sham in this pattern for sale.

Vintage suitcase pillow sham decoupage makeover

It turns out when I got it home,  I had just the right amount of fabric to restyle the second largest case, and I was thrilled!

First, I cut the decorative fabric away from the plain blue fabric on the pillow cases underside.

DSC_0465

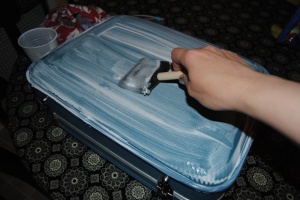
I placed the suitcase on the top of the fabric to get an idea of how much fabric I would need for both sides.  It was easiest to cut it in half.  I allow the fabric to hang over slightly, as I planned on trimming away the excess fabric later.  I applied Mod Podge generously with a foam craft brush to the suitcase surface.

DSC_0468

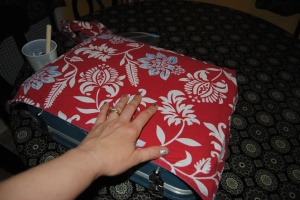
I then carefully laid the fabric over it,  repeating the same process twice for both sides of the suitcase.

DSC_0469

Once dry, I applied Mod Podge generously over it to seal the fabric.  I also generously applied Mod Podge to the edges where I planned on trimming the excess fabric.

DSC_0473

Once dry, the fabric stiffens and I carefully used a box cutter knife to trim the extra fabric using the suitcase crevice/seam as a guide.  Keep in mind to use just enough pressure as too much can damage the suitcase.

DSC_0472

I applied two more layers of Mod Podge to each side of the suitcase. Working the glue once again in around the suit case edges.

Decoupage suitcase using a pillow sham

I loved how this little suitcase turned out!  Stay tuned for suitcase number three coming soon!

decoupage vintage suitcases with fabric and Mod Podge


 Material Used:

Hard Top Suitcase

Fabric of choice (For this project I used an old pillow sham)

Scissors

Foam Craft Brush

Box Cutting Knife

Mod Podge

Clear Varnish (Optional add for extra protection)

A Little Bit Of Luck: Second Hand Roses Christmas Placemats Giveaway.

I was so pleased to learn that “On the Upcycle” was the lucky winner of two lovely vintage looking felt holiday placemats, courtesy of Deb and Kathy at “Second Hand Roses”

cropped-2nd-hand-roses3

Second Hand Roses is a blog that features the shopping adventures and sometimes misadventures of Kathy and Deb. Their wonderful sense of humor comes across in every post and the blog is an enjoyable read, so be sure and stop by and visit them! I was quite excited to receive a package with the placemats and this lovely vintage greeting card.

Vintage Christmas Card

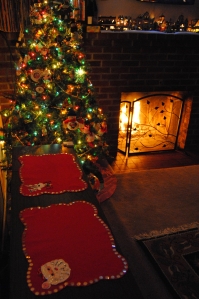
The placemats are made of felt and are adorned with glittery decorations.  They feature Santa Clause and a reindeer. They are absolutely adorable and I am so grateful to have won their christmas giveaway!  I placed them on our vintage stereo cabinet and snapped this picture of our living room.

DSC_1331

Thanks again to Kathy and Deb for bringing some holiday cheer into our home this holiday season!

DSC_1317

If only we could live here….A Close Up Snapshot of our Christmas village on our mantle.

DSC_1330

Happy Holidays from “On The Upcycle” and Many Thanks to Kathy and Deb!

DSC_1346

Weekend Warriors: A Thrifting Revolution.

This past Saturday, My sister and I took a trip with the little one to Red Bank Battlefield in National Park NJ.  An important battle was fought here during the Revolutionary war, and the area is now part of the Gloucester County, NJ Park System.  My daughter loved the playground and refused to get off the swing (insert 2 year-old temper tantrum here) Despite this, it was a beautiful day to get out and enjoy nature, after weeks of torrential rain and heat waves!

Image

Image

We also got to visit an awesome thrift store called Glassboro Thrift Village.  To say they had everything would be a understatment! I especially liked the “free” items they had out front.  They happened to have a chair marked free and I was very excited to see it! I have been for sometime, searching for a spare chair seat.  I have a great chair I have been wanting to restore with a broken seat.  I scooped up this “free chair” and was amazed at all the great items they had inside.  This would be a great place to get furniture for college students or people just starting out.  I picked up a few future crafting items and a magna doodle for my daughter for a dollar.  They also support local charities with a portion of their sales. I want to go back here sometime in the future to take a more thorough look around.  Can’t wait to get started on a few new projects this week!

Image

Expect The Unexpected: A Couple Of Weeks In The Life Of A Thrifter.

When thrifting, part of the excitement is, you never know what you are going to find. Sometimes you walk out a winner ,and other times the goat for having wasted precious time without reason. Lately, I  have been unable to come up with many upcycle project items. I have found some great pieces and items that were better left in their original state, so I am not exactly complaining!  Of course, Thrift stores are also never short on “interesting folk” for example who would have thought I would have struck up a conversation with the famous Woodbury Dancing Man ? Never a dull moment.  I can hardly call that a wasted trip!

I thought today, I would take a moment to share with you some interesting items I have picked up over the last couple of weeks.

Bert's Blockbusters

Who didn’t grow up and love Sesame Street? I jumped at the chance to buy this record from 1974 featuring the voices of the late great Jim Henson and the talented Frank Oz.  I am a small collector of records and still love listening to them on my vintage stereo. For me this was a must buy item~ The price for this lovely item you ask?  Just .99 cents!

DSC_1152

I came across this vintage wooden nut tray and didn’t think much of it at first until I took a 2nd look and was lured in by price a mere .99 cents! I could tell this tray was quality made and it was stamped on the bottom Weavewood Inc. Minneapolis.  After some research turns out trays like these are going for $ 15-$20 each on Etsy.

vintage pyrex glassware

Vintage Pyrex items are a rare find at best in my area, but I jumped at the chance to pick up this 1 1/2 court Pyrex bakeware item for $2.99 at Goodwill.  Of course, I was disappointed it did not have a lid, but the nostalgic gal in me couldn’t resist buying it anyway!  Who’s family did not have at least one piece of Classic Pyrex Glassware growing up?

VHS Disney Movie Collection

I am not ashamed to admit that we still have a VHS Tape player in our daughters playroom. While looking through Goodwill’s .99 cent video collection I noticed that they had most of all the classic Disney movies many of which I enjoyed myself as a much younger person. I couldn’t resist them at such a deeply discounted price, and jumped at the chance at building our daughter’s Disney movie collection. (Of course if you look closely I also couldn’t resist the classic Muppet Move in between Pinocchio and the Aristocats.) An amazing bargain! I got all of them for the price of one DVD!

Stay THRIFTY my Friends…..and happy hunting!

Upcycled Little Girls 1970’s inspired side table

I have been blogging for over a month now and I am so thankful to you all for the encouraging words and thoughts.  I am also blown away by the amount of talent and creativity I have seen from others on here! Creativity is key!  For me, things don’t always work out as you envision them.  This forum allows me to feel free and unafraid even if I make a mistake!  For that I am grateful!

I am back from my two day hiatus; However a lot of craftiness and shopping has taken place in those days!  The family went thift shopping yesterday, two Goodwills and a Walmart! It was a very productive day!  I picked up a few future projects, and pined and dreamed over other future projects that I could not fit in our little Hyundai!

I saw this little brown, particle board,  table and I picked it up,  I am obsessed with small furniture, as I am always thinking about items that Erin can use that are perfect for toddlers just starting to utilize furniture. She also loves to imitate us and it is wonderful seeing Erin sitting at her kid’s table reading a book like the little person she is becoming.

I also found this great funky floral fabric that screamed 1970.  In it’s previous incarnation it was a window drape.  I can’t imagine! A bit too funky for curtains according to my taste, but not funky enough to use to redo kids furniture!

Materials:

$5.99 table

Fabric

Mod Podge

paint brushed various sizes

acrylic paint

black marker

scissors

First, I turned the table upside down onto the fabric and traced with a black felt tipped marker.  I carefully cut out the fabric.  I then used Mod Podge Matte finish to glue the fabric to the table top.  I set aside to dry.  I wanted the paint the table pink to match part of the fabric, but I didn’t have any pink handy.  I was able to mix red, purple, and yellow, and came up with the color you see here! I primed the piece and then covered the legs and sides with pink paint. Once dry I used Mod Podge to seal the entire piece using about three coats total.

Image

Before and After:

Image

Our cat Nucky seemed to be fascinated with what I was doing.  He was my cat apprentice as Erin was napping at the time!

Image