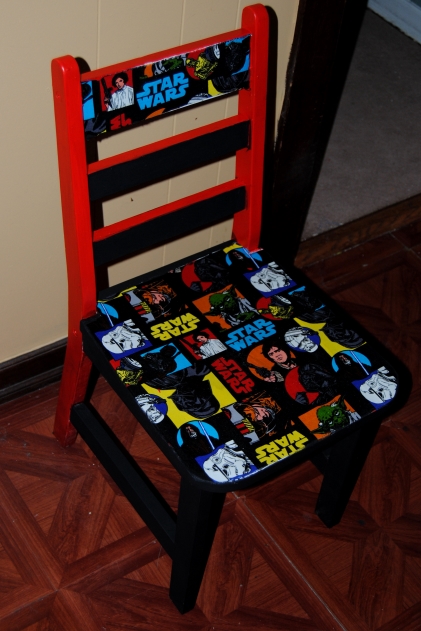
Creative Blast Off: Star Wars Fabric Decoupage Kids Chair

I was in Joann Fabric recently and came across some great Star Wars themed fabric.  They were in the midst of having a huge fabric sale and I jumped at the chance to purchase something unique and fun at a discounted price.  When I brought the fabric to the counter to have it measured and cut, the clerk informed me that their was a larger scrap piece she could sell me for an additional half off!  It was my lucky day as I really only needed a half yard.  This piece was large enough to use for additional projects, and I jumped at the chance to buy it.  Two other fabrics I purchased also had discounted scrap pieces.  It was my lucky day!  Over a yard of fabric Star Wars fabric cost a mere $5.30!

Thrift Store Kids Chair

I had picked up two kids chairs during a furniture sale (shown above) at a local Goodwill store.   My first project to utilize one of these chairs was for a Strawberry Shortcake themed guest blogger project celebrating Geek Month on Cheeky Geeks Blog. I primed both chairs with a spray on white latex primer, and this chair sat for quite sometime unfinished.  It seemed a perfect fit for the Star Wars fabric.  My husband and I are like many our age, huge fan “geeks” when it comes to Star Wars. I was more than happy to base a kids chair on such a fun topic from our youth.

Trace chair seat on to fabric

I flipped the chair over on to a table and laid the chair seat upon the flip side of the fabric, tracing carefully with a black marker.  I carefully cut out the piece of fabric, along with a smaller sized piece I would use for the chair back. I applied Mod Podge to the chair seat surface with a large foam craft brush.  I then carefully laid the cut fabric on the chair with my hands smoothing it out to prevent wrinkles.  I trimmed the back of the fabric carefully where the seat back and chair back met. This enabled me to cover the seat with as much fabric as possible.  I repeated the same steps to apply the smaller piece of fabric to the chair back.  Once dry, I covered the fabric over top with Mod Podge, and allowed it to dry.

Decoupage Kids Chair

I then hand-painted the chair with red and black acrylic paint.  Like the first chair, it required quite a few coats of paint. Once dry, I painted on a coat of Mod Podge to seal it.

Star Wars Fabric Decoupage Kids Chair

Materials Used:

Old Kids Chair

Mod Podge

Star Wars Themed Fabric

Foam Craft Brush/Paint Brushes/Scissors

Black and Red Acrylic Paint

White Latex Primer

Star Wars Themed Fabric Decoupage Chair

Check out all the great licensed character themed fabrics Joann Fabric has to offer here

Fabric Decoupage Chair Seat

The Broken Chair Challenge Part 2: Chair Back Photo Frame

It all started when I purchased a lovely (but very abused) chair from Goodwill for $3.99.  I loved the design qualities of this chair and thought it would make a lovely restyle. I especially loved the is.  Which means “ Lily flower” in French.  I removed the chair seat, only to discover it broken beyond repair. I was not willing to let this chair go, and  I was determined to find a replacement seat.  My husband and I kept our eyes open for any broken chairs on the side of the road that we could use to salvage a seat.

For months, this chair sat and I resisted the temptation of buying a chair to salvage.  Then one day, my patience paid off.  My sister and I went thrift shopping one weekend and in front of the store they had free furniture.  I was ecstatic!  Their it was the perfect candidate, a chair missing the arms, but with a perfectly usable seat.  I confirmed with the store manager that this chair was indeed “free” and loaded it into the car with the biggest smile planted on my face. I immediately removed the seat when I got the chair home and it was a perfect fit.

Upcycled Black and White Damask Chair

To read more about this project see The Broken Chair Challenge: Upcycled Black and White Damask Chair.

Now, I was left with the remnants of another chair, and did not want the all the parts of this chair to end up in the trash.  It had a lovely seat back, and I had seen some lovely upcycling of chair backs into picture frames on Pinterest. I decided to give it a try.  One great example of this can be found at All Things Thrifty.com

Old Chair Back

The finish on this was extremely worn. If it had not been in such poor shape, I don’t think I would have opted to paint it. By far,  the most difficult and challenging aspect of this project was sawing the legs off the chair back.  I used a hacksaw, but it was quite tough to do!  An electric or battery operated hand saw would have worked better, but on the bright side it was at least a 500 calorie burner! Rarely can you say you burn calories crafting!  Once this was completed, I sanded the area that was cut.  I took the chair back outside and spray painted it black, using about two coats.  I allowed the piece to dry overnight.

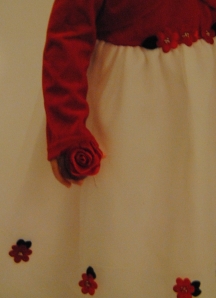
The next day, I chose a large photo from one of my daughter’s previous Picture People photo sessions.  I measured the area and trimmed the photograph to sit inside the middle of the chair back.  I used a hot glue gun to adhere the photo to the wood.  I had a few craft jewels and roses that I added to the chair back to make it “pop”  I originally glued a large rose to the bottom of the chair back, but decided to remove it later as you will see in the photos below.  One of the smaller roses, I carefully glued to her hand in the photo, It creates an illusion that she is actually holding a rose in the photo.  I think it gives the photo a bit of an extra dimension.  A nice little “touch” to the project.

Hand Holding Rose

I decided to hang this in our bedroom which is black, white with grey wall.  It was very difficult to snap an adequate photo as the flash kept reflecting off the shiny surface , but it is lovely and I am so glad I tried this!

DSC_0343

Think of all the possibilities before you toss that old chair!

Materials:

Hot Glue Gun

Spray Paint (If you choose to paint)

Old Chair Back

Scissors

Saw (If needed)

Screw driver (if needed)

Sandpaper

An old chair back re-purposed into a Picture frame

A Piece Of Americana: Upcycled Windsor Back Chair

Since I began upcycling, crafting, and decoupaging, I have wanted to make an Americana art piece.  I was uncertain as to what the object would be.  I was waiting to see what life, or thrifting was going to place in my path.  Then one day, I spotted this chair in a Goodwill Store.  The chair needed a bit of TLC, and had some issues.  Most of the finish was worn off the chair, and the spindles and legs were loose.  The chair passed “the sit test” I sat on it and I didn’t end up on the floor! Nothing I thought a little love and wood glue wouldn’t fix. Despite it’s problems, I knew this chair was something special.  The chair displayed several design elements I found intriguing, and the chair style looked very “American” to me.  I will be honest, I  didn’t actually know anything about this chair, but I knew one thing- I liked it.

A woman behind me saw me looking at it ,and said “That’s a Windsor Back Chair.”  She was from New England and these chairs are popular in that area. Then she simply walked away.  She was eyeing it up, but I had a tight grip on it.  By now the chair was in my cart and rolling with me out of the store.  The chair cost $5.99, but for this I think I would have paid a little more, so it was a great deal!

Windsor Chair

When I got home, I did some research on the chair and It had several of the Windsor Chair Design elements.  I found this great website for a company that makes these chairs Gummel Chair works and they feature an interesting history of these Windsor Chairs Beginning with their origins during the reign of King George in England to the shores of New England and the Early American Colonies.  It also states it became “preferred” in some circles to paint these chairs to bring out their unique design qualities.   This made me feel better about painting the chair, and since I did not have the space to keep the chair out year round, I thought it would be a nice to showcase the chair during the patriotic holidays.  Having a reproduction in need of some work seemed exciting and the “perfect” Americana project candidate,  It also happened to come along at the perfect time.  The July 4th holiday was quickly approaching, and I had to submit an original project for the new Green Crafting Book The Green Crafts Lifestyle .

Materials Used:

Red, White and Blue Acrylic paint

Decal, Print, Patriotic decorations for decoupage

Foam Brush to apply Mod Podge

Paint Brushes of various sizes

Scissors

I cleaned the chair before I got started with a damp cloth.

I primed the chair with two coats of a white latex primer.

Chair Materials

I applied the Mod Podge with a foam brush to the seat surface generously.  I took the patriotic image I was using and carefully glued the image to the seat.  I used my hand to smooth out any wrinkles or air bubbles.  If you have one available, you can also use the rubber Mod Podge, or roller tool to do this as well. Once dry, I applied a layer of Mod Podge with a foam brush over the image to seal it.  Now it was time to paint the chair.  I used a red white and blue color scheme and continued the pattern featured on the patriotic image for the chair seat.  Once the visible parts of the chair were dry, I flipped the chair over and painted underneath.  I then cut out some small white stars I wanted to decoupage to the top of the chair to add some additional flare.  I applied Mod Podge to the top of the chair with a smaller paint brush and applied the stars to the chair.

Once the chair was dry, I carefully inspected the chair for any painted areas that needed touching up, and added additional paint needed to these areas.  I allowed the chair to dry thoroughly overnight in front of a stand up fan. The next day,  I applied 2 coats of Mod Podge over the entire piece using the foam brush for larger surfaces, and a smaller paint brush on the smaller areas and chair legs.

An Upcycled Windsor Chair draped in Americana Decoupage:

Patriotic Windsor Style Chair:

Before and After:

Patriotic decopage Painted chair before and after

When Crafts Go Wrong: Restyling the Upcycle

On May 12th, I posted a Time Out chair I restyled.  Truth is I was never happy with how it turned out.  I think I know why it didn’t turn out as I planned.  I forced it. I was determined to finish the project even when I felt I should put it aside.  One thing I lack is patience and that can be a crafter’s undoing.  Sometimes it is just better to set a project that is frustrating aside to finish at a later date.The Time Out chair is an example of restyling a restyle.(You could say)

My upcycled 70’s inspired girls table has so far been Erin’s favorite.  It is the perfect size table, but lacked a chair.  We caught her pulling the table up to the step in an attempt to sit at the table. That is when I thought of the time out chair. We are very blessed so far.  We rarely have to put her in Time Out, so we haven’t really used the chair, and I thought if I restyled the chair, it would go great with the table.  I used the same 70’s fabric as the table, and re-painted the chair to match. Now Erin has the perfect place to sit and read her book, and I have a chair I can live with!

70's inspired KidsTable and Chair