Sesame Street Girls Painted Kids Rocking Chair Made With Mod Podge

Image

Monday’s get me down, but rainy days don’t!  It has been raining all weekend and what better indoor therapy is there, than starting and finishing a new project!

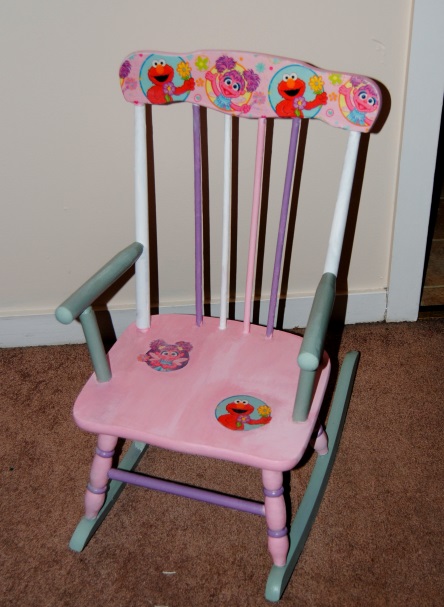
Last week, I was on my lunch break and something told me to stop in the local Good Will Store. The last time I was in this store I was very disappointed with their prices and stock.  I am glad I listened to my “thrifty senses” and gave it another try.  As soon as I walked toward the back of the store where they keep all the furniture, I noticed the little rocking chair sitting there.   Before anyone else had time to notice this little “diamond in the rough”, I snatched it up.  I knew this was not going to be easy.  The chair was black lacquer and in several places on the chair, it looked like a small dog had chewed on it. The chair was also loose, but appeared it could easily be tightened up.  The chair was priced $6.99, which was a bit steep for an item in this condition, but who knows when I might find a kids rocking chair again?

I took it home and hand sanded the areas where the wood was damaged until it was smooth.  I then used two coats of latex primer and painted the entire chair.  Once dry I began the process of working out the color scheme and hand painted the chair using acrylics.This took a while as when dry I had to add additional coats.  Once the chair was painted, I used Sesame Street wrapping paper for the chair back and on the seat.  I glued the wrapping paper down with Mod Podge carefully smoothing out any air bubbles.  Once dry, I coated the entire chair with Mod Podge matte finish and repeated a total of 3 times.  The result is what you see here.  Now, My little girl will have her very own chair to sit on and read in her room. I think I am in love with kids furniture!

Image

Erin reading a book in her new rocking chair

1960’s Inspired Decoupage Coffee Table

1960's Style Decoupage Coffee table

Impulsive.  That is the word I would used to describe this latest project.  This table was simply in the way.  I was storing it in my craft room and it was propped up against the wall taking up precious space.  I didn’t want to bring it up into the attic mainly because I didn’t want to have to drag it back down again.  After all, I had plans for this table what they were I wasn’t exactly sure.

I had purchased this great fabric at Goodwill, and to me it had a 1960’s style appeal. The material is made by Helen Trast Ikea of Sweden and appear originally to be drapes.  I was attracted to the bright colors.  There is nothing I love more than color.  I used this fabric for both the garden pig make over and step stool of my previous post.   I had an idea.  The coffee table was still in pretty good shape, accept for the table top.  In this case, I decided to give the paint brush a rest.  I thought the bright colored fabric would also go well in our family room/playroom. I went with it.  I flipped the table over onto the fabric and traced the table top with a black marker. I then carefully cut out trying to stay as close to the line as possible.  Once cut, I slathered the table with Mod Podge and glued the fabric carefully to the table top, spreading it out evenly. Once dry I did about 4 coats of Mod podge to the table top allowing to dry between coats.

I realize this fabric style may not be everyone’s cup of tea; However this simple coffee table makeover can be done to restore otherwise destroyed surfaces.  The fabric styles out there are endless and can be modified to a person’s individual taste. The free spirited 60’s and 70’s live on thanks to Mod Podge!

Decoupage Coffee Table

Sports Team TV Trays made with Mod Podge

My husband and I were sitting down last Sunday after our little one had finally gone to bed.  We were watching our favorite show, Game of Thrones.    It has become our Sunday night ritual and is easily one of my favorite top five shows of all time!

Most of our house is now toddler proof, so we are lacking a coffee table in our living room as well as side tables.  We pulled out the old TV trays we had up in the attic and they were perfect to put our popcorn and drinks down on, but that’s about all the good I could say about them.  To me, they were just plain and ugly! I said to my husband that I should give the tables a makeover.  We have three total.  The original plan was to re-create the baseball card decoupage table I had seen on Pinterest, but the hubby didn’t want to part with any of his old baseball cards and I can’t say that I blame him.  So, we decided I would make a TV tray dedicated to my husband’s favorite sports team-The Philadelphia Phillies.  There are a lot of great, free graphics on the web. If you have a good printer at home and some larger paper you can find just about anything online to decoupage. (Ink jet printers not recommended as the ink will often times run)   The limits are endless on what can be used so keep that in mind.  Old sports linens, place mats, wrapping paper, sports decals-just about ANYTHING can be used to decoupage, so let your imagination run wild and always think outside the box. First I cleaned the table, removing any dirt or dust.  I used a latex primer to prime the entire TV tray.  Once dry,  I used Acrylic paint and painted the legs and underneath as well as the table top edges.  I used Mod Podge to glue the print to the table top carefully smoothing out any air bubbles.  Once dry I used three coats of Mod Podge Matte to seal the piece letting the table dry completely between coats.  I was actually shocked as to how well it turned out!  I was so pleased I decided to do the other two TV trays as well in the hopes of selling them. We plan on purchasing our flea market space one weekend this summer in the hopes of raising some money to take a much needed family vacation. Sesame Place or bust!

Materials used for this project:

Mod Podge Matte Finish

(I also used the Modge Podge Roller Tool to help smooth out the air bubbles)

X Acto knife

An item to decoupage (poster, print, linens, decals, place mat or anything you can dream up!

Acrylic Paint

DSC_0071

DSC_0094

Decoupage Sports Team TV Trays

Wooden Rocking Horse Re-Do

I wanted to make something special this year for my daughter who is turning 2 next month. My husband and I share a common love of shopping at thrift stores and we found this horse at Good Will for $4.99. I sanded it lightly and used a primer. I then used acrylic paint to paint the horse two shades of pink and white. I decoupaged scrapbook paper onto the horse and used Mod Podge Matte
finish to glue and seal this project. I was going for a more classic rocking horse and the debate with family and friends over whether I should give the horse a mouth and eyes was quite amusing. What do you think? Do you prefer whimsical or classic rocking horses?

Wooden Rocking Horse Re-Do