The Toilet Paper Roll Experiment: Part Two

Just think of all the toilet paper rolls that are discarded each day!  They serve their purpose and are tossed in the trash can without a thought. When I walked into the bathroom at work, I noticed a few sitting there waiting to be discarded.  Since my upcycling mission started, I tend to look at things a bit different.  I especially love to take something that most certainly would end up in the garbage and give it a second life. I snatched a roll and went home to craft The Spare a Square Project.

DSC_1122

The initial project was a success, and I realized these card board rolls can be used in organizing my craft room items.  There are many upcycle ideas on the web when it comes to cardboard rolls. One amazing example, can be found here.  Word got out around the office that I was starting to save these rolls from the trash for a project to be determined later.  Suddenly, they started appearing on my desk and before I knew it, I had quite a few of them thanks to my recycling and equally curious friends.  I think they were curious to see what exactly I planned to do with them!

DSC_1508

I was sitting in craft room pondering the idea and I decided to create craft supply wall storage. Initially, I was not sure what I would store inside them, that idea would come to me later.

First, I painted the inside of the tubes white with acrylic paint.

DSC_1509

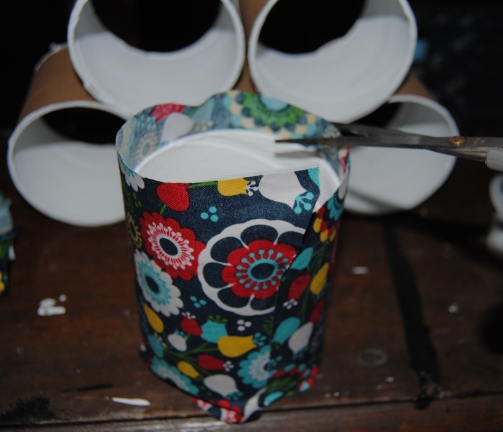
Next, I looked through the fabric that I had available and decided on a “fun” colorful pattern to decoupage. I cut pieces of fabric that would be enough to cover the outside of the roll.  I applied Mod Podge to the it with a foam craft brush, and placed it on to the fabric.

DSC_1513

Once the Mod Podge was applied I “rolled” the toilet paper roll on the fabric, and it adhered nicely.

DSC_1514

I trimmed away any excess fabric with a pair of scissors.

DSC_1515

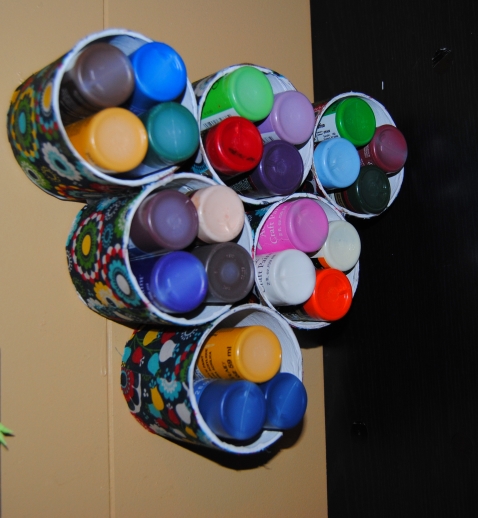
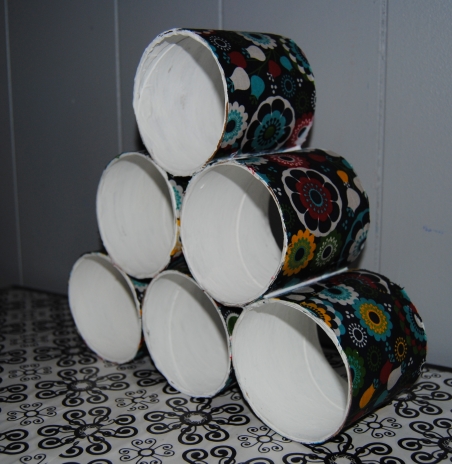
I repeated this process with all of them.  Once they were done, I used a high temp hot glue to glue them together. I arranged them in rows. Three at the bottom, then two then one. Like this:

DSC_1521

I touched up the white paint in spots particularly around the edges, and once dry, added a Mod Podge finish to the entire project.

DSC_1533

Now that the project was complete, I had to figure out what to store in it!  It didn’t take me long to come up with the idea of storing my smaller containers of paint, and it created easy access to any color I need.

And…I decided to hang it like this:

DSC_1540

Who needs a square, when you can have the whole roll?

Materials:

Six Large toilet paper rolls

Mod Podge

Fabric

Hi Temp Hot Glue Gun

White Acrylic Paint

Scissors/Foam Craft Brush, and a Paint Brush.

Rescued Vinyl And The Magic of Mod Podge

With the holidays officially over and the New Year off to a rather frigid start, I share with you the last project on my Christmas list this year.  Late last month, I posted a tutorial for Sports Inspired TV Trays which have turned out to be a popular item among family and friends. The beauty of restyling these tables are the limitless possibilities.

TV Tray before

These tables are neutral and relatively easy to work with.  One of my upcycled gift recipients is not big on sports, so I thought she might like to have a TV table, but with an alternate theme.  A while back, I created a table from an old record, and a plant stand. I used Aerosmith’s greatest hits record.  The record was not in playable shape, so I decided to recycle the LP and use it for a upcycle project. The family member receiving the gift is a huge Aerosmith fan, and I decided to use the album cover and decoupage it to the table top. Upon further inspection, the cover was in pretty rough shape, so in the end I decided not to use it.  The liner notes; however were in great shape, and a colorful purple with the Aerosmith winged symbol in the middle.

DSC_1270

This seemed perfect for decoupage while incorporating something she and I hold close to our hearts~ records.  I have a collection too, mostly stocked through bargain bins.  It is not always easy to tell if a record is playable before purchase, and every so often you wind up purchasing a damaged record.  Not only can you reuse the record itself, but the artwork is perfect for decoupage.  Another example of this can be seen here from a previous post. Long live the LP!

DSC_1269

For a full tutorial and some examples of TV tray table redesigns click here and here.

DIY Decoupage Novelty Candles and Tea Light Holder

Looking for a great “personalized” gift that will keep you within your shopping budget? The holiday’s, and birthday’s can be tough, and it is more important than ever to get the most out of every penny. At the same time, It is also important to let those close to you know that they are appreciated throughout the year. I try to keep my ears and eyes open as to what matters to friends and family, by soaking in all of their interests and hobbies. I file these ideas away, and when I am trying to come up with gift ideas, I refer back to them.

As our extended families and circle of friends continue to grow, and the holiday’s become more and more about the children (As it should be, of course) It has become at times, a challenge to come up with gifts for friends and the adults in the family. This year, I decided to make personalized candles for some of those on my Christmas list. You can purchase candles anywhere, and they are reasonably priced. This year, I had many music lovers on my list, so I decided to decoupage some candles featuring the recipients favorite musical artists.   The possibilities are truly endless.  You can personalize and create any type of candle that you want.  For the non-music lovers on my list, I refashioned the candles with fabric, or with a family photo.  Making these is a simple process. I applied Mod Podge to the outside of the candle with a foam craft brush. I searched the internet for the images I planned to use and printed them out on my printer (the size of the images I used was 4×6) I trimmed the images to fit, and carefully applied them to the candles, smoothing any wrinkles. You can add Mod Podge over top of the image, but it is not needed. If you are looking for a shinier finish, you will need to complete this step. Once dry they are ready to be gifted!

Decoupage Candles

Rock N’ Roll Inspired Candles

\Grateful Dead tea light holder

Repurposed Candle made into a Tea Light Holder

I got a fever for Pringles Can Crafts!

I saw on Pinterest  recently many uses for all those left over Pringles Chips cans. Through the magic of decoupage, these cans can be transformed from downright ugly to lovely!  They can be used to store various items and are a great way to gift Christmas cookies for the holidays.

Pringles-Gift-Box-Fun-Holiday-Crafts

Like these cookie containers from Cheap Crafting.Com

Today, I share with you a Pringle can kid’s craft.  My daughter loves to listen to music, but loves to make music even more!  I love to get her involved in the process and creating music together has been a wonderful Mother and Daughter bonding experience.  I cleaned out the can first.  You can fill the cans with dry pasta or dried beans.   I would fill the can up about half way.  To secure the lid, use a hot glue gun to adhere the lid permanently to the can.  Once the lid is secure, you can use either scrapbook paper or fabric and decoupage the outside of the can.  (This is necessary only if you want it to look “pretty”)  Apply the Mod Podge with a foam craft brush and wrap the fabric or scrapbook paper around the outside of the can.  This is also a great way to get use out of those old pieces of scrap fabric, that may be a bit small for other projects.  My daughter loves “shaking” her new percussion instruments. These “instruments” are a great way to encourage sensory development while at the same time encouraging fun!

DSC_1147

Kids instrument made from the smaller Pringles can.

Inexpensive Gift Ideas: Miniature Desk Radio Decoupage

I have seen many radios and stereos in my day.  Everything from The Giant Boom Boxes of the 1980’s, to little mp3 players that fit in the palm of your hand, music has been delivered via many forms. I am a bit of a collector when it comes to music and pretty much anywhere I set up shop, I need to have a radio nearby. That includes my desk at work although it is rare I turn it on, listening to music does help with work related stress at times.  I also enjoy listening to the afternoon baseball games in the summertime.

Many stores carry these small desk top radios.  The one below was purchased at one of my favorite stores  Christmas Tree Shops. These also make great gifts for the music, sports lover in your life. This particular radio takes three AA batteries making it easy to take with you while on the go.

Desk top am fm radio


To personalize the radio and add a little flair, I decoupaged some fabric on to the outer case.  Since the radio has a “retro” feel I chose a colorful Mod fabric. I simply applied Mod Podge to the outer case with a smaller paint brush, measured and cut the fabric, and applied it to the case.  Once dry I applied a few coats of Mod Podge over the top.

DSC_1233


These make great gifts, and choice of fabric can be tailored around ones own individual tastes such as with character fabrics, and various designs featured at such stores as Joann Fabrics.

Mod Mini Radio Decoupage


Decoupage Mini Desk Radio


This little radio now has a retro feel that I love!

Hope your holiday season so far is merry and bright!!

Simple Fabric Decoupage Snowman Hand Soap Dispenser

As much as I love the holiday season, It has been a hectic few weeks decorating, attempting to make Christmas gifts and getting caught up in the everyday hustle and bustle of life.  Today, I experienced disappointment, after a mistake by yours truly turned into an epic craft fail. I now have to rethink an idea for an intended Christmas gift.  Not to mention most of the items I make between now and December 25th, I cannot share yet as it would ruin the surprise for those intended recipients.

I did manage to complete a simple craft today, I have been wanting to do for the upcoming Christmas holiday.  We like to decorate every room in our home including our bathroom.  I had an ordinary plastic soap dispenser that cost $.99 that is easily refilled.  I decided to decoupage some scrap snowman fabric left over from a previous project .

Image

I used outdoor Mod Podge previously used for a few summer projects.  The finish is a bit more durable when used in watery conditions. I carefully removed the label and I applied the Mod Podge with a foam craft brush to the outside if the bottle.  I wrapped the fabric around it, and smoothed out any wrinkles.  I trimmed any excess fabric and applied more Mod Podge over the fabric. I allowed it to dry for a few hours.  Once dry, it was ready to take its place along side the other decorative items and function as an inexpensive alternative to a fancy store-bought holiday soap dispenser.

Image

Holiday Decoupage Soap Disp

This idea can also be applied to hand lotion, and other gift basket items to add a holiday flare and personalize.  Choose a fabric suited to your holiday decor at Joann Fabrics.  Everything is better with decoupage!

I am “Thankful” For My Readers: Decoupage Wooden Tray Giveaway: WINNER!

I hope everyone had a very Happy Thanksgiving day with their family and friends.

Image

Thanksgiving “On The Upcycle” Style

Now that the hubby, daughter and I are recovered from eating all the great food we were very blessed to have on our table yesterday, I wanted to take the time once again to thank you all for your continued readership.  This year to celebrate our readers, “On The Upcycle” is  giving away a Victorian art inspired wooden decoupage tray to one lucky reader who commented and liked “On The Upcycle on facebook” That winner is:

Image

Patricia from DanielaJoe’s blog Congratulations!  Please e-mail me your full name and address to ontheupcycle@gmail.com and I will ship your prize out to you!

Thanks to all of those who entered the giveaway:

Upshabby

Being Zhenya

Pillows A-La Mode

Roof Top Creations

Please be sure and stop by these amazing blogs.  You will be very “thankful” that you did!

The Green Craft Lifestyle Christmas Addition: Free Amazon Download begins This Saturday, November 30th!

Pickled Lamp: “On The Upcycle” Christmas Craft full tutorial featured in today’s newly released “The Green Craft Lifestyle: Christmas Edition”

Image

The Green Crafts Lifestyle – Christmas Edition – Make Christmas Decor, Cards and Gifts!

1451464_674360959264580_1206827235_n

I have had the pleasure once again to be a part of the second installment of “The Green Craft Lifestyle”.  The new Christmas Edition is jam packed with green Christmas crafts from around the world.  The very talented Mahe Zehra Husain (MZ) is giving away free copies for download from the 30th of November to the 4th of December you can find it here: http://www.amazon.com/dp/B00GXE82S4 and http://www.amazon.co.uk/dp/B00GXE82S4. On Facebook?  Join the free event here. Don’t have a Kindle?  Download Kindle Cloud Reader for your Laptop!

Image

The “On The Upcycle” family want to wish everyone a very safe and happy Thanksgiving day Holiday!

I am “Thankful” For My Readers: Decoupage Wooden Tray Giveaway!

Still not too late to enter” On The Upcycle’s” Thanksgiving day giveaway! Be sure and comment and check us out on facebook. A winner will be drawn on Thanksgiving day. Thanks again to all my amazing readers who support us in our repurposing mission!

ontheupcyclemom's avatarOn The Upcycle~

The Thanksgiving holiday is a time to reflect on the many blessings a person has in their life. Many times the stresses of everyday life cloud our thinking and distract us from what really matters. I am so deeply blessed to have connected with so many wonderful people in my life past and present. This includes all those who have taken the time out of their day to stop by  “On The Upcycle” to read, comment and share ideas with me. It has been a little over 6 months since I started my blog and the response has been overwhelming.  A special “thank you” to those in the Word Press community whom helped lend a helping hand to yours truly along the way!

I thought to myself, that this would be a great time to show a small token of appreciation to my readers who have inspired me to keep…

View original post 131 more words

From “Odd To Mod” Upcycled Thrift Store Mystery Wall Hanging

Recently, I have made quite a few thrift store walk throughs, without finding much of anything to stimulate my creativity.  My pockets are lighter, and even the amount of freebie finds have dwindled. Sure, my attic is filled with items all screaming “Repurpose me, me, meee!”, but our attic is a bit of an organizational nightmare I can’t seem to wake up from, not to mention it is unheated and freezing cold up there! When I go up there, I have to bundle up like I am going for a mile walk across the tundra!  I also feel the secret is out now and when I pull up to the Goodwill store, I am lucky if I can find a parking space!

Despite this, I always take a look for those unique items you can only find in a second-hand store and yard sales. Part of the fun is the thrill of the hunt, and coming up empty-handed is a part of it.   I am always interested in quirky little items even if I am not sure what its original use was.  My husband and the toddler apprentice were out with me one Saturday, and we couldn’t find much, but did spot this unique wooden wall hanging with a bit of storage.  It definitely screamed late 70’s early 80’s to me, and I thought it would look cute in our kitchen.

thrift store wooden wall storage thing

I wanted to re-style it to be more vibrant and colorful.  I thoroughly cleaned the piece with a damp cloth.  I had some leftover red spray paint from a previous project and decided to use it to brighten up the piece.  I took it outside and sprayed it red.

Spray painted piece

This particular spray paint required about 9-24 hours to completely dry.  Once it was dry enough for me to pick up, I brought it inside to my craft room and allowed it to dry in front of the fan.  Later in the evening the piece seemed dry enough, so I placed the front of the piece down upon the back of the fabric to trace it with a fine tipped black marker.  Probably better if I had traced the object on to the fabric before it was painted, but I was lucky and none of the marker made its way on the painted area.  I then applied Mod Podge with a foam craft brush on the front.

Apply Mod Podge

I then applied the cut fabric and smoothed it carefully out with my hands.  I picked a fun Mod fabric with a lot of bright colors.

Apply Fabric

I applied Mod Podge over the fabric and allowed it to dry overnight.  The next morning it was ready to hang.  I love the bright colors which go along perfectly in our yellow kitchen. Now, I just have to decide what I will use it for.  I am leaning toward a salt and pepper holder.

Upcycled Kitchen Wall Hanging and Storage

Before and After: 

From Odd To Mod-Upcycled Thrift Store Wooden Wall Hanging Restyled with Mod Podge, Paint, and Fabric