Decoupage “Ugly Tray” Re-styling using Mod Podge

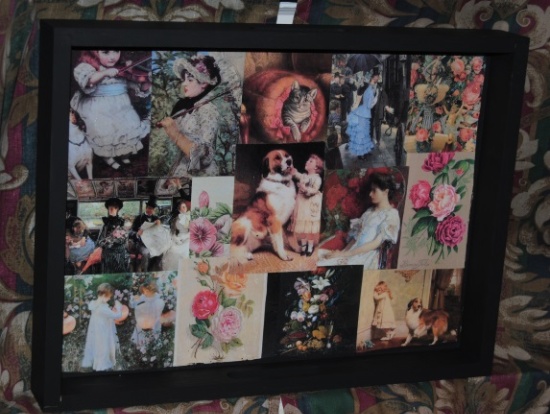
One of the things I look for when I go to thrift stores and swap meets are ugly trays.  I like them because they are great items to decoupage and I love decoupage!  They are also fairly inexpensive.  They are great practice and experimental pieces, and they are functional.  The possibilities are endless as to  themes and what you can do with these trays.  They also make great gifts. For My first decoupage tray, I used a freestyle approach.  I printed out all these lovely Victorian Era prints.  I love the Victorian era artwork and elegant look.  I had this old tray that was quite boring and a few times I had actually thought of throwing it away because it took up space and was just plain ugly.  I decided it would be a great piece to experiment on.   I painted the entire piece black with acrylic paint, and cut out the prints I wanted to use in the collage. I then used Mod Podge Gloss finish to glue the images to the tray.  Once completely dry, I sealed the entire piece with 3 coats of Mod Podge gloss finish.   I decided to hang the tray on our living room wall.   These trays also make great wall art.

Image

DIY Upcycled, Decoupage Switch Plate and Outlet Covers

It’s the little things in life that sometimes make a big difference, and that is also the case with home decorating.  If you are just starting out one of the best places to start is with your outlet, and switch plate covers.  A little sprucing up can add a lot of detail to your home.  If it is your first time venturing into decoupage it is also a great starter project.  This was my first project using Mod Podge.  It wasn’t too long after this that I started doing furniture and other items.  Just a warning it can become an addiction!

Materials:

Mod Podge Matte Finish

I used an old gift bag, but you can also use cloth or scrapbook paper

X acto knife

Pencil

Remove the outlet/switch plate cover from the wall and carefully trace all areas with a Pencil.

Use the X acto knife to carefully cut out the tracing.

Once cut, use the Mod  Podge to adhere the paper to the cover carefully smoothing out any air bubbles.  Let Dry.  Then cover the papered area with three coats of Mod Podge allowing to dry thoroughly between coats.  Once dry they are ready to install!  Just say no to boring white covers!

Made with recycled gift bag and Modge Podge

Made with recycled gift bag and Modge Podge

Trash to Treasure~ Upcycled Decoupage Bedroom Nightstands

In early 2002 My husband and I were just starting out, and like most people just starting out you tend to be a little light when it comes to home decor and home furnishings. I will admit that not only do I like frequenting Good Will and various other thrift stores, I also like trash night. I always keep my eyes open for curbside furniture finds. I feel a little like a hero- I am keeping one more piece of garbage out of the landfill. So, it was on this fateful night that I spotted two bedroom nightstands beside the apartment dumpster no diving required LOL! The hubby and I were desperate to simply have a place to put a drink, or a book beside our bed. They were functional yes, but I secretly hated them and dreamed of getting new nightstands someday. Flash forward to 2013 and we still have the nightstands! We never got around to replacing them, and they were inching ever closer to fulfilling their original destiny when I discovered… Decoupage! There was no question these tables needed a serious makeover, but thanks to my other addiction Pinterest, the ideas were flowing and I decided to give it a try, besides they were going to end up in the trash anyway!

Materials I used:

One very old and beat up nightstand
Mod Podge Matte Finish
Black Acrylic Paint
Scrapbook Paper

These tables were so beat up not much sanding was required. I painted the entire piece and cut the scrapbook paper to fit the various areas of the table I wanted to cover. I used the Mod Podge to glue down the paper to the wood. I then sealed the entire table with Mod Podge covering the painted areas to give it a sheen and seal the paint so it wouldn’t chip. You see the final result below came out better than I imagined it would and once again these tables avoided the trash heap! They are holding up very well too although I would suggest using a coaster for that drink! : 0 )

DSC_1126h    Black and white decoupage tables  DSC_0032

Wooden Rocking Horse Re-Do

I wanted to make something special this year for my daughter who is turning 2 next month. My husband and I share a common love of shopping at thrift stores and we found this horse at Good Will for $4.99. I sanded it lightly and used a primer. I then used acrylic paint to paint the horse two shades of pink and white. I decoupaged scrapbook paper onto the horse and used Mod Podge Matte
finish to glue and seal this project. I was going for a more classic rocking horse and the debate with family and friends over whether I should give the horse a mouth and eyes was quite amusing. What do you think? Do you prefer whimsical or classic rocking horses?

Wooden Rocking Horse Re-Do