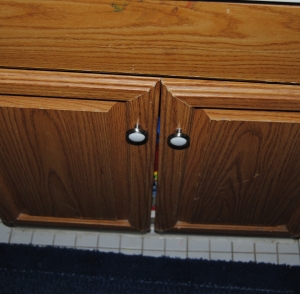
Of all the rooms in our home our bathroom I can say without a doubt is my least favorite. Our house was built-in 1937 and most older homes provided basic accommodations when it came restroom facilities. Adding to these difficulties is the fact that we have only one, small bathroom in our home and it is in desperate need of a re-model. That of course financially is not in the cards for us now. However; I am a firm believer in making the best out of a situation, and I have had plans for quite sometime to work on improving our bathroom. Our biggest eye sore was our bathroom sink cabinet. Replacing it was not an option, so I thought I could use some paint and a fabric decoupage to improve the look of the cabinet and add some design qualities to a rather bland and uninspired bathroom.
I hadn’t tried a project like this before and I knew it would require quite a bit of work. I picked up a half yard of fabric from Joann Fabric and prepped the cabinet by cleaning it with a damp cloth. I used a screwdriver to remove the doors from the hinges. I then removed the knobs and placed them aside. I used a white all in one latex paint and primer to paint the outside and inside shelf of the cabinet. I used a paint roller on the larger areas and a smaller paint brush for the areas the roller couldn’t reach. I also painted the cabinet doors. I allowed the cabinet to dry thoroughly overnight. It took about three coats to completely cover it.

The next morning, I traced the painted cabinet doors onto the back of the fabric. Any access fabric, I would trim away later with a box-cutter knife. I applied Mod Podge to the doors with a foam craft brush.
I then applied the fabric to the surface and smoothed it out with my hands. I applied another coat of Mod Podge over the top of the fabric and I used my nail to work the fabric into the crevices.
I repeated the same process for the second door and allowed them to dry in front of the fan. Once dry, I used a box cutter knife to carefully trim the excess fabric using the groove of the door as a guide.
I reconnected the doors to the cabinet and reattached the knobs. I applied an additional fabric swatch to the front of the cabinet, and repeated the same process of applying the Mod Podge and fabric and trimming away the access fabric. I then touched up any areas of the cabinet with paint that needed it.
I really love the aqua and brown color scheme and hope to incorporate some more color in our bathroom. I feel this may be a great start to improving our tiny neglected lavatory! I was surprised at how well this project turned out and the cabinet has gone from eyesore to accent! It cost only about ten dollars worth of materials to make this project a reality, and I am really glad I gave it a try. I have a feeling this is only the begining!
Bathroom Cabinet Makeover Materials:
Mod Podge
All in one latex primer and paint in one
Fabric of choice
foam craft brush/paint roller
paint brush/fine tipped marker
Box cutter knife/scissors
Before and After:


I love how it turned out! Well done! Aren’t you afraid that water is going to get on ModPodged surface and ruin it? Or is it waterproof?
LikeLike
It’s only a problem if you let water sit on it for a length of time.
LikeLike
Very cute
LikeLike
Thanks!
LikeLike
I did a pier 1 TV armoire mod podge style a few years ago. I’m not huge fan of the MP but for these projects it rocked it!
LikeLike
Thanks! It really changed the look of our bathroom, but still some more work to be done.
LikeLike
This looks great – so eye catching. I’ve seen something similar done with wallpaper which I thought sounded like it would be tricky to get right. Your way with fabric looks easier to me!
LikeLike
Thank you! I have to say of all the materials I have worked with I like fabric the most, and the variety of styles and colors is limitless!
LikeLike
What a difference, well done!
LikeLike
So pretty!!!
LikeLike
Thank you so much for sharing with us.
LikeLike
Very lovely. I did the same thing to our old bathroom, minus the decoupage. I’ll try that next time.
LikeLike
Thank you! It turned out better than I expected. : )
LikeLike
Very impressive and a great idea. Happy Holidays! Blessings, Mtetar
LikeLike