Upcycled Wooden Pedestal Bowl

Image

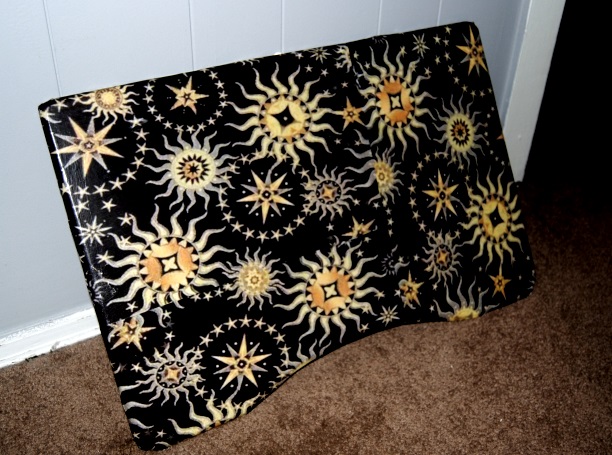
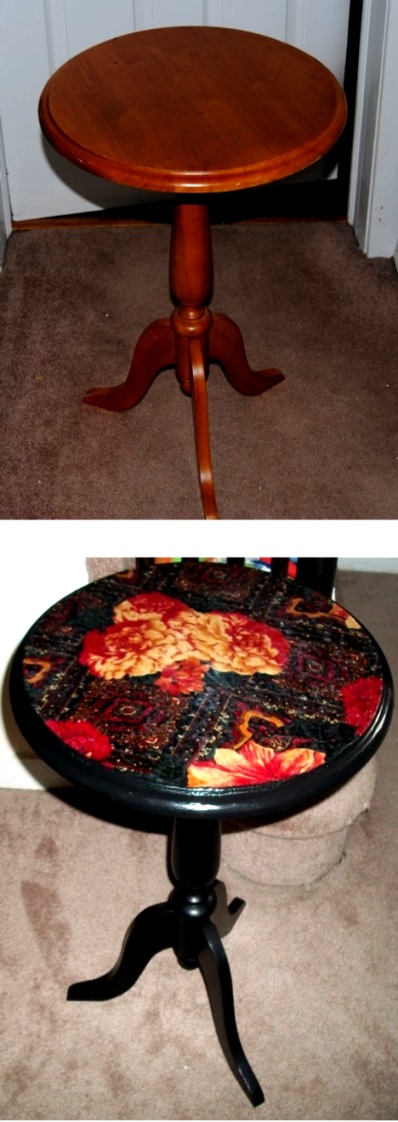
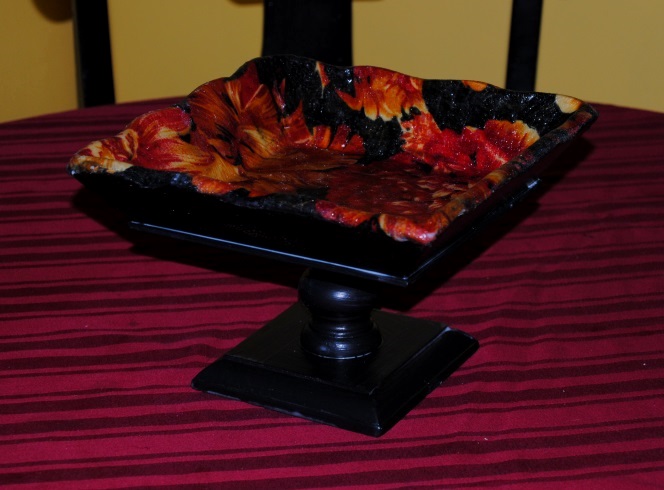
Recently I came across this great wooden pedestal bowl at a flea market.  The first thing I noticed wasn’t the bowl.  Their was a big cardboard sign stating “Everything on this table only a dollar!.”  A buck seriously? I have to admit most of the items on the table were junk, but the little wooden pedestal bowl caught my eye.  I had nothing to lose!  I had some of the scarf material left, I could use this to decoupage the inside.  I had used this same material on a side table in a previous post. I had a vision when it came to this little bowl!  First, I primed the bowl with a white latex primer.  Once dry I used black acrylic paint and painted the entire piece.  Next was the tricky part.  I couldn’t measure the fabric for the inside surface of the bowl.  Instead I took a larger piece of fabric than I needed and using Mod Podge glued it to the surface leaving the extra fabric to hang over the edges.  Once dry I carefully trimmed the fabric and applied Mod Podge to the edges to mold it to the wood.  I then sealed it with four coats of Mod Podge applying it to the entire piece.  I really liked how this turned out and will be sure to keep my eyes open for any wooden bowls that cross our path in the future!

Image

Restyled Celestial Decoupage Portable Lap Top Desk

Image

Their is nothing I love more than trolling around in our attic!  I call it re-shopping. Before I go out and buy something new, I always check in our attic for items that have long been forgotten, stored away and are one step away from the trash can.  It was on this day that I came across an ugly old lap top desk.  I find myself more often times than not, blogging from my bed on my laptop . This would be perfect, but boy was it an ugly eye sore! Mod Podge to the rescue!  I had these cool celestial prints I had printed out and had no idea what to do with them!  I like the pattern and thought I would tuck them away and use someday.  I thought to myself someday is now!  You can use wrapping paper, scrapbook paper, magazine cut outs, the possibilities are endless! It really depends on your personality! The biggest challenge with this project was the size of the laptop table surface.  Matching up the design was a challenge as was gluing the paper to the curved edges of the surface.  Otherwise this was a fairly simple project.

Materials used:

Old laptop desk

Mod Podge Matte Finish

Paper of choice to decoupage

Scissors and a marker for tracing

Mod Podge rubber smooth out tool

Restyled LapTop Desk

Character Cupcake trays made with Mod Podge

Sesame Street Cupcake tray

Ahhh ugly old trays! Gotta love them!  There is no shortage of them at your local thrift store, or Dollar Store.  I am on a mission to rescue as many of these trays as possible!  They make great decorations and are simple and easy to repurpose.  I will admit as great wrapping paper is to use when decoupaging, I always struggle a bit with the wrinkles and air bubbles, but the variety of paper and styles available keep me coming back.  In this case, I used Sesame Street, but you can use any characters you like.  My daughter’s 2nd birthday theme is all of the Sprout channel characters.   Sesame Street seemed like a great choice for this cupcake tray and I thought it would make a great decoration for her party.  These are pretty simple to make.  I simply traced the tray onto the wrapping paper, carefully cutting the paper along the line with a pair of scissors.  I used Mod Podge to glue the wrapping paper to the tray, doing my best to smooth out as many air bubbles and wrinkles as I could.  I then applied several coats of Mod Podge to seal the image onto the tray.  I find when using wrapping paper the more coats of Mod Podge the better so use the Mod Podge generously!

Materials:

Ugly old tray of your choice

Mod Podge Matte Finish

Character Wrapping paper

Scissors

Thin tip black marker

Sesame Street Girls Painted Kids Rocking Chair Made With Mod Podge

Image

Monday’s get me down, but rainy days don’t!  It has been raining all weekend and what better indoor therapy is there, than starting and finishing a new project!

Last week, I was on my lunch break and something told me to stop in the local Good Will Store. The last time I was in this store I was very disappointed with their prices and stock.  I am glad I listened to my “thrifty senses” and gave it another try.  As soon as I walked toward the back of the store where they keep all the furniture, I noticed the little rocking chair sitting there.   Before anyone else had time to notice this little “diamond in the rough”, I snatched it up.  I knew this was not going to be easy.  The chair was black lacquer and in several places on the chair, it looked like a small dog had chewed on it. The chair was also loose, but appeared it could easily be tightened up.  The chair was priced $6.99, which was a bit steep for an item in this condition, but who knows when I might find a kids rocking chair again?

I took it home and hand sanded the areas where the wood was damaged until it was smooth.  I then used two coats of latex primer and painted the entire chair.  Once dry I began the process of working out the color scheme and hand painted the chair using acrylics.This took a while as when dry I had to add additional coats.  Once the chair was painted, I used Sesame Street wrapping paper for the chair back and on the seat.  I glued the wrapping paper down with Mod Podge carefully smoothing out any air bubbles.  Once dry, I coated the entire chair with Mod Podge matte finish and repeated a total of 3 times.  The result is what you see here.  Now, My little girl will have her very own chair to sit on and read in her room. I think I am in love with kids furniture!

Image

Erin reading a book in her new rocking chair

Restyled Side Table

100_6249

Their is nothing I love more then a good side table.  They can add so much to a room if you can find one with the right look.  I purchased this side table at Walmart for under 20 dollars more than 6 years ago.  Sure, the table served it’s purpose well, but was far from anything special. I decided to give it a new look, but what to do?  These days, I find myself looking at things differently.  When I am out and about,  I am always looking for fabric, textiles that stand out in the crowd.  Mod Podge and fabric are great for revamping furniture.

On this day I found a really nice woman’s scarf for 99 cents at the thrift store. It was perfect to cover the table top of a smaller piece of furniture.  I primed the table using my trusty latex primer.  Once the table was dry, I painted the entire table with black acrylic paint.  Several coats were required.  I turned the table upside down and carefully traced with a black sharpie marker, onto the scarf material.  I used scissors to cut the fabric.  Now I was ready for Mod Podge!  I covered the table top with Mod Podge and glued down the material.  Through experience I find different materials are better in this process than others.  This scarf because of it’s texture was difficult to smooth out the air bubbles.  I wish I could tell you the materials make up , but the tag was cut off the item.

Once the piece was dry, I coated the entire table with 4 coats of Mod Podge. The result is what you see here and I love it especially the splash of colors (Did I mention I LOVE COLOR)

In the end, The table top had a rougher finish than I preferred so you may want to try using the gloss finish to add a bit more sheen. I generally use Matte finish in most of my projects and it is fine, but sometimes the material you use makes a difference.

side table made with Modge Podge

1960’s Inspired Decoupage Coffee Table

1960's Style Decoupage Coffee table

Impulsive.  That is the word I would used to describe this latest project.  This table was simply in the way.  I was storing it in my craft room and it was propped up against the wall taking up precious space.  I didn’t want to bring it up into the attic mainly because I didn’t want to have to drag it back down again.  After all, I had plans for this table what they were I wasn’t exactly sure.

I had purchased this great fabric at Goodwill, and to me it had a 1960’s style appeal. The material is made by Helen Trast Ikea of Sweden and appear originally to be drapes.  I was attracted to the bright colors.  There is nothing I love more than color.  I used this fabric for both the garden pig make over and step stool of my previous post.   I had an idea.  The coffee table was still in pretty good shape, accept for the table top.  In this case, I decided to give the paint brush a rest.  I thought the bright colored fabric would also go well in our family room/playroom. I went with it.  I flipped the table over onto the fabric and traced the table top with a black marker. I then carefully cut out trying to stay as close to the line as possible.  Once cut, I slathered the table with Mod Podge and glued the fabric carefully to the table top, spreading it out evenly. Once dry I did about 4 coats of Mod podge to the table top allowing to dry between coats.

I realize this fabric style may not be everyone’s cup of tea; However this simple coffee table makeover can be done to restore otherwise destroyed surfaces.  The fabric styles out there are endless and can be modified to a person’s individual taste. The free spirited 60’s and 70’s live on thanks to Mod Podge!

Decoupage Coffee Table

Bedroom table lamp and magazine rack restyled using Mod Podge.

Image

We have lived in our home for about 7 years and one of the last rooms we put our individual stamp on was our bedroom.  Out of all the rooms in our house at the time, the bedroom was the one room we could live with as is.   It was painted blue and the walls were still in pretty good shape, so we focused on some of the other rooms first that needed our attention.  My husband had a bedroom growing up that was painted grey.  Out of all the rooms he slept in over the years he said he felt more relaxed and slept better in a grey room.  Finally about two months ago we decided to go for it and finally re-do our bedroom.  After we painted the room grey it looked great, but some of our furniture did not.  As per a previous post the first thing that needed our attention was our bedroom nightstands.  We were so pleased with how they turned out we decided to decoupage our table lamp and magazine rack.  We inherited this table, as it was left behind by the previous people who lived in our house.  First thing I did was tighten the table as it was quite loose.  I cleaned the entire table with a wet cloth removing any dust and dirt.  I then glued (using Mod Podge Matte finish)   scrapbook paper to the table top, and the bottom of the magazine rack.  I then removed the drawer knob and traced the front of the drawer onto the scrapbook paper. Using an X Acto knife I carefully cut the paper and glued to the front of the drawer using Mod Podge.  Once dry, I primed the areas I planned on painting with a white latex primer. I painted the table with two coats of black acrylic paint.  Once dry, I covered the piece with 3 layers of Mod Podge allowing to dry completely between coats.  We switched out the lampshade with a lamp shade that matched from Christmas Tree Shop  http://www.christmastreeshops.com/  and poof!  Now we have a matching table, lamp and magazine rack to go along with our bedroom nightstands!

Materials used:

Mod Podge Matte Finish

X Acto knife

Scrapbook paper

White Latex Primer

Black Acrylic Paint

Pencil

Hand Painted Decoupage Kids Time Out Chair

Image

Happy Mother’s day to all you wonderful crafty moms out there!

It was a bit ironic, that this weekend’s project is a kids Time Out chair, but my daughter is about to turn 2 in two weeks and my husband and I want to start using the little chair as a learning tool and why not learn in style?  I have to say this craft was a bit of a challenge for me, mostly because I wasn’t sure how I wanted to make the chair.  Looking back I may have done the chair a little differently as I am not a 100% happy on how it turned out.  I think the color scheme could have been a bit better and I am not sure I would have used flowers if I had it to do all over again.  I try not to get discouraged if something doesn’t turn out exactly as planned.   After all without mistakes what can we learn from?

Materials Used:

Scrap book paper

Acrylic Paint

Mod Podge-Matte Finish

Stick on Letters

Wrapping paper (for “time out” flower)

White Latex Primer

The chair was not in the greatest of shape.  I rescued it from the flea market for $ 2.00! When I got it home, I cleaned it as best I could and primed it with the latex primer.  I let it dry thoroughly   I then cut and measured the scrapbook paper for the seat and glued it to the seat using Mod Podge.  Then I hand painted the entire piece.  This was the most time consuming aspect of the project.  Once dry, I used the stick on letters for the “Time Out”  and wrapping paper I had for the flower over the letters.  I then sealed the entire piece with 3 coats of Mod Podge.  Who would have  thought a punishment chair could be pretty? (LOL)

Frida Kahlo inspired decorative decoupage tray and art case

Nothing is worth more than laughter. It is strength to laugh and to abandon oneself, to be light.
~Frida Kahlo

I picked up this ugly old tray for $2.00 at the flea market about a week ago.  At that time I really had no idea what I was going to do with it.  I did know one thing it needed a makeover! My sister’s birthday is coming up and since discovering my new upcycling obsession, I wanted to make her something special.  I always admired the artist Frida Kahlo and I was intrigued by her artwork and her life story.  My sister is also a fan of her art and got to see an exhibit of her work a few years back.  I recently did a quick project of my own when I decoupaged my art box with Frida Kahlo art and scrap book paper. (Pictured below)

This gave me the idea for the tray. Simple projects too!

Her birthday is next week.  Hope she likes the tray, but I am keeping the art box!

; 0 )

Art Case Before

DSC_0037

DSC_0067

DSC_0080

Sports Team TV Trays made with Mod Podge

My husband and I were sitting down last Sunday after our little one had finally gone to bed.  We were watching our favorite show, Game of Thrones.    It has become our Sunday night ritual and is easily one of my favorite top five shows of all time!

Most of our house is now toddler proof, so we are lacking a coffee table in our living room as well as side tables.  We pulled out the old TV trays we had up in the attic and they were perfect to put our popcorn and drinks down on, but that’s about all the good I could say about them.  To me, they were just plain and ugly! I said to my husband that I should give the tables a makeover.  We have three total.  The original plan was to re-create the baseball card decoupage table I had seen on Pinterest, but the hubby didn’t want to part with any of his old baseball cards and I can’t say that I blame him.  So, we decided I would make a TV tray dedicated to my husband’s favorite sports team-The Philadelphia Phillies.  There are a lot of great, free graphics on the web. If you have a good printer at home and some larger paper you can find just about anything online to decoupage. (Ink jet printers not recommended as the ink will often times run)   The limits are endless on what can be used so keep that in mind.  Old sports linens, place mats, wrapping paper, sports decals-just about ANYTHING can be used to decoupage, so let your imagination run wild and always think outside the box. First I cleaned the table, removing any dirt or dust.  I used a latex primer to prime the entire TV tray.  Once dry,  I used Acrylic paint and painted the legs and underneath as well as the table top edges.  I used Mod Podge to glue the print to the table top carefully smoothing out any air bubbles.  Once dry I used three coats of Mod Podge Matte to seal the piece letting the table dry completely between coats.  I was actually shocked as to how well it turned out!  I was so pleased I decided to do the other two TV trays as well in the hopes of selling them. We plan on purchasing our flea market space one weekend this summer in the hopes of raising some money to take a much needed family vacation. Sesame Place or bust!

Materials used for this project:

Mod Podge Matte Finish

(I also used the Modge Podge Roller Tool to help smooth out the air bubbles)

X Acto knife

An item to decoupage (poster, print, linens, decals, place mat or anything you can dream up!

Acrylic Paint

DSC_0071

DSC_0094

Decoupage Sports Team TV Trays