To Upcycle or not to Upcycle. That is the question.

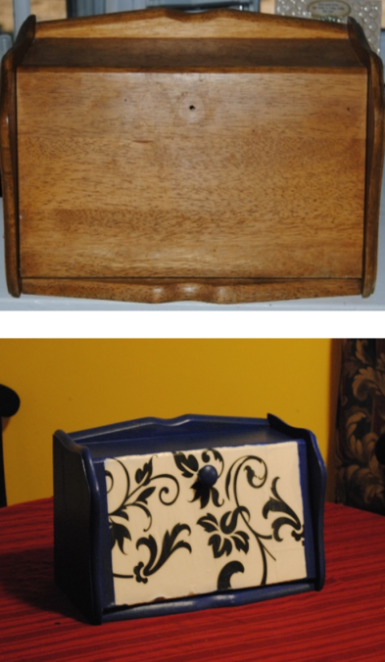
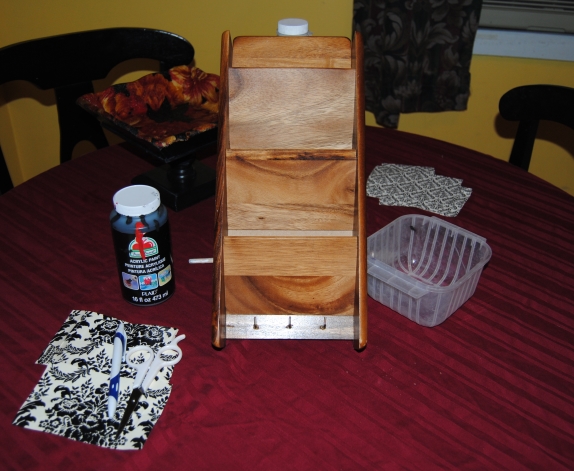
I’ll admit when I go thrifting I am attracted to certain items, but not for the reasons you may think.  Sure everyone dreams about finding the picture frame with a copy of the original US constitution in it resulting in the big “pay day”, but I am not always in it for what something is worth. I still have a lot to learn when it comes to determining what has the most value. More often than not, my choices are simply based on what I like.  I love anything retro, furniture, and fabric. I love to think outside the box when it comes to how I utilize these materials.

It was on one of many trips to the Goodwill that I came across this kids rocking chair:

Image

I saw it from a far and I didn’t waste anytime making my way over to it.  In my cart it went without hesitation. I didn’t even check the price at first.  Anytime I see kids furniture, I can restyle I buy it. Looking down at the tag I couldn’t believe my eyes.  I could tell it was a well made chair and it was only $5.99! I flipped the chair over and saw this:

Image

When I got the chair home, I did a little internet research on it and the company that made the chair. The Dixie Seating Company was founded in 1930’s and are known for making quality chairs and furniture for kids and adults. Most of these chairs are going for $76-$200 per chair online! I paid $5.99.  Except for some minor wear, the chair is in excellent condition.

After taking this all into consideration, I have put away the primer and I am instead taking out the Murphy’s oil soap. I am rethinking the upcycle and my decision is to leave the chair in it’s original state.

What do you think?  Have you ever decided not to upcycle an item because you were concerned  a redesign could effect value?  I would love to hear what others think on this.  Do you all think I made the right decision?

I e-mailed the company to try to gain more info on the chair including when the chair was made. They have not  have responded. The company started in 1934, but has changed owners a few times, and they had no information on this serial #.  They said best guess early 50’s. I believe the chair is at least  30 years old.  If anyone out there can offer any additional info on this chair, I would greatly appreciate and would love to hear from you!

Image

What is it? The 50 Cent Wooden Mini Pallet Makeover

Buy now ask questions later! The price was certainly right, only 50 cents, but what was this item and what was it’s original use?  It looked like a miniature pallet, but felt a little like a tray. Whatever it was didn’t really matter. I loved the fact that it was a fresh unstyled piece and I was determined to give it a new look. After searching the Goodwill shelves a bit more and leaving disappointed, I took a trip down the fabric aisle and found a nice old bed skirt with a triangular pattern that would be a perfect restyle fabric.

I gathered the materials I would need. Firstly, I traced the pallet slats onto the fabric with a black sharpie marker. I repeated this a total of 3 times once for each slat.  I then cut the fabric out with scissors.

Image

I applied the Mod Podge to each slat with a foam brush and glued down the fabric smoothing it out gently with my hand.  I used black acrylic to paint the non decoupaged areas. Once the piece was completely dry, I applied Mod Podge over the entire tray to seal it.  Not bad for 50 cents!

Before/After:

Image

Image

“Me Want Cookie!!!” Cookie Monster Decoupage Cookie Jar

Family Proclamation: We really need a cookie jar!  Every time me or my husband open a bag of vanilla wafers for our little one, the bag rips and the box won’t stay closed. The cookies also don’t stay fresh for very long under these conditions.  Often times, I end up cramming all the cookies into one sandwich bag, not very attractive!  So, I just so happened to be in the thrift store last week, when I  came across a large glass jar with a lid for only $1.99!  This I thought to myself, would make a perfect cookie jar so into my cart it went.

As most of my readers already know my daughter is a HUGE Sesame Street fan.  Her favorite doll is her Ernie doll which she carries with her everywhere she goes and takes with her to bed at night. Her other favorites are Elmo and Cookie Monster.  It just seemed like a no brainer that a Cookie Monster/Sesame Street Cookie Jar was in order.  I printed out 5×7 Cookie Monster image from online, and for the sides of the jar I decided to recycle an old Sesame Street Birthday Party Decoration.

Materials:ImageImage

I cut out all of the images I wanted to decoupage to the jar.  The birthday decorations were a bit larger than needed so I carefully trimmed them up so they would fit. The great thing about using the birthday decorations you ask?  They are double-sided and reflected the same image on the inside of the  jar as well as the outside-Awesome.

Image

Next step was to  apply the Mod Podge with a medium-sized artist’s brush.  I carefully glued the images on the glass.  I did this slowly, smoothing out the paper with my hand as to capture as little air between the paper and the glass as possible. Once dry, I applied two coats of Mod Podge over each image to seal it permanently to the glass.

Now, we have a fun and decorative place to keep our cookies fresh without dealing with those frustrating bags!

Image

Image

Wine Craft Wednesday: Upcycled Wine Bottle Garden Decorations

Image

There is nothing better than spending an evening decompressing after a long, hard day with a glass of wine.  Of course, even the occasional wine drinker is left to answer the question, “What do I do with all those empty wine bottles?” There are many great ideas out on the world-wide web for upcycling used bottles of all shapes and sizes.  Some of these projects call for “bottle cutting” and from what I have been reading online this is not always for the faint of heart. I wanted to do a wine bottle upcycle project that was simple and didn’t end with a trip to the Emergency Room.  I had decoupaged some bottles in the past, but I thought this time I would try something a little different.  I would attempt to make an outdoor garden marker using Outdoor Mod Podge and recycled gift bags.  First, I filled up a large pot with hot tap water.  I filled the wine bottles with hot water so they would submerse,  and placed them in the pot.  I let them sit for about and hour or until I could easily remove the wine labels.  While they dried I gathered the materials I needed.

Gift Bags

Scissors

Outdoor Mod Podge

Foam brush

I cut out the images I wanted to decoupage.  I turned the bottle upside down bottom of the bottle facing up.  I glued the images to the bottle using the Mod Podge and a foam brush.  I used my hands to smooth out the images and placed the  bottles under a stand up fan to dry.  Once dry, I applied 3 coats of Outdoor Mod Podge over the top of the image to seal. The instructions on the bottle of Outdoor Mod Podge say to let the piece dry indoors for about 72 hours.  An alternative use would be larger garden markers.  You could decoupage an image of a vegetable for example to label plants in the garden. The bottle neck acts as a stake to anchor the bottle into the ground.  Nowyou can kick back in the yard with that glass wine and admire your upcycle!

Image

Upcycled Wine Bottle Garden Markers

It’s Sunday, Have a Seat: Upcycled, Hand Painted Decoupage Football Lover’s Chair

I can assure you this will not be the last chair upcycle you will see on this blog.  I have really grown fond of Upcycling old chairs.  Not only do they look great when finished, They are a manageable pieces of furniture that fit easily in my smaller car. (I dream of someday having a truck or van to go for the bigger pieces) They also tend to be priced right.  Many of them are chair orphans separated from their original set.  On this day of thrifty shopping I came across two chairs priced very reasonably at $5.99 each. My husband had suggested since the Sports Team TV Trays turned out great, to do a matching sports themed chair.  Of course me being me I said sure!  I had picked up a perfect X back chair that would work well  for this latest project.

First, I cleaned the chair removing any dust or dirt.  I then painted the entire chair with a white latex primer.  I applied two coats of primer total. This was important since I did not sand the chair and it had a bit of a lacquer finish.  The Latex primer helps the paint to adhere to the chair better.  While the chair dried I prepared The Philadelphia Eagles logo I had printed.  I cut out the image.  Once the seat was dry I used Mod Podge Matte to glue the decal to the seat carefully smoothing out any air bubbles. I then added a few layers of Mod Podge over top of the decal.  When you hand paint using brushes sometimes the paint will splatter.  Protect your decal by covering it with Mod Podge (Once dry any paint can be wiped away with a wet cloth.) Or cover it with a plastic shopping bag.

Image

Now it was time to paint the chair.  The Philadelphia Eagles colors are Hunter Green, Black and White and those are the colors I wanted to use for this chair. I used about 2 coats of Acrylic paint allowing to dry thoroughly between coats in front of a stand up fan.

The next day, I used the Mod Podge Matte to completely cover the chair to seal it to prevent chipping.  I covered the chair in 2 coats of Mod Podge and the seat received 4 coats. I always add a bit of extra protection in areas I know will get the most use.

Before and After:

Image

Recap of Materials Used:

Chair

Mod Podge Matte

Sponge Brush to apply Mod Podge

Print Sports Team Decal of your choice

Scissors

Acrylic Paint/Various sized brushes

Image

Sports ChairSports Fan Chair Made with Mod Podge-On The Upcycle

Fabric and Mod Podge Mania- Upcycled Kids Wooden School Desk

What to do? Yesterday, the hubby had to go off to work so it was just me and the daughter dear all day. I decided to take a trip up to the new Joann Fabric  mega store that just opened up down the street from my house (I now have a craft store practically within walking distance, this could be dangerous!)  Usually, as you all know, I am a “thrifty” shopper, but today I had a few crafting supplies I had to pick up and I figured why not give it a look?  They had a great coupon I found online,  30% off total purchase (except for sale items of course) Which was icing on the cake –if I decided to buy anything.  I walked into the store and it was HUGE!  The place was filled with aisles, upon aisles of fabric.  I am used to Goodwill prices, so I was shocked at how expensive fabric can be! One fabric in particular  was $49.99 per yard… yikes!  Thank goodness they had good sales and aisles filled with fabric at $4.99 a yard phew!

Image

I found this great school themed material. I had purchased a wooden school desk at an outdoor flea market some time ago, and had no idea how or with what material I was going to restyle it.  Now it was no question the winner was… fabric! I picked up a yard for about $5.89 on sale.  Once me and the giggle-goo got home, nap time was approaching so, I put the little one to bed and gathered my materials I would need to get started.

Image

First thing was to make sure the piece was clean and free of dust.  Then I used a black marker to trace the desk top and seat onto the fabric.  Once this was done, I carefully cut the cloth with a pair of scissors. I then generously applied the Mod Podge Matte finish on the desk top and on the seat using a larger paint brush to smooth it out.  Then I applied it to the fabric, using my hands to smooth out any air bubbles.  Messy you say?  Absolutely, but I feel with fabric it gives me more control, than using the Mod Podge tools.  Besides, I have never been afraid to get my hands dirty!  Once it was smoothed out, I then applied a layer of Mod Podge over top of the fabric. While that was dying, I painted the piece.  I used Red, Black, and Blue all colors featured in the fabric. The wood was ready to paint and not in need of priming, but it was very dry and soaked the paint in initially.  It took about 3 coats overall to get the desired result. I brought the piece back upstairs and allowed it to dry for several hours under a stand up fan.

Fast forward to later in the evening.,with the daughter asleep for the night and the hubby finally home, I worked on finishing the piece. I decided to cut out some swatches from the material and Mod Podge these onto the sides to add a little more life to that area.  I then covered the entire desk with 2 coats of Mod Podge.  I usually add more coats to the areas that will get more use and where the cloth was applied.  I used 4 coats on the seat and the desk top areas.  Pictured below is the wooden desk before and after:

Image

The hubby loved how it turned out and I can’t wait for the little one to use it!  She loves sitting at her little table and chair so I think she will enjoy this just as much and it will grow with her.  I also love the neutrality of the desk a boy or girl could use it!

Image

Stay calm and happy crafting my friends : 0 )

DIY Recycled Wooden Photo Plaque

We have all seen them at the thrift stores and swap meets, and outdoor flea markets.  They are wooden plaques with various images painted or printed on them.  Sure, you can purchase wooden plaques at your local craft store brand new, but this one cost only .99 cents and I rescued it from a possible trip to the landfill.  Purchasing “pre -owned, only added one additional step to the project. I had to use a white, latex primer first before I could paint the plaque black with acrylic paint.   As far as projects go, it doesn’t get any easier than this!   This is a great beginner project if you are using Mod Podge for the first time.

First, I formatted and cropped the black and white photo into an oval shape and printed it out on photo paper.   I can’t afford photo shop, but there are plenty of free great photo editing software on the web.  I use  Paint.net .  This is my one of my favorite photo’s.   I took this when my daughter was only two days old.  Amazing how those days go by so quickly!  Even more reason to immortalize these special  moments  in time.  I left some time for the ink to dry on the paper and cut out the image carefully with a pair of scissors leaving a white border around it.  This I thought  would make the photo stand out from the black plaque.  I then glued the photograph down to the plaque using Mod Podge Matte finish.  Once dry, I covered the photo plaque with two coats of Mod Podge allowing the plaque to dry between coats.  The nice thing about recycled plaques are often times than not, they come ready to hang on the wall!  I was more than happy to add this Photo Plaque to our photo wall leading upstairs.

Image

Image

Pictured above Before and After

Materials:

Wooden Plaque/New or Recycled

Mod Podge Matte Finish

Printed Photo to decoupage

Scissors, Paint brush

Black Acrylic Paint

White Latex Primer

Image

Breaking Bread: Decoupage Bread Box Restyle

Decoupage Bread Box

When I was growing up, the one thing I remember we always had in our house was a bread box. So, naturally, when I moved out and acquired a home of my own, I immediatly bought this breadbox. Yes, this ACTUAL bread box! That would make this breadbox over 18 years-old! As far as bread boxes go it was typical, a wooden box and that was it.  No color, no style.  For years I thought of doing away with a bread box all together.  It took up a lot of counter space and it was nothing special, but where would I put the bread? When I started experimenting with Mod Podge and decoupage, This bread box was on my to do list.  Many projects have come and gone and it was finally time to decoupage the box!

This project was not as easy as it looks.  First, I measured the scrapbook paper I wanted to decoupage to the door,  I only had one piece in this style and in order to make it work, I had to trim, line up the design,  and fit it together in a few spots.  After the bread box  was cleaned, and primed, I glued the paper down with Mod Podge, and let dry.  I then painted most of the Bread box blue with acrylic paint and let it dry.  Next challenge was the number of coats of paint!  Cleaning it only helped so much after many years in the kitchen there was still a bit of grease on it.  I applied as many coats as it needed about 4 in all.Once the entire piece was dry, I applied the Mod Podge Matte to seal it.  I find the more layers of Mod Podge the better.  Yet another challenge was the door and not leaving enough room between the paper and the opening.  I had to carefully trim this with an X Acto knife.  Despite all this, I am glad this project is finally finished and the bread has a restyled box to call home

Decoupage Bread Box Mod Podge

A Lively Computer Tablet: Decoupage Makeover

Decoupage Tablet

I remember a time before computers.  Sure, actual computers have been around since as early as the mid 1930’s, but most computers were not accessible to the general public until the later 1990’s when I was already out of High School and beginning college. It wasn’t until the internet came in to play that everything changed, and computers began to get smaller and smaller.  I also remember a time when the closest thing to a computer in school was a book or a type writer.  I looked forward to getting new books every year, just so I could cover them with a brown paper bag!  I loved to draw designs on these paper jackets, pay tribute to my favorite music groups, and draw just about anything my teenage mind could come up with.  This was the inspiration behind this project.  Why not  “cover” the modern book, my little MID brand tablet.  I loved the result I achieved with decoupage smart phone makeover  So, I decided to give it a try.  I prepped the tablet cleaning it and removing any dust.   I then traced the tablet onto the scrapbook paper.  I picked a nice brightly-colored scrapbook design.   Keep in mind the design possibilities are endless! Joann Fabric had a great sale, five sheets of selected papers for only $1.00!   Once traced, I cut the it out, carefully cutting away the speaker area with an X-Acto knife.  I also paid close attention to  any other areas I did not want to cover with the paper.

Next, I applied Mod Podge to the back of the tablet, carefully avoiding any areas that might not tolerate glue, like the speaker for example.  I carefully glued the scrapbook paper to the back of the tablet, mind fully and with a smaller paintbrush.  This kept the glue from getting into any of the important areas.  If you are worried, you can also put a small piece of scotch tape over those areas to protect them, carefully peeling it off later.  Once dry, I covered the outside with multiple coats of Mod Podge Matte finish allowing to dry thoroughly between coats.

Materials used:

DSC_0602

I love the new look!  Who says an ugly tablet doesn’t deserve a decoupage makeover?

Live on the UPCYCLE!

Mail Call: Upcycled, Decoupage Mail and Key Holder

Image

I found this little wooden mail and key holder for two bucks at an outdoor swap meet.   I decided to use it by our front door so we could have a centralized place for our keys, cell phones and any other small items we take with us to work each day.  Initially, I was unsure of the design I would choose.  Then I remembered,  I still had some of the recycled gift bag I had used for my living room switch plate and outlet covers.  It became evident , the key/mail holder would be hanging  in close proximity to the switch plate and I thought it would look better if they matched.

Decoupage Switch Plate, Outlet

I measured and cut the gift bag to fit the mail slots. I then applied Mod Podge to glue the gift bag tracings to the slots.  While drying, I painted the rest of the piece black with acrylic paint.  Once the paint was completely dry I applied about three coats of Mod Podge over the entire piece to seal it. This was a very simple project with dramatic resulst!  It really stands out nicely against the Sandstone background and keeps electronics and other important items out of little toddler hands.

Before

Materials:

Mail/Key Holder

Mod Podge Matte finish

Gift bag/Scrapbook  paper

Black Acrylic Paint

Pen/Scissors/Paint Brushes

Decoupage key holder