Wine Craft Wednesday: Upcycled Wine Bottle Garden Decorations

Image

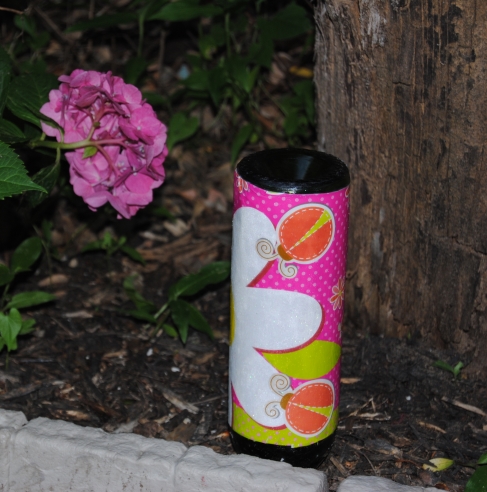
There is nothing better than spending an evening decompressing after a long, hard day with a glass of wine.  Of course, even the occasional wine drinker is left to answer the question, “What do I do with all those empty wine bottles?” There are many great ideas out on the world-wide web for upcycling used bottles of all shapes and sizes.  Some of these projects call for “bottle cutting” and from what I have been reading online this is not always for the faint of heart. I wanted to do a wine bottle upcycle project that was simple and didn’t end with a trip to the Emergency Room.  I had decoupaged some bottles in the past, but I thought this time I would try something a little different.  I would attempt to make an outdoor garden marker using Outdoor Mod Podge and recycled gift bags.  First, I filled up a large pot with hot tap water.  I filled the wine bottles with hot water so they would submerse,  and placed them in the pot.  I let them sit for about and hour or until I could easily remove the wine labels.  While they dried I gathered the materials I needed.

Gift Bags

Scissors

Outdoor Mod Podge

Foam brush

I cut out the images I wanted to decoupage.  I turned the bottle upside down bottom of the bottle facing up.  I glued the images to the bottle using the Mod Podge and a foam brush.  I used my hands to smooth out the images and placed the  bottles under a stand up fan to dry.  Once dry, I applied 3 coats of Outdoor Mod Podge over the top of the image to seal. The instructions on the bottle of Outdoor Mod Podge say to let the piece dry indoors for about 72 hours.  An alternative use would be larger garden markers.  You could decoupage an image of a vegetable for example to label plants in the garden. The bottle neck acts as a stake to anchor the bottle into the ground.  Nowyou can kick back in the yard with that glass wine and admire your upcycle!

Image

Upcycled Wine Bottle Garden Markers

Advertisement

Putting pearls on a pig~whimsical garden pig makeover

I received this little fellow from a friend of mine that was relocating to the West coast and could not take this poor little piggy with him. From the beginning I wasn’t sure how I felt about the little guy. He was grey, and even though he had cute little pig features, they were hard to see. From a distance he looked like a grey blob in the garden. I decided rather then send him to piggy heaven aka “the landfill”, I would try out some outdoor Mod Podge I had purchased a few weeks ago. I would give the pig a final shot at garden glory.
I was pleased with the end result, but It wasn’t easy!

Materials used:
Latex Primer
Mod Podge Outdoor formula
yellow latex paint
70’s drapery material
Black permanent marker

The first step was giving little piggy a good scrubbing and clean behind his ears. I placed him in the sink and started the hot water. I didn’t notice the small hole in the bottom of the pig. I started cleaning him and suddenly ants started pouring out of it! So lesson learned if something has been sitting out in the elements for a while, it’s not always the greatest idea to bring it into your home. So far I am thinking to myself this is not going well! At this point I am totally creeped out by all the bugs!

Once the ants were eliminated, I cut out the flowers from the fabric and used the Mod Podge to glue the fabric to the pig. This made painting with the primer more difficult, but I really wanted the fabric to stick to the pig and it may not as well if glued directly to the primer paint. I then primed and let dry, cutting in around the flowers carefully.
Then I made my 2nd mistake. I thought he would look good as a red pig. I painted him and I hated it! He looked darker than I expected and I was trying to bring out his features. So, I found an old can of yellow latex paint in the basement and I painted him yellow, but alas red is hard to cover. I should have primed it again before re-painting. I had to use 3 coats just to cover the red and even then some of the red was bleeding through, but it looked acceptable and I liked the dept the red gave it.
Once the paint dried I slathered on the Outdoor Mod Podge to seal the piggy. It is the first time I am using this formula, so I am interested to see how well he will hold up in the elements. I used a black marker to fill in his eyes, and added a slight outline to his mouth. After 72 hours in the house I was ready to release a bit of whimsy into our garden. It was a tough and challenging project, but I am pleased with how much color he adds to a not so colorful spot in our garden. He even fills in the space from a broken brick! I think I know how I feel about him now. I think I’m in love!

Whimsical Garden Pig Re-Style

DSC_0017