Restyled Side Table

100_6249

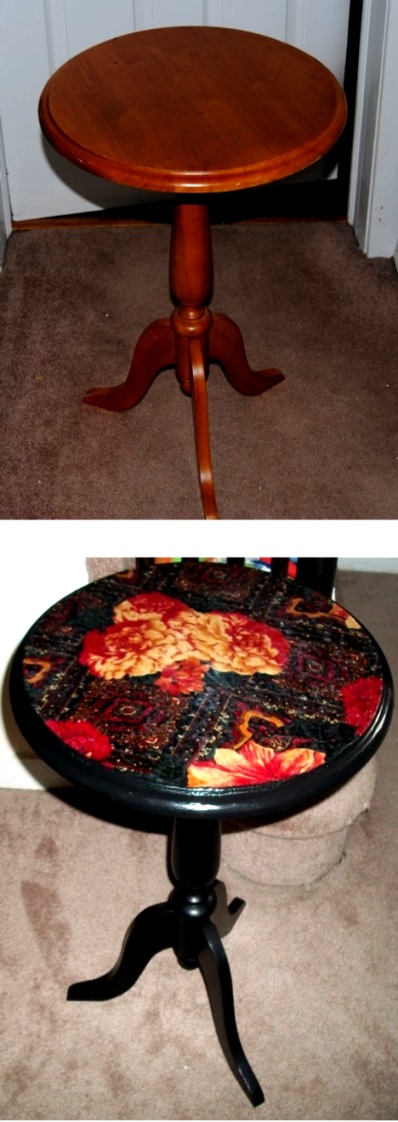
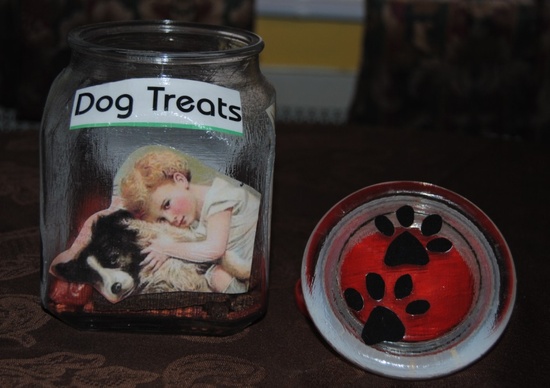
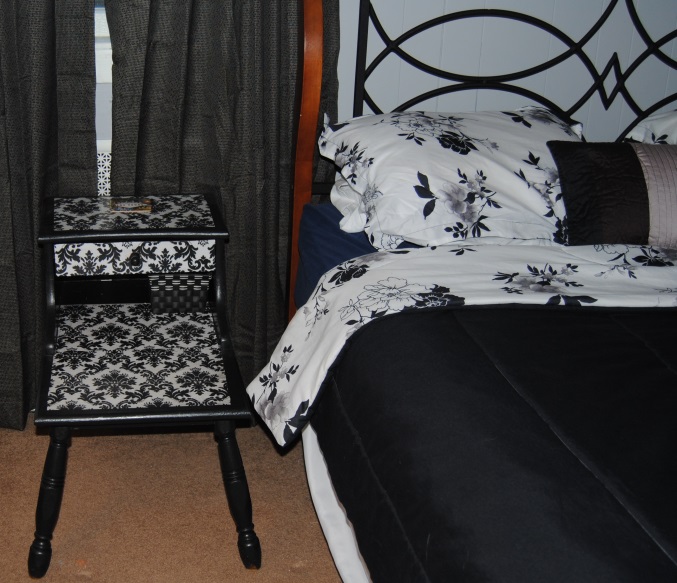
Their is nothing I love more then a good side table.  They can add so much to a room if you can find one with the right look.  I purchased this side table at Walmart for under 20 dollars more than 6 years ago.  Sure, the table served it’s purpose well, but was far from anything special. I decided to give it a new look, but what to do?  These days, I find myself looking at things differently.  When I am out and about,  I am always looking for fabric, textiles that stand out in the crowd.  Mod Podge and fabric are great for revamping furniture.

On this day I found a really nice woman’s scarf for 99 cents at the thrift store. It was perfect to cover the table top of a smaller piece of furniture.  I primed the table using my trusty latex primer.  Once the table was dry, I painted the entire table with black acrylic paint.  Several coats were required.  I turned the table upside down and carefully traced with a black sharpie marker, onto the scarf material.  I used scissors to cut the fabric.  Now I was ready for Mod Podge!  I covered the table top with Mod Podge and glued down the material.  Through experience I find different materials are better in this process than others.  This scarf because of it’s texture was difficult to smooth out the air bubbles.  I wish I could tell you the materials make up , but the tag was cut off the item.

Once the piece was dry, I coated the entire table with 4 coats of Mod Podge. The result is what you see here and I love it especially the splash of colors (Did I mention I LOVE COLOR)

In the end, The table top had a rougher finish than I preferred so you may want to try using the gloss finish to add a bit more sheen. I generally use Matte finish in most of my projects and it is fine, but sometimes the material you use makes a difference.

side table made with Modge Podge

1960’s Inspired Decoupage Coffee Table

1960's Style Decoupage Coffee table

Impulsive.  That is the word I would used to describe this latest project.  This table was simply in the way.  I was storing it in my craft room and it was propped up against the wall taking up precious space.  I didn’t want to bring it up into the attic mainly because I didn’t want to have to drag it back down again.  After all, I had plans for this table what they were I wasn’t exactly sure.

I had purchased this great fabric at Goodwill, and to me it had a 1960’s style appeal. The material is made by Helen Trast Ikea of Sweden and appear originally to be drapes.  I was attracted to the bright colors.  There is nothing I love more than color.  I used this fabric for both the garden pig make over and step stool of my previous post.   I had an idea.  The coffee table was still in pretty good shape, accept for the table top.  In this case, I decided to give the paint brush a rest.  I thought the bright colored fabric would also go well in our family room/playroom. I went with it.  I flipped the table over onto the fabric and traced the table top with a black marker. I then carefully cut out trying to stay as close to the line as possible.  Once cut, I slathered the table with Mod Podge and glued the fabric carefully to the table top, spreading it out evenly. Once dry I did about 4 coats of Mod podge to the table top allowing to dry between coats.

I realize this fabric style may not be everyone’s cup of tea; However this simple coffee table makeover can be done to restore otherwise destroyed surfaces.  The fabric styles out there are endless and can be modified to a person’s individual taste. The free spirited 60’s and 70’s live on thanks to Mod Podge!

Decoupage Coffee Table

Bedroom table lamp and magazine rack restyled using Mod Podge.

Image

We have lived in our home for about 7 years and one of the last rooms we put our individual stamp on was our bedroom.  Out of all the rooms in our house at the time, the bedroom was the one room we could live with as is.   It was painted blue and the walls were still in pretty good shape, so we focused on some of the other rooms first that needed our attention.  My husband had a bedroom growing up that was painted grey.  Out of all the rooms he slept in over the years he said he felt more relaxed and slept better in a grey room.  Finally about two months ago we decided to go for it and finally re-do our bedroom.  After we painted the room grey it looked great, but some of our furniture did not.  As per a previous post the first thing that needed our attention was our bedroom nightstands.  We were so pleased with how they turned out we decided to decoupage our table lamp and magazine rack.  We inherited this table, as it was left behind by the previous people who lived in our house.  First thing I did was tighten the table as it was quite loose.  I cleaned the entire table with a wet cloth removing any dust and dirt.  I then glued (using Mod Podge Matte finish)   scrapbook paper to the table top, and the bottom of the magazine rack.  I then removed the drawer knob and traced the front of the drawer onto the scrapbook paper. Using an X Acto knife I carefully cut the paper and glued to the front of the drawer using Mod Podge.  Once dry, I primed the areas I planned on painting with a white latex primer. I painted the table with two coats of black acrylic paint.  Once dry, I covered the piece with 3 layers of Mod Podge allowing to dry completely between coats.  We switched out the lampshade with a lamp shade that matched from Christmas Tree Shop  http://www.christmastreeshops.com/  and poof!  Now we have a matching table, lamp and magazine rack to go along with our bedroom nightstands!

Materials used:

Mod Podge Matte Finish

X Acto knife

Scrapbook paper

White Latex Primer

Black Acrylic Paint

Pencil

Hand Painted Decoupage Kids Time Out Chair

Image

Happy Mother’s day to all you wonderful crafty moms out there!

It was a bit ironic, that this weekend’s project is a kids Time Out chair, but my daughter is about to turn 2 in two weeks and my husband and I want to start using the little chair as a learning tool and why not learn in style?  I have to say this craft was a bit of a challenge for me, mostly because I wasn’t sure how I wanted to make the chair.  Looking back I may have done the chair a little differently as I am not a 100% happy on how it turned out.  I think the color scheme could have been a bit better and I am not sure I would have used flowers if I had it to do all over again.  I try not to get discouraged if something doesn’t turn out exactly as planned.   After all without mistakes what can we learn from?

Materials Used:

Scrap book paper

Acrylic Paint

Mod Podge-Matte Finish

Stick on Letters

Wrapping paper (for “time out” flower)

White Latex Primer

The chair was not in the greatest of shape.  I rescued it from the flea market for $ 2.00! When I got it home, I cleaned it as best I could and primed it with the latex primer.  I let it dry thoroughly   I then cut and measured the scrapbook paper for the seat and glued it to the seat using Mod Podge.  Then I hand painted the entire piece.  This was the most time consuming aspect of the project.  Once dry, I used the stick on letters for the “Time Out”  and wrapping paper I had for the flower over the letters.  I then sealed the entire piece with 3 coats of Mod Podge.  Who would have  thought a punishment chair could be pretty? (LOL)

Frida Kahlo inspired decorative decoupage tray and art case

Nothing is worth more than laughter. It is strength to laugh and to abandon oneself, to be light.
~Frida Kahlo

I picked up this ugly old tray for $2.00 at the flea market about a week ago.  At that time I really had no idea what I was going to do with it.  I did know one thing it needed a makeover! My sister’s birthday is coming up and since discovering my new upcycling obsession, I wanted to make her something special.  I always admired the artist Frida Kahlo and I was intrigued by her artwork and her life story.  My sister is also a fan of her art and got to see an exhibit of her work a few years back.  I recently did a quick project of my own when I decoupaged my art box with Frida Kahlo art and scrap book paper. (Pictured below)

This gave me the idea for the tray. Simple projects too!

Her birthday is next week.  Hope she likes the tray, but I am keeping the art box!

; 0 )

Art Case Before

DSC_0037

DSC_0067

DSC_0080

Dog Treat Jar made with Mod Podge

I really loved our dog treat jar!  Then I knocked it off our counter top and it broke into a million pieces.  I was bummed.  So I began searching for a replacement jar.  Most that I found were either boring or too expensive.

It was Mod Podge to the rescue!  I had an old cookie jar that I stopped using because I stopped buying cookies.  I was determined to get healthy after the birth of our baby girl.    I printed out some cute images off the internet and decoupaged them onto the jar using Mod Podge.  It was really simple and easy to make.  Of course our Bichon Frise Casper, could care less about what his jar looks like.  He is more concerned with the treats inside! ; 0 )

Dog Treat Jar 4e05969369f599e7a0038225b6f9333a

DIY Upcycled, Decoupage Switch Plate and Outlet Covers

It’s the little things in life that sometimes make a big difference, and that is also the case with home decorating.  If you are just starting out one of the best places to start is with your outlet, and switch plate covers.  A little sprucing up can add a lot of detail to your home.  If it is your first time venturing into decoupage it is also a great starter project.  This was my first project using Mod Podge.  It wasn’t too long after this that I started doing furniture and other items.  Just a warning it can become an addiction!

Materials:

Mod Podge Matte Finish

I used an old gift bag, but you can also use cloth or scrapbook paper

X acto knife

Pencil

Remove the outlet/switch plate cover from the wall and carefully trace all areas with a Pencil.

Use the X acto knife to carefully cut out the tracing.

Once cut, use the Mod  Podge to adhere the paper to the cover carefully smoothing out any air bubbles.  Let Dry.  Then cover the papered area with three coats of Mod Podge allowing to dry thoroughly between coats.  Once dry they are ready to install!  Just say no to boring white covers!

Made with recycled gift bag and Modge Podge

Made with recycled gift bag and Modge Podge

Adding a little Spice in the Kitchen~Skinny kitchen cabinet decoupage Re-do

This is a little skinny kitchen cabinet I picked up through ABC Distributing.  It added much needed cabinet space in our kitchen.  I was never thrilled with the finish, but it functioned great as it does not take up much space in our kitchen.  I am not sure how she managed to do it, but my active little 2 year-old decided one day to do a little modification herself and ripped a huge piece off the side leaving it scarred.  It was very noticeable and I didn’t have the funds to go out and buy another cabinet.   So, I decided to re-style it.

Materials used:

Mod Podge Matte Finish

Electric Blue and Black Acrylic Paint

Scrapbook Paper

Sandpaper

ruler

My kitchen is a bright yellow and even though I originally wanted to paint it black, I was compelled to pick a color a bit out of the ordinary, so I decided to go with blue.  I thought it would really “pop” against the yellow walls.  I did a light sanding on it, and skipped the priming this time.  I painted the entire piece blue and let it dry.  I then outlined the door in black.  I  measured out the scrap paper, paying close attention to  line the flower pattern up as best I could.  I had to glue it in pieces, so by matching it up, it made the pattern seem more seamless.  I used the Mod Podge to glue down the scrapbook paper on the door surface and the top surface of the cabinet.  I let dry and then covered with three coats of  Mod Podge to seal the piece.  I like this piece because it is unique and it actually looks better in person than in the picture.  It is holding up well and so far appears to be toddler proof!

Skinny kitchen cabinet decoupage

Trash to Treasure~ Upcycled Decoupage Bedroom Nightstands

In early 2002 My husband and I were just starting out, and like most people just starting out you tend to be a little light when it comes to home decor and home furnishings. I will admit that not only do I like frequenting Good Will and various other thrift stores, I also like trash night. I always keep my eyes open for curbside furniture finds. I feel a little like a hero- I am keeping one more piece of garbage out of the landfill. So, it was on this fateful night that I spotted two bedroom nightstands beside the apartment dumpster no diving required LOL! The hubby and I were desperate to simply have a place to put a drink, or a book beside our bed. They were functional yes, but I secretly hated them and dreamed of getting new nightstands someday. Flash forward to 2013 and we still have the nightstands! We never got around to replacing them, and they were inching ever closer to fulfilling their original destiny when I discovered… Decoupage! There was no question these tables needed a serious makeover, but thanks to my other addiction Pinterest, the ideas were flowing and I decided to give it a try, besides they were going to end up in the trash anyway!

Materials I used:

One very old and beat up nightstand
Mod Podge Matte Finish
Black Acrylic Paint
Scrapbook Paper

These tables were so beat up not much sanding was required. I painted the entire piece and cut the scrapbook paper to fit the various areas of the table I wanted to cover. I used the Mod Podge to glue down the paper to the wood. I then sealed the entire table with Mod Podge covering the painted areas to give it a sheen and seal the paint so it wouldn’t chip. You see the final result below came out better than I imagined it would and once again these tables avoided the trash heap! They are holding up very well too although I would suggest using a coaster for that drink! : 0 )

DSC_1126h    Black and white decoupage tables  DSC_0032

Wooden Rocking Horse Re-Do

I wanted to make something special this year for my daughter who is turning 2 next month. My husband and I share a common love of shopping at thrift stores and we found this horse at Good Will for $4.99. I sanded it lightly and used a primer. I then used acrylic paint to paint the horse two shades of pink and white. I decoupaged scrapbook paper onto the horse and used Mod Podge Matte
finish to glue and seal this project. I was going for a more classic rocking horse and the debate with family and friends over whether I should give the horse a mouth and eyes was quite amusing. What do you think? Do you prefer whimsical or classic rocking horses?

Wooden Rocking Horse Re-Do