Hand Painted Decoupage Kids Time Out Chair

Image

Happy Mother’s day to all you wonderful crafty moms out there!

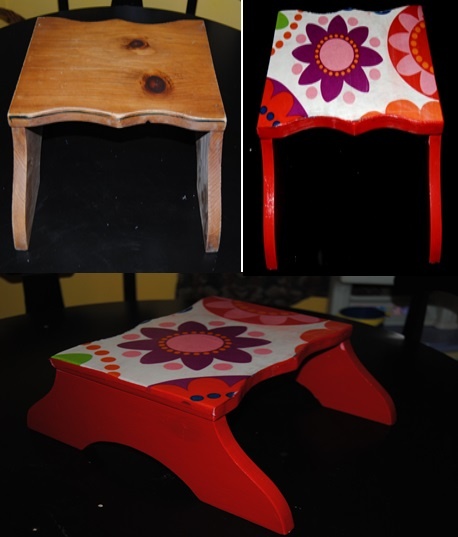
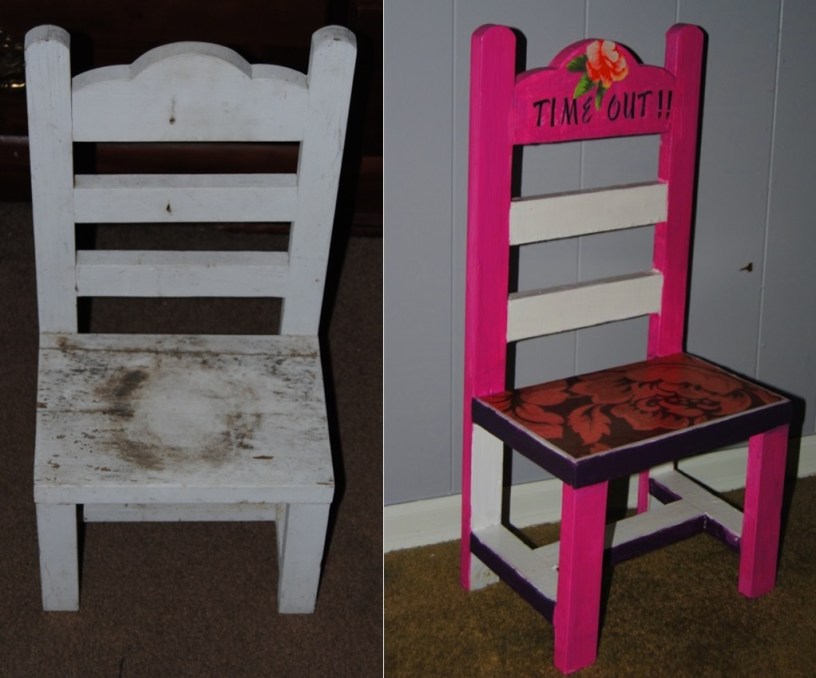
It was a bit ironic, that this weekend’s project is a kids Time Out chair, but my daughter is about to turn 2 in two weeks and my husband and I want to start using the little chair as a learning tool and why not learn in style?  I have to say this craft was a bit of a challenge for me, mostly because I wasn’t sure how I wanted to make the chair.  Looking back I may have done the chair a little differently as I am not a 100% happy on how it turned out.  I think the color scheme could have been a bit better and I am not sure I would have used flowers if I had it to do all over again.  I try not to get discouraged if something doesn’t turn out exactly as planned.   After all without mistakes what can we learn from?

Materials Used:

Scrap book paper

Acrylic Paint

Mod Podge-Matte Finish

Stick on Letters

Wrapping paper (for “time out” flower)

White Latex Primer

The chair was not in the greatest of shape.  I rescued it from the flea market for $ 2.00! When I got it home, I cleaned it as best I could and primed it with the latex primer.  I let it dry thoroughly   I then cut and measured the scrapbook paper for the seat and glued it to the seat using Mod Podge.  Then I hand painted the entire piece.  This was the most time consuming aspect of the project.  Once dry, I used the stick on letters for the “Time Out”  and wrapping paper I had for the flower over the letters.  I then sealed the entire piece with 3 coats of Mod Podge.  Who would have  thought a punishment chair could be pretty? (LOL)

Frida Kahlo inspired decorative decoupage tray and art case

Nothing is worth more than laughter. It is strength to laugh and to abandon oneself, to be light.
~Frida Kahlo

I picked up this ugly old tray for $2.00 at the flea market about a week ago.  At that time I really had no idea what I was going to do with it.  I did know one thing it needed a makeover! My sister’s birthday is coming up and since discovering my new upcycling obsession, I wanted to make her something special.  I always admired the artist Frida Kahlo and I was intrigued by her artwork and her life story.  My sister is also a fan of her art and got to see an exhibit of her work a few years back.  I recently did a quick project of my own when I decoupaged my art box with Frida Kahlo art and scrap book paper. (Pictured below)

This gave me the idea for the tray. Simple projects too!

Her birthday is next week.  Hope she likes the tray, but I am keeping the art box!

; 0 )

Art Case Before

DSC_0037

DSC_0067

DSC_0080

Sports Team TV Trays made with Mod Podge

My husband and I were sitting down last Sunday after our little one had finally gone to bed.  We were watching our favorite show, Game of Thrones.    It has become our Sunday night ritual and is easily one of my favorite top five shows of all time!

Most of our house is now toddler proof, so we are lacking a coffee table in our living room as well as side tables.  We pulled out the old TV trays we had up in the attic and they were perfect to put our popcorn and drinks down on, but that’s about all the good I could say about them.  To me, they were just plain and ugly! I said to my husband that I should give the tables a makeover.  We have three total.  The original plan was to re-create the baseball card decoupage table I had seen on Pinterest, but the hubby didn’t want to part with any of his old baseball cards and I can’t say that I blame him.  So, we decided I would make a TV tray dedicated to my husband’s favorite sports team-The Philadelphia Phillies.  There are a lot of great, free graphics on the web. If you have a good printer at home and some larger paper you can find just about anything online to decoupage. (Ink jet printers not recommended as the ink will often times run)   The limits are endless on what can be used so keep that in mind.  Old sports linens, place mats, wrapping paper, sports decals-just about ANYTHING can be used to decoupage, so let your imagination run wild and always think outside the box. First I cleaned the table, removing any dirt or dust.  I used a latex primer to prime the entire TV tray.  Once dry,  I used Acrylic paint and painted the legs and underneath as well as the table top edges.  I used Mod Podge to glue the print to the table top carefully smoothing out any air bubbles.  Once dry I used three coats of Mod Podge Matte to seal the piece letting the table dry completely between coats.  I was actually shocked as to how well it turned out!  I was so pleased I decided to do the other two TV trays as well in the hopes of selling them. We plan on purchasing our flea market space one weekend this summer in the hopes of raising some money to take a much needed family vacation. Sesame Place or bust!

Materials used for this project:

Mod Podge Matte Finish

(I also used the Modge Podge Roller Tool to help smooth out the air bubbles)

X Acto knife

An item to decoupage (poster, print, linens, decals, place mat or anything you can dream up!

Acrylic Paint

DSC_0071

DSC_0094

Decoupage Sports Team TV Trays

Dog Treat Jar made with Mod Podge

I really loved our dog treat jar!  Then I knocked it off our counter top and it broke into a million pieces.  I was bummed.  So I began searching for a replacement jar.  Most that I found were either boring or too expensive.

It was Mod Podge to the rescue!  I had an old cookie jar that I stopped using because I stopped buying cookies.  I was determined to get healthy after the birth of our baby girl.    I printed out some cute images off the internet and decoupaged them onto the jar using Mod Podge.  It was really simple and easy to make.  Of course our Bichon Frise Casper, could care less about what his jar looks like.  He is more concerned with the treats inside! ; 0 )

Dog Treat Jar 4e05969369f599e7a0038225b6f9333a

Decoupage “Ugly Tray” Re-styling using Mod Podge

One of the things I look for when I go to thrift stores and swap meets are ugly trays.  I like them because they are great items to decoupage and I love decoupage!  They are also fairly inexpensive.  They are great practice and experimental pieces, and they are functional.  The possibilities are endless as to  themes and what you can do with these trays.  They also make great gifts. For My first decoupage tray, I used a freestyle approach.  I printed out all these lovely Victorian Era prints.  I love the Victorian era artwork and elegant look.  I had this old tray that was quite boring and a few times I had actually thought of throwing it away because it took up space and was just plain ugly.  I decided it would be a great piece to experiment on.   I painted the entire piece black with acrylic paint, and cut out the prints I wanted to use in the collage. I then used Mod Podge Gloss finish to glue the images to the tray.  Once completely dry, I sealed the entire piece with 3 coats of Mod Podge gloss finish.   I decided to hang the tray on our living room wall.   These trays also make great wall art.

Image

Victorian inspired Art decoupage birdhouse

Happy Cinco De Mayo!

Yesterday afternoon, our family hit the flea market circuit  in the hopes of finding a kids sized wooden chair to convert into a Time Out chair, and any other items that would make a good future project.  I am happy to report that we walked away with several items: A kids wooden chair,   a wooden school desk and a few decorative trays.    It was an absolute beautiful day today to walk around outside and soak in the sun.  Yard sale season is also in full swing.  We saw many on the trip, but had to save our yard sailing aspirations for another day.

Today was also the day my most recent craft:  my Victorian bird house, would be ready to hang outside.    Prime real estate for some lucky little bird family.  I wanted to create a Victorian feel. I searched the internet for Victorian art and floral images.  I then printed out the images I wanted to use on my color printer.  I carefully cut out the images with an X acto knife.  I painted the bird house red and white.  Once the bird house was dry, I used the Mod Podge to adhere the cut out images to the birdhouse.  The possibilities are endless as far as the styles and themes you can create.  You can choose any images you like including family photos, sports etc.  I then applied 3 coats of Mod Podge allowing to dry thoroughly between coats.  I used a metal hook  and screw for hanging outside.

Materials:

Wooden bird house from Michael’s Crafts

Red and White Acrylic paint

X acto Knife

Outdoor Mod Podge

Untitled

DIY Upcycled, Decoupage Switch Plate and Outlet Covers

It’s the little things in life that sometimes make a big difference, and that is also the case with home decorating.  If you are just starting out one of the best places to start is with your outlet, and switch plate covers.  A little sprucing up can add a lot of detail to your home.  If it is your first time venturing into decoupage it is also a great starter project.  This was my first project using Mod Podge.  It wasn’t too long after this that I started doing furniture and other items.  Just a warning it can become an addiction!

Materials:

Mod Podge Matte Finish

I used an old gift bag, but you can also use cloth or scrapbook paper

X acto knife

Pencil

Remove the outlet/switch plate cover from the wall and carefully trace all areas with a Pencil.

Use the X acto knife to carefully cut out the tracing.

Once cut, use the Mod  Podge to adhere the paper to the cover carefully smoothing out any air bubbles.  Let Dry.  Then cover the papered area with three coats of Mod Podge allowing to dry thoroughly between coats.  Once dry they are ready to install!  Just say no to boring white covers!

Made with recycled gift bag and Modge Podge

Made with recycled gift bag and Modge Podge

Adding a little Spice in the Kitchen~Skinny kitchen cabinet decoupage Re-do

This is a little skinny kitchen cabinet I picked up through ABC Distributing.  It added much needed cabinet space in our kitchen.  I was never thrilled with the finish, but it functioned great as it does not take up much space in our kitchen.  I am not sure how she managed to do it, but my active little 2 year-old decided one day to do a little modification herself and ripped a huge piece off the side leaving it scarred.  It was very noticeable and I didn’t have the funds to go out and buy another cabinet.   So, I decided to re-style it.

Materials used:

Mod Podge Matte Finish

Electric Blue and Black Acrylic Paint

Scrapbook Paper

Sandpaper

ruler

My kitchen is a bright yellow and even though I originally wanted to paint it black, I was compelled to pick a color a bit out of the ordinary, so I decided to go with blue.  I thought it would really “pop” against the yellow walls.  I did a light sanding on it, and skipped the priming this time.  I painted the entire piece blue and let it dry.  I then outlined the door in black.  I  measured out the scrap paper, paying close attention to  line the flower pattern up as best I could.  I had to glue it in pieces, so by matching it up, it made the pattern seem more seamless.  I used the Mod Podge to glue down the scrapbook paper on the door surface and the top surface of the cabinet.  I let dry and then covered with three coats of  Mod Podge to seal the piece.  I like this piece because it is unique and it actually looks better in person than in the picture.  It is holding up well and so far appears to be toddler proof!

Skinny kitchen cabinet decoupage

Putting pearls on a pig~whimsical garden pig makeover

I received this little fellow from a friend of mine that was relocating to the West coast and could not take this poor little piggy with him. From the beginning I wasn’t sure how I felt about the little guy. He was grey, and even though he had cute little pig features, they were hard to see. From a distance he looked like a grey blob in the garden. I decided rather then send him to piggy heaven aka “the landfill”, I would try out some outdoor Mod Podge I had purchased a few weeks ago. I would give the pig a final shot at garden glory.
I was pleased with the end result, but It wasn’t easy!

Materials used:
Latex Primer
Mod Podge Outdoor formula
yellow latex paint
70’s drapery material
Black permanent marker

The first step was giving little piggy a good scrubbing and clean behind his ears. I placed him in the sink and started the hot water. I didn’t notice the small hole in the bottom of the pig. I started cleaning him and suddenly ants started pouring out of it! So lesson learned if something has been sitting out in the elements for a while, it’s not always the greatest idea to bring it into your home. So far I am thinking to myself this is not going well! At this point I am totally creeped out by all the bugs!

Once the ants were eliminated, I cut out the flowers from the fabric and used the Mod Podge to glue the fabric to the pig. This made painting with the primer more difficult, but I really wanted the fabric to stick to the pig and it may not as well if glued directly to the primer paint. I then primed and let dry, cutting in around the flowers carefully.
Then I made my 2nd mistake. I thought he would look good as a red pig. I painted him and I hated it! He looked darker than I expected and I was trying to bring out his features. So, I found an old can of yellow latex paint in the basement and I painted him yellow, but alas red is hard to cover. I should have primed it again before re-painting. I had to use 3 coats just to cover the red and even then some of the red was bleeding through, but it looked acceptable and I liked the dept the red gave it.
Once the paint dried I slathered on the Outdoor Mod Podge to seal the piggy. It is the first time I am using this formula, so I am interested to see how well he will hold up in the elements. I used a black marker to fill in his eyes, and added a slight outline to his mouth. After 72 hours in the house I was ready to release a bit of whimsy into our garden. It was a tough and challenging project, but I am pleased with how much color he adds to a not so colorful spot in our garden. He even fills in the space from a broken brick! I think I know how I feel about him now. I think I’m in love!

Whimsical Garden Pig Re-Style

DSC_0017

Steppin’ It up~ Restyled Wooden Step Stool

I was on a mission: to find the perfect wooden step stool, I could restyle and put my own stamp on. It won’t be long before our little Erin will need one so that she can stand at our bathroom sink and wash her hands and brush her teeth. I thought finding the right one wouldn’t be easy. Going to thrift stores is hit or miss when it comes to finding something specific. As luck would have it hiding under a table of various thrift store tchotchke was the perfect little wooden steps tool. It was love at first site! I snatched it up immediately. As luck would also have it, I found the perfect material to use to decoupage onto the stool. A“groovy” drape designed by Helen Trast for Ikea. It was perfect for many reasons, the material was almost burlap- like, so it would hold up well after sealing, and it was colorful and fun.
Materials Used:
Cloth Drapery
Mod Podge Matte Finish
Red Acrylic Apple Barrel Paint
White Latex Primer
Mod Podge Roller tool
First I used white primer to paint over the wood. Then I turned the step stool upside down onto the drape material and traced the top surface with a black marker. I used scissors to carefully cut the outline. I used the Mod Podge to glue the material down and smoothed out any air bubbles with the Mod Podge Roller tool. I painted the remaining uncovered parts of the stool with red Apple Barrel Acrylic paint. Once everything was dry I used the Mod Podge to seal the item. I repeated this step 3 times letting it dry thoroughly between coats and Voila! Erin will now be able to step up in style with a 70’s groove!
Wooden Step Stool Redo