The Secrets Out: John Waterhouse Decoupage Wooden Box Craft

I was in Michael’s Craft Store picking up some scrapbook paper, when I took a small detour down the wood craft aisle.  They had every shape and sized bird house, jewelry box, and  storage crates just to name a few.  Normally, I would just walk down the aisle and keep going,  but today I was intrigued by the idea of creating a craft from new previously un-used material. Besides, I had already looked through my home, been out thrifting, and  spent work lunches at Goodwill, and was unable to come across a simple wooden box to decoupage.  I thought one of these wooden boxes would be perfect for my friend’s birthday which was still a few month’s out, so I had plenty of time to make it in between making other crafts.

Art Minds Wooden Box

Wooden Box at Michael’s.com

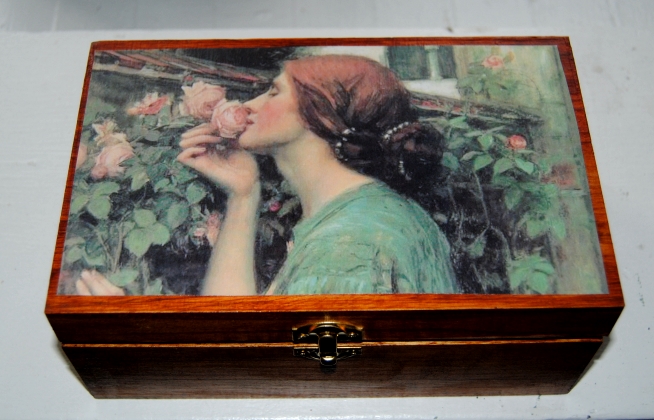
My friend is a fan of the arts and I had been searching for the perfect painting to decoupage for her.  I came across the artwork of John Waterhouse  and saw a print entitled “My Sweet Rose”  It reminded me of my friend instantly when I saw it, and I thought she would love the image. I traced the box lid  on to the print with a pencil, cut it out and placed it to the side.  I used a foam brush to apply the Mod Podge to the box lid.  Once applied I glued the image to the box, carefully smoothing out any air bubbles or wrinkles.  I allowed the piece to dry.  Once dry I applied another coat of Mod Podge to the top of the photo, sealing the photo to the box.

I decided to stain the box instead of painting it.  I used a wood walnut stain, but any wood stain, finish or color would work. It really depends on personal taste.  I didn’t want the box to appear too dark so I only applied two coats total. I allowed the box dry. While drying I measured out the floral wrapping paper I wanted to use to line the inside.  I applied the wrapping paper with Mod Podge. The biggest challenge was keeping the wrapping paper from bubbling up.  I find wrapping paper the few times I have used it, doesn’t work well (Keep in mind it is thinner paper and purchased from the dollar store) The floral print ; However matched perfectly and I decided despite the challenges to use it in this project. Once the entire piece was dry I used another coat of Mod Podge to seal the entire box. I allowed the entire piece to dry under a fan overnight.

DSC_0813

DSC_0814

My friend’s birthday was July 4th, and she received the box in the mail and loved it.  John Waterhouse it turns out is one of her favorite artists, and she loved the keepsake quality of the box.

That also means, now that the secrets out I can share this craft with all of my internet friends.  I hope you enjoy!

Materials:

Used or new wooden box

Wood stain color of choice

Image/or images e to decoupage

wrapping paper (inside liner)

Craft foam brush

Scissors

Paint brush to apply stain

Advertisement

Nuts and Bolts: Re-Purposed Plastic Container Earring Box

Image

We have all seen them in hardware stores, or down the home improvement aisle. Those nifty assorted nail, nut and bolt sets housed in those plastic containers. I had purchased one some time ago and after using most of the nails, I was left with the plastic box.  I held onto it thinking I would eventually use it for something. After some thought,  I had the perfect use for it, an earring holder.  Sure, I have a jewelry box, but the nice thing about this plastic box were all the individual compartments.  There is nothing worse than digging through a jewelry box drawer trying to find a matching pair of earrings.  Using this box would eliminate that problem.  It worked great, but lacked an aesthetic appeal, so I decided to do a simple restyle.  I traced the top of the box onto the scrapbook paper, then used Mod Podge Matte finish to glue the paper to the top of the lid. Once dry I used two coats of Mod Podge to seal the lid and the paper.  This was a very simple project, and works great!

Image

Image

Sesame Street: Abby Cadabby Decoupage Jewelry Box

I had this piece for a while as I was not sure what I wanted to do with it.  I picked it up at Goodwill for $2.99.  The last week has been focused mostly on my daugter’s birthday party.  It was a nice smaller project for me.  Most of this project was completed before she woke from her afternoon nap.

As my daughter gets older, she is accumulating quite a bit of jewelry, hair bows and other various adornments.  I thought this box would be great because it consisted of three fairly deep drawers for storage.  I wanted to make it girly and restyle it using a character that Erin loves.  I chose Abby Cadabby from Sesame Street.  I love the pink and purple colors that make up her character. I printed out some Abby images along with a nice purple and pink floral inspired background on photo paper.  I removed the drawers.  I had already primed this piece previously, so it was ready to paint.  I painted the top surface dark purple and the sides pink with acrylic paint. I set aside and to dry.  I cut out the Abby images first and glued them to the drawer using Mod Podge Matte Finish.   I then measured out the floral background.  The biggest challenge was applying the paper around the knob.  The knobs on the drawers did not appear removable so I lined it up with the paper and cut a small round hole carefully feeding the knob through.  I then used a smaller paint brush and applied the Mod Podge to glue the paper down to the drawer surface.  Once dry, I applied the Mod Podge generously over the drawer and photo surface and the painted  jewelry box.  This seals the entire piece.  I used several coats to seal.  Letting dry between coats.  I usually sit them in front of a fan to speed up the drying process.   The result is what you see here and I like overall how it turned out.  For some reason when taking a picture it appears more blue than purple!

Abby Cadaby Girls Jewelry box

Materials used:

Mod Podge Matte

Old wooden jewelry box

Scissors

smaller artist paint brushes

paper for decoupage

pink and purple acrylic paint

Abby Girls Jewelery box