The Craft Must Go On: Upcycled Rock N’ Roll Bar Stool

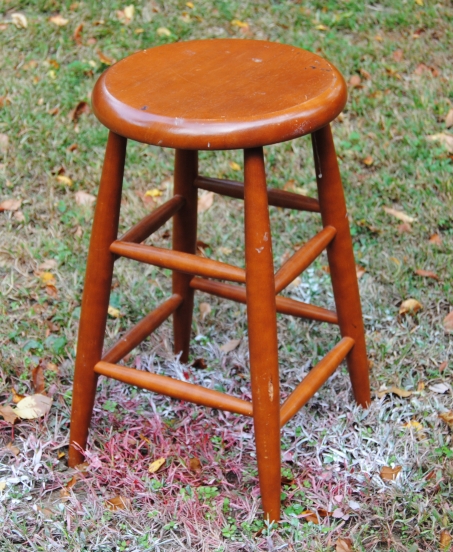
A few months back, I came across a wooden bar stool at Goodwill for $5.99. I liked the size and design of the stool, and thought it would make a great decoupage piece.

DSC_0884

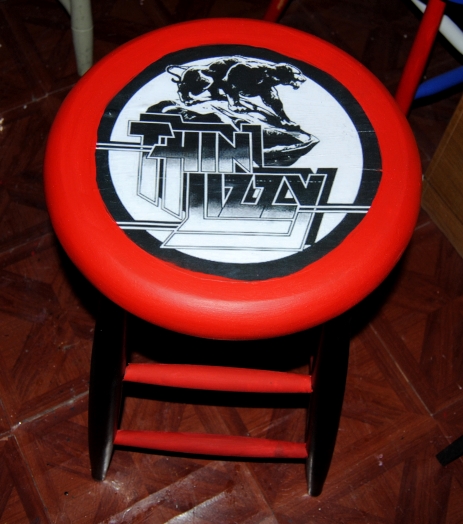
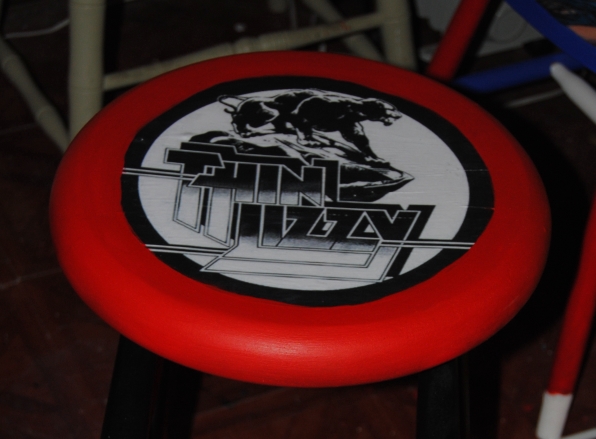
I decided to upcycle the stool with a Rock N’ Roll theme,  and since it was to be a gift for my husband, I chose the Irish Rock band Thin Lizzy as a subject. The band is one of our favorites and have a vast catalog of great music.  This initial vision took a back seat to the holidays, and various other projects. The idea seemed doomed afer one mishap after another involving this project.  I abused this stool, and used it to allow smaller painted projects to dry.  When I attempted to prime it, the spray can malfunctioned splattering the primer.  (I believe the can may have been too cold) After the bar stool was dry, I sanded off the “lumpy” paint by hand.  Creating yet more work for myself, while attempting to smooth out an air bubble on the initial decoupage print, I tore a hole in it and had to scrape it off only to start all over again.  Despite all of these blunders,  the project managed to come together.  Turns out I found a much nicer print, based on the album cover for “Nightlife” The print featured a black panther on the prowl like the one featured on the cover below.

Thin Lizzy Night Life

I painted the entire chair in black and red alternating the colors.  It took several coats to obtain good coverage.  Once dry I applied Mod Podge to the seat with a foam brush.  I carefully applied the printed logo and smoothed it out carefully with my hands doing my best to avoid tearing or wrinkling.  I painted the area not covered by the print red, creating a bull’s eye effect on the seat.  Once all the paint was dry, I used Mod Podge to cover the entire bar stool.

DSC_1581

Finally, my crafting nightmare showed some “Nightlife” after much adversity.  More importantly my husband seems happy with the result. Now we just need the bar..

Wanna see more chair restyles from “On The Upcycle?  Click Here

DSC_1583

Best Foot Forward: Upcycled Dress Shoe Repair

When I was young, I remember my mom taking me to the mall to visit the Shoemaker.  It was much more common back then to have your shoes repaired.  I remember my mom getting Taps on her shoes to protect the heel and make the shoes last longer.  I did a bit of internet research and was surprised to find that Shoemakers still exist, although not in quite as large numbers as thirty years ago.

Everyone has that pair of shoes that they love.  It is hard to part with a pair that fit well and are comfortable.  Recently, my employer  adopted a casual business attire policy.  After five years of being able to come to work dressed in t-shirts and sneakers, this left me scrambling for an appropriate work wardrobe.   I went to thrift stores mostly, and picked up a wonderful pair of shoes.  They have a block heel and were extremely comfortable for a dress shoe.  One of the problems I encountered was getting used to walking in dress shoes.  I scuffed up the back of the heel pretty badly and the sole began to separate from the shoe.  I was not ready to give them up, so I share with you my first pair of “Upcycled” shoes.

Shoes


This was a total experiment, but I figured I had nothing to lose since I could not wear them in their present condition.  The first repair made was to the sole.  I used a high temperature hot glue gun to adhere the sole back on the shoe.  I used two sticks and applied generously.  I put my hand inside the shoe to apply pressure, while the glue dried.  I then painted the heels with black acrylic paint.  Once the heels and soles were dry I applied a layer of Mod Podge with a paint brush,  I then added another layer of polyurethane for added protection.

DSC_1578


DSC_1572


So far they are holding up well despite the repairs.  The true test will be the hot glue and every day wear.

Stories of a house From | Inspire Me Heather

{stories of a house} my quote wall | Inspire Me Heather.

Since the last several days have consisted of me battling a nasty winter cold and the weather (Over 12 inches of snow last evening) I wanted to share with you a great Mod Podge project from Inspire me Heather.  It consists of a wall decorated with favorite quotations.  I would love to create a wall like this leading up to our attic, or down to our basement area.  I think I would try decoupage tiles, or even coasters.  I thought this was a fun project and I wanted to share it with all of you.

So.. I am putting down the snow shovel, and tissues, and moving on to my next upcycle project..

Memories of Paris: Upcycled Drink Coaster Wall Hanging

Since my upcycle adventures started last April, the word has gotten out to family and friends.  I am on a upcycling mission!  The best part of all is that others are starting to see ordinary items normally discarded or not used in a different light.  The original purpose of an item can be changed and restyled.  Instead of discarding something that can no longer be used, it can be modified so that it may have a new useful new purpose in your life.

Such is with the case of this project I am about to share with you.  My sister brought me a set of coasters she purchased during a trip to France.

DSC_1506

They are lovely and feature famous scenes and landmarks, but she felt the beauty of these coasters was wasted, and she never used them for their original intended purpose. It seemed a total waste not to display these in some way.  She asked me if I would I be able to do “something” with them. I love a challenge so I accepted the task, although at the time I really had no idea what the project plan would be, but luckily she was OK with that!

I held on to the coasters for a while, and kicked around a few ideas in my head.  Then one night I was lying in bed unable to sleep when I remembered this little wooden wall plaque.

DSC_1504

It was an item I had picked up at Goodwill a few months back.  When I purchased it for a dollar, I had no idea how I would use it.  Then it hit me!  It would be great to create a vertical wall hanging featuring the tile-like coasters.  She has a pink and brown french themed bedroom that I thought this would look perfect in.  I created my first chair upcycle for her.  A ladder back chair in pink and brown colors, known as  The Pillow Case Makeover.

I cleaned and primed the piece with a while latex primer.  Once dry, I painted the face of the plaque chocolate-brown.  The edges I painted pink.

DSC_1511

I applied Mod Podge matte finish to the painted areas. Once the Mod Podge was dry and clear, I used a high temperature hot glue gun to attach the coasters to the wood lining them up and allowing the same amount of space between them. I applied the hot glue generously and adhered them carefully one by one.

My sister seemed happy with the end result.  I have never been to France, but have a feeling I would love it there.  Everywhere you look is inspired by art, and hopefully looking at these images will bring back all the great memories of her trip!

DSC_1551

DSC_1547

The Toilet Paper Roll Experiment: Part Two

Just think of all the toilet paper rolls that are discarded each day!  They serve their purpose and are tossed in the trash can without a thought. When I walked into the bathroom at work, I noticed a few sitting there waiting to be discarded.  Since my upcycling mission started, I tend to look at things a bit different.  I especially love to take something that most certainly would end up in the garbage and give it a second life. I snatched a roll and went home to craft The Spare a Square Project.

DSC_1122

The initial project was a success, and I realized these card board rolls can be used in organizing my craft room items.  There are many upcycle ideas on the web when it comes to cardboard rolls. One amazing example, can be found here.  Word got out around the office that I was starting to save these rolls from the trash for a project to be determined later.  Suddenly, they started appearing on my desk and before I knew it, I had quite a few of them thanks to my recycling and equally curious friends.  I think they were curious to see what exactly I planned to do with them!

DSC_1508

I was sitting in craft room pondering the idea and I decided to create craft supply wall storage. Initially, I was not sure what I would store inside them, that idea would come to me later.

First, I painted the inside of the tubes white with acrylic paint.

DSC_1509

Next, I looked through the fabric that I had available and decided on a “fun” colorful pattern to decoupage. I cut pieces of fabric that would be enough to cover the outside of the roll.  I applied Mod Podge to the it with a foam craft brush, and placed it on to the fabric.

DSC_1513

Once the Mod Podge was applied I “rolled” the toilet paper roll on the fabric, and it adhered nicely.

DSC_1514

I trimmed away any excess fabric with a pair of scissors.

DSC_1515

I repeated this process with all of them.  Once they were done, I used a high temp hot glue to glue them together. I arranged them in rows. Three at the bottom, then two then one. Like this:

DSC_1521

I touched up the white paint in spots particularly around the edges, and once dry, added a Mod Podge finish to the entire project.

DSC_1533

Now that the project was complete, I had to figure out what to store in it!  It didn’t take me long to come up with the idea of storing my smaller containers of paint, and it created easy access to any color I need.

And…I decided to hang it like this:

DSC_1540

Who needs a square, when you can have the whole roll?

Materials:

Six Large toilet paper rolls

Mod Podge

Fabric

Hi Temp Hot Glue Gun

White Acrylic Paint

Scissors/Foam Craft Brush, and a Paint Brush.

Rescued Vinyl And The Magic of Mod Podge

With the holidays officially over and the New Year off to a rather frigid start, I share with you the last project on my Christmas list this year.  Late last month, I posted a tutorial for Sports Inspired TV Trays which have turned out to be a popular item among family and friends. The beauty of restyling these tables are the limitless possibilities.

TV Tray before

These tables are neutral and relatively easy to work with.  One of my upcycled gift recipients is not big on sports, so I thought she might like to have a TV table, but with an alternate theme.  A while back, I created a table from an old record, and a plant stand. I used Aerosmith’s greatest hits record.  The record was not in playable shape, so I decided to recycle the LP and use it for a upcycle project. The family member receiving the gift is a huge Aerosmith fan, and I decided to use the album cover and decoupage it to the table top. Upon further inspection, the cover was in pretty rough shape, so in the end I decided not to use it.  The liner notes; however were in great shape, and a colorful purple with the Aerosmith winged symbol in the middle.

DSC_1270

This seemed perfect for decoupage while incorporating something she and I hold close to our hearts~ records.  I have a collection too, mostly stocked through bargain bins.  It is not always easy to tell if a record is playable before purchase, and every so often you wind up purchasing a damaged record.  Not only can you reuse the record itself, but the artwork is perfect for decoupage.  Another example of this can be seen here from a previous post. Long live the LP!

DSC_1269

For a full tutorial and some examples of TV tray table redesigns click here and here.

Vintage Wooden Wall Shelf Redesigned

Most of my recent trips to the thrift stores have been utterly disappointing.  It would seem that spring cleaning is the last thing on anyone’s mind.  It’s bitterly cold outside, yard sale season is long over, and the streets are blanketed in snow from our most recent weather event Hercules (Since when did we start naming snow storms??) Everyone seems to be walking around with a post holiday hangover causing many (myself included) to limp into the New Year. Luckily, I still have a few projects up my extremely bundled and layered sleeve to share with you.

Although most of my thrift store trips have been uneventful, Every once in a while I still manage to find something unique.  I came across a really lovely and unique vintage wall shelf with a drawer.  I especially loved the curved sides and the drawer for storage.  It was in rough shape, but that didn’t deter me from placing it inside my cart.

Vintage Wooden Wall Shelf

When I originally purchased the shelf I had every intention of keeping it.  A blunder made during another project intended as a Christmas gift changed that and I had shift the original intention of this piece.

I lightly sanded the item with sand paper, and used a white latex primer to cover the piece.  I left the inside of the drawer alone as it was still in very good condition.  I decided to paint the piece black. This shelf has the potential to be hung in any room, so I wanted the color to go with any decor, and black is neutral. I painted all of the piece except for the drawer and shelf.  I planned to decoupage these areas later and didn’t want the dark color to bleed through the fabric. I used two coats of black acrylic paint and once it was completely dry added a layer of Mod Podge over top to seal it. I had some left over black and white damask fabric from a previous project.  I applied Mod Podge to the front of the door and shelf with a foam craft brush, I cut the fabric to fit as best I could as I would trim away any excess fabric later.  I made sure to line up the fabric design so that the piece would appear symmetrical.  I applied Mod Podge over top of the fabric allowing my nail to work the fabric into any grooves and once it was dry, carefully trimmed any excess fabric with a box cutter knife.

Black and White Damask Decorative Wall Shelf

Decoupage Black and White Damask Wall Shelf with drawer

I love damask designs and this was a tough piece to part with. My favorite project is draped in damask and this would match it beautifully. In the end I was happy to gift it to my sister to go with the chair I made for her in her bedroom, or perhaps it will go in her kitchen?  We shall see, as I offered my services free of charge to help her hang it!

Happy New Year from On The Upcycle!

Happy New Year

I want to take the opportunity to wish all of my readers a very safe and prosperous New Year!  As with most years of my life 2013 has been filled with many good times and some “not so good” times.  In April 2013, I began this humble little blog with zero expectations, and since then I have received over 25, 600 total page views, (and counting) and in December, 2013 On The Upcycle reached a milestone of over 200 followers.  I had the opportunity of being featured in two digital craft books on Amazon, The Green Crafts Lifestyle, and The Green Crafts Lifestyle Christmas edition.  I was also a guest blogger for the first time this year, contributing a project for Geek Week, On Elise’s Cheeky Geeks Blog.   As crazy as it sounds, I was also contacted regarding a crafting reality show!  Don’t expect to see yours truly on TV anytime soon, but it was all still very flattering.   Also, a special thank you to those who became involved with the “Upcycle” and brought me items to restyle from attics, trash bins , yard sales and thrift shops.

On the Upcycle was also very lucky this year and won two prize drawings.  I would like to send out a BIG THANK YOU to Diana at  Ray’s So Crafty Blog and Kathy and Deb over at Second Hand Roses  for their generosity and appreciation of their readers by sponsoring these giveaways.  I would also like to send ”Congratulations” to Daniella Joe’s Blog who won On The Upcycle’s very first prize giveaway.   A  very special “Thank you” to Katherine at Pillows Ala Mode, who welcomed me to the Word Press community by sharing my blog with her readers, and nominating On The Upcycle for the good neighbor award. I wish I could thank everyone who helped me along the way. Thanks to all my readers who took the time to comment and “like” my posts.  Everyone here has kept me inspired even when I felt I did not have much to give.

As with any New Year, 2014 is filled with mystery.  I am hoping to continue the Upcycling mission in 2014, and be the best mother and wife I can.  My resolution this year, is to treat myself better both physically and emotionally.  This will be my greatest challenge.  As with many of you out there, it is easiest to neglect yourself, when making sure everyone else’s needs are met.  This will be my goal  for 2014 and beyond.  Let’s hope I can make it happen!

May all your wishes and dreams come true in 2014!

easter2013m

DIY Decoupage Novelty Candles and Tea Light Holder

Looking for a great “personalized” gift that will keep you within your shopping budget? The holiday’s, and birthday’s can be tough, and it is more important than ever to get the most out of every penny. At the same time, It is also important to let those close to you know that they are appreciated throughout the year. I try to keep my ears and eyes open as to what matters to friends and family, by soaking in all of their interests and hobbies. I file these ideas away, and when I am trying to come up with gift ideas, I refer back to them.

As our extended families and circle of friends continue to grow, and the holiday’s become more and more about the children (As it should be, of course) It has become at times, a challenge to come up with gifts for friends and the adults in the family. This year, I decided to make personalized candles for some of those on my Christmas list. You can purchase candles anywhere, and they are reasonably priced. This year, I had many music lovers on my list, so I decided to decoupage some candles featuring the recipients favorite musical artists.   The possibilities are truly endless.  You can personalize and create any type of candle that you want.  For the non-music lovers on my list, I refashioned the candles with fabric, or with a family photo.  Making these is a simple process. I applied Mod Podge to the outside of the candle with a foam craft brush. I searched the internet for the images I planned to use and printed them out on my printer (the size of the images I used was 4×6) I trimmed the images to fit, and carefully applied them to the candles, smoothing any wrinkles. You can add Mod Podge over top of the image, but it is not needed. If you are looking for a shinier finish, you will need to complete this step. Once dry they are ready to be gifted!

Decoupage Candles

Rock N’ Roll Inspired Candles

\Grateful Dead tea light holder

Repurposed Candle made into a Tea Light Holder

Decoupage Sports Fan TV Trays Revisited

This holiday season,  I decided to craft some gifts not only to save money, but simply for the sake of doing something different.  When people stop by our house for a visit, they notice all the upcycled furniture and home decor items.  One of those items in particular, our Decoupaged  Philadelphia Phillies TV tray gets a good deal of attention. For this reason, I thought tables such as these would make great gifts.  Most folks have a set of these boring wooden TV trays at home.

TV Tray before

Despite the lack of design qualities these trays are very functional and often times serve an important purpose.  Who hasn’t sat in front of the TV, and used one of these little trays to devour a late night snack, or simply use as a laptop computer table?

I was in the thrift store and happened across four for sale.  I snatched them up and was glad that I did!  For three of these tables, I decided to use sports team themes, (the recipients are all sports fans, I will save what I did to the fourth table for a future post.)  I found sports images online and printed them out on my printer. If you do not have an available printer, you can use decals, fabric, baseball cards, you name it!

First, be sure and clean the table thoroughly.  Once the table is clean and dry apply a white latex primer.  To speed up this process, I purchased a spray on primer.  I took the tables outside and applied two coats to each table, allowing each table to dry thoroughly between coats.  Table number one was for a Washington Redskins fan.  I painted the table with acrylic paint in the Washington Redskins colors, gold and a deep dark red, almost burgundy color.  Once dry, I used Mod Podge to carefully apply the printed image to the table surface.   I then applied Mod Podge over top of the print and covered all the painted areas with Mod Podge to seal the table.  The Mod Podge on its own is enough to seal the table, but since I was giving these as gifts, I added a coat of a polyurethane clear coat sealer for added protection against moisture and heavy use.  Be sure to be mindful of the parts of the table that fold up. (“On the Upcycle” mistake alert!)  If any Mod Podge or Polyurethane drip into these areas and dry it can be problematic if you try to open the table and it “sticks”  This happened a little with the Washington Redskins table and caused the paint to “chip” a bit in the area that the legs were slightly “stuck” together.  Despite this minor flaw, the table turned out well!

Washington Redskins Decoupage TV Tray

sports tv tray

I repeated the same steps for table number two (New York Yankees Sports fan table)

Yankees Decoupage Sports TV Tray

and table number three (Philadelphia Eagles Sports fan table)

philadelphia eagles tv tray

Before giving the gifts, I inspected the tables carefully, touching up any areas that needed it.  They seemed to be a big hit with those who received one.  It also marked the first time I attempted to work on multiple projects at the same time.

TV Trays Before and After:

Decoupage Sports Themed TV Trays made with Mod Podge