Breaking Bread: Decoupage Bread Box Restyle

Decoupage Bread Box

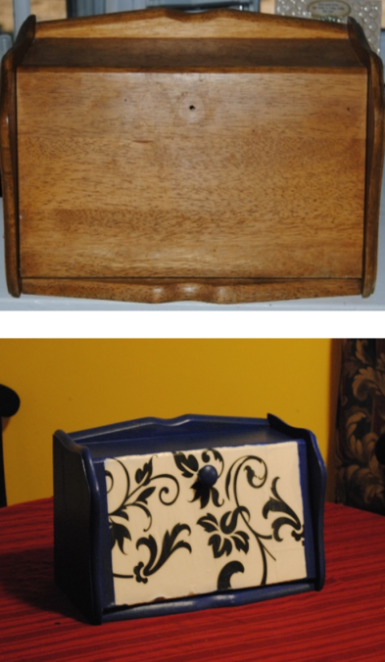
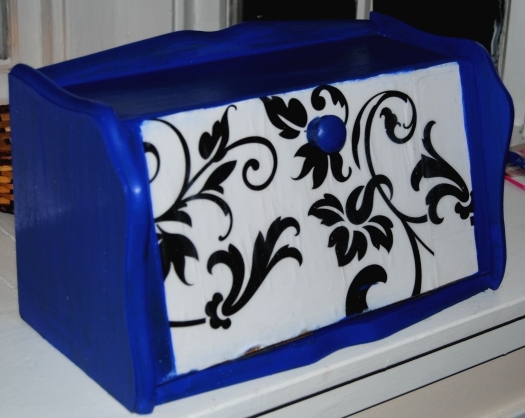
When I was growing up, the one thing I remember we always had in our house was a bread box. So, naturally, when I moved out and acquired a home of my own, I immediatly bought this breadbox. Yes, this ACTUAL bread box! That would make this breadbox over 18 years-old! As far as bread boxes go it was typical, a wooden box and that was it.  No color, no style.  For years I thought of doing away with a bread box all together.  It took up a lot of counter space and it was nothing special, but where would I put the bread? When I started experimenting with Mod Podge and decoupage, This bread box was on my to do list.  Many projects have come and gone and it was finally time to decoupage the box!

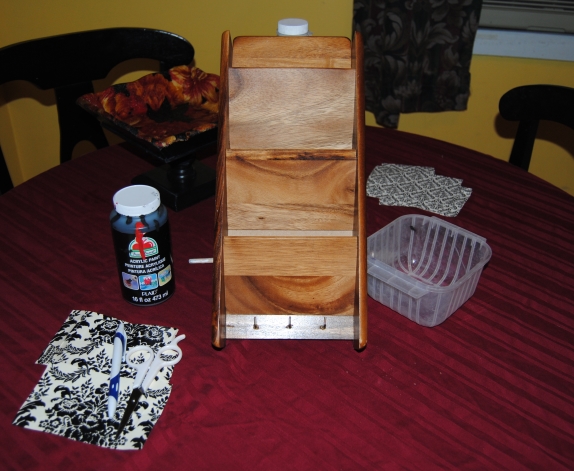
This project was not as easy as it looks.  First, I measured the scrapbook paper I wanted to decoupage to the door,  I only had one piece in this style and in order to make it work, I had to trim, line up the design,  and fit it together in a few spots.  After the bread box  was cleaned, and primed, I glued the paper down with Mod Podge, and let dry.  I then painted most of the Bread box blue with acrylic paint and let it dry.  Next challenge was the number of coats of paint!  Cleaning it only helped so much after many years in the kitchen there was still a bit of grease on it.  I applied as many coats as it needed about 4 in all.Once the entire piece was dry, I applied the Mod Podge Matte to seal it.  I find the more layers of Mod Podge the better.  Yet another challenge was the door and not leaving enough room between the paper and the opening.  I had to carefully trim this with an X Acto knife.  Despite all this, I am glad this project is finally finished and the bread has a restyled box to call home

Decoupage Bread Box Mod Podge

A Lively Computer Tablet: Decoupage Makeover

Decoupage Tablet

I remember a time before computers.  Sure, actual computers have been around since as early as the mid 1930’s, but most computers were not accessible to the general public until the later 1990’s when I was already out of High School and beginning college. It wasn’t until the internet came in to play that everything changed, and computers began to get smaller and smaller.  I also remember a time when the closest thing to a computer in school was a book or a type writer.  I looked forward to getting new books every year, just so I could cover them with a brown paper bag!  I loved to draw designs on these paper jackets, pay tribute to my favorite music groups, and draw just about anything my teenage mind could come up with.  This was the inspiration behind this project.  Why not  “cover” the modern book, my little MID brand tablet.  I loved the result I achieved with decoupage smart phone makeover  So, I decided to give it a try.  I prepped the tablet cleaning it and removing any dust.   I then traced the tablet onto the scrapbook paper.  I picked a nice brightly-colored scrapbook design.   Keep in mind the design possibilities are endless! Joann Fabric had a great sale, five sheets of selected papers for only $1.00!   Once traced, I cut the it out, carefully cutting away the speaker area with an X-Acto knife.  I also paid close attention to  any other areas I did not want to cover with the paper.

Next, I applied Mod Podge to the back of the tablet, carefully avoiding any areas that might not tolerate glue, like the speaker for example.  I carefully glued the scrapbook paper to the back of the tablet, mind fully and with a smaller paintbrush.  This kept the glue from getting into any of the important areas.  If you are worried, you can also put a small piece of scotch tape over those areas to protect them, carefully peeling it off later.  Once dry, I covered the outside with multiple coats of Mod Podge Matte finish allowing to dry thoroughly between coats.

Materials used:

DSC_0602

I love the new look!  Who says an ugly tablet doesn’t deserve a decoupage makeover?

Live on the UPCYCLE!

Mail Call: Upcycled, Decoupage Mail and Key Holder

Image

I found this little wooden mail and key holder for two bucks at an outdoor swap meet.   I decided to use it by our front door so we could have a centralized place for our keys, cell phones and any other small items we take with us to work each day.  Initially, I was unsure of the design I would choose.  Then I remembered,  I still had some of the recycled gift bag I had used for my living room switch plate and outlet covers.  It became evident , the key/mail holder would be hanging  in close proximity to the switch plate and I thought it would look better if they matched.

Decoupage Switch Plate, Outlet

I measured and cut the gift bag to fit the mail slots. I then applied Mod Podge to glue the gift bag tracings to the slots.  While drying, I painted the rest of the piece black with acrylic paint.  Once the paint was completely dry I applied about three coats of Mod Podge over the entire piece to seal it. This was a very simple project with dramatic resulst!  It really stands out nicely against the Sandstone background and keeps electronics and other important items out of little toddler hands.

Before

Materials:

Mail/Key Holder

Mod Podge Matte finish

Gift bag/Scrapbook  paper

Black Acrylic Paint

Pen/Scissors/Paint Brushes

Decoupage key holder

Crazy For Half Tables: Table Restyle using Mod Podge

Image

I love half tables!  I was so excited when I found this one at a thrift store while shopping one weekend with the family.  It was the first item in my cart.  I was also ecstatic over the reasonable price- only $5.99! I knew exactly where I would put this table in our house, at the base of our stairs.  Space is limited in this area and this half table would be a perfect space saver.

I searched through my available scrapbook paper and went through several styles before I settled on this one.  I turned the table upside down onto the backside of two sheets of paper and traced the table top onto the paper.  I cut the tracing and used Mod Podge Matte Finish to glue the paper to the table top. I used my rubber Mod Podge tool and my hand to gently smooth out any air bubbles.  While the table top dried, I painted the rest of the table black with acrylic paint. One of the things I like about this table is, it had some etched details on the legs and top.  I accentuated this by painting the floral etching white.  Once all the paint dried I used about 4 coatings of Mod Podge to seal the piece.  I skipped priming the piece because the table felt rough almost like it had been lightly sanded before I bought it. The paint covered well with about two coats. I was happy with the design and the neutral black and white design goes well with our living room walls which are painted with Behr paint and primer in one sandstone color.

before and after

Image

Materials:

Two pieces of scrapbook paper design of choice

Black Acrylic paint

Mod Podge Matte Finish

Rubber Mod Podge

Scissors, Paint Brushes, Black Marker

Table top close up

Another Large Wooden Tray Restyle

I picked up this tray for just a couple of dollars at Goodwill and had no initial plans for it.  I admit I love rescuing old trays even if I have no idea what to do with them.  It sat in our spare room for quite sometime primed, but unfinished.  I then picked up some Victorian inspired black with white fabric during a second Goodwill trip.  I liked it because it had trees on it with children playing.  It reminded me of some of the decor we had in my house growing up in the late 70’s early 80’s. I decided to use the fabric on the tray. I thought it would be a great way to display the fabric and keep the scene intact. I painted the tray with white acrylic paint and then applied the Mod Podge.  Since the fabric was dark, I couldn’t trace it, so I applied the fabric I had to the tray, and when the Mod Podge dried and the fabric hardened I used a box cutter knife to remove the excess fabric. Once dry I used about two more coats of Mod Podge over the entire piece.  If you are just starting out working with Mod Podge, trays are definitely the way to go!  They are a great starter project and the possibilities for styling are endless.

Image

Materials:

Mod Podge

Tray

Fabric

Box Cutter style knife

White acrylic paint and primer

Nuts and Bolts: Re-Purposed Plastic Container Earring Box

Image

We have all seen them in hardware stores, or down the home improvement aisle. Those nifty assorted nail, nut and bolt sets housed in those plastic containers. I had purchased one some time ago and after using most of the nails, I was left with the plastic box.  I held onto it thinking I would eventually use it for something. After some thought,  I had the perfect use for it, an earring holder.  Sure, I have a jewelry box, but the nice thing about this plastic box were all the individual compartments.  There is nothing worse than digging through a jewelry box drawer trying to find a matching pair of earrings.  Using this box would eliminate that problem.  It worked great, but lacked an aesthetic appeal, so I decided to do a simple restyle.  I traced the top of the box onto the scrapbook paper, then used Mod Podge Matte finish to glue the paper to the top of the lid. Once dry I used two coats of Mod Podge to seal the lid and the paper.  This was a very simple project, and works great!

Image

Image

Mini Mystery Cabinet Restyled with Decoupage

I picked up this little mini cabinet at Goodwill for $2.99.  Originally, It was navy blue with Asian lettering on the front.  I thought it was intriguing, but had no idea what it’s original use was.  It looked like a jewelry box, but inside were miniature shelves.  First, I primed the entire piece with a white latex primer.  Then I carefully cut the scrapbook paper so that it would fit onto the doors.  This was the biggest challenge, because I wanted to line up the design so that it would appear seamless.  Once I was able to do this, I used Mod Podge to glue the scrapbook paper to the miniature doors.  Once dry, I painted the piece black with acrylic paint. I then waited for the entire piece to dry, and used the Mod Podge matte finish to seal the piece.  I used about three coats, allowing the piece to dry fully in between coats. The result is what you see below.  Now that the piece was restyled, I still struggled as to what I would use it for. One of our biggest challenges is keeping our house safe for our two-year old.  My husband and I decided to hang this in our kitchen way above little hands.  We keep our daily medications in it and it is perfect for keeping smaller unsafe items out of her reach.  Mission accomplished!

Image

Materials:

Mod Podge Matte

Scrapbook paper

X-Acto knife

Black acrylic paint

Small Cabinet

Paint brushes/black felt tipped marker

When Crafts Go Wrong: Restyling the Upcycle

On May 12th, I posted a Time Out chair I restyled.  Truth is I was never happy with how it turned out.  I think I know why it didn’t turn out as I planned.  I forced it. I was determined to finish the project even when I felt I should put it aside.  One thing I lack is patience and that can be a crafter’s undoing.  Sometimes it is just better to set a project that is frustrating aside to finish at a later date.The Time Out chair is an example of restyling a restyle.(You could say)

My upcycled 70’s inspired girls table has so far been Erin’s favorite.  It is the perfect size table, but lacked a chair.  We caught her pulling the table up to the step in an attempt to sit at the table. That is when I thought of the time out chair. We are very blessed so far.  We rarely have to put her in Time Out, so we haven’t really used the chair, and I thought if I restyled the chair, it would go great with the table.  I used the same 70’s fabric as the table, and re-painted the chair to match. Now Erin has the perfect place to sit and read her book, and I have a chair I can live with!

70's inspired KidsTable and Chair

Wooden Basket Restyle using Mod Podge

I like little wooden baskets.  They can be used for just about anything and hold a variety of objects.  When I came across this one for 50 cents, I thought I could redesign and repurpose it.  The price was certainly right.  It appeared to have been an Easter basket.  It had blue rabbits painted on it’s side.

I had this nice red and black floral print I wanted to use.  I traced the bottom of the basket with a black marker onto the print.  I cut it out and glued it down to the inside of the basket with Mod Podge.  I then painted the entire basket with acrylic paint following the red and black color scheme.  Once dry I applied three more coats of Mod Podge.  Gotta pick more of these baskets up if I see them!  I love how this project turned out and I have so  many uses for them!!

Restyled Wood Basket


Materials:

Mod Podge Matte

Red and black acrylic paint

Printed paper for decoupage

scissors and a black marker

Paint brushes


Before and After…


wood basket

Upcycled Little Girls 1970’s inspired side table

I have been blogging for over a month now and I am so thankful to you all for the encouraging words and thoughts.  I am also blown away by the amount of talent and creativity I have seen from others on here! Creativity is key!  For me, things don’t always work out as you envision them.  This forum allows me to feel free and unafraid even if I make a mistake!  For that I am grateful!

I am back from my two day hiatus; However a lot of craftiness and shopping has taken place in those days!  The family went thift shopping yesterday, two Goodwills and a Walmart! It was a very productive day!  I picked up a few future projects, and pined and dreamed over other future projects that I could not fit in our little Hyundai!

I saw this little brown, particle board,  table and I picked it up,  I am obsessed with small furniture, as I am always thinking about items that Erin can use that are perfect for toddlers just starting to utilize furniture. She also loves to imitate us and it is wonderful seeing Erin sitting at her kid’s table reading a book like the little person she is becoming.

I also found this great funky floral fabric that screamed 1970.  In it’s previous incarnation it was a window drape.  I can’t imagine! A bit too funky for curtains according to my taste, but not funky enough to use to redo kids furniture!

Materials:

$5.99 table

Fabric

Mod Podge

paint brushed various sizes

acrylic paint

black marker

scissors

First, I turned the table upside down onto the fabric and traced with a black felt tipped marker.  I carefully cut out the fabric.  I then used Mod Podge Matte finish to glue the fabric to the table top.  I set aside to dry.  I wanted the paint the table pink to match part of the fabric, but I didn’t have any pink handy.  I was able to mix red, purple, and yellow, and came up with the color you see here! I primed the piece and then covered the legs and sides with pink paint. Once dry I used Mod Podge to seal the entire piece using about three coats total.

Image

Before and After:

Image

Our cat Nucky seemed to be fascinated with what I was doing.  He was my cat apprentice as Erin was napping at the time!

Image