Stay Calm and Craft- A Simple Wooden Tray Decoupage

Nothing helps me manage stress better than crafting and creating.  When I don’t put my nervous energy to good use, the anxiety levels within me rise.  When I am creating I feel as though my stress levels decrease and my positive energy increases, and I am a better, lesser stressed out version of myself.  When I am working on a piece of art or a craft project, it is one of the few times my mind is clear of all worry and I become completely focused.  I was feeling a bit stressed and this small and simple wooden tray decoupage craft was exactly what the Dr. ordered.

Little Wooden Tray

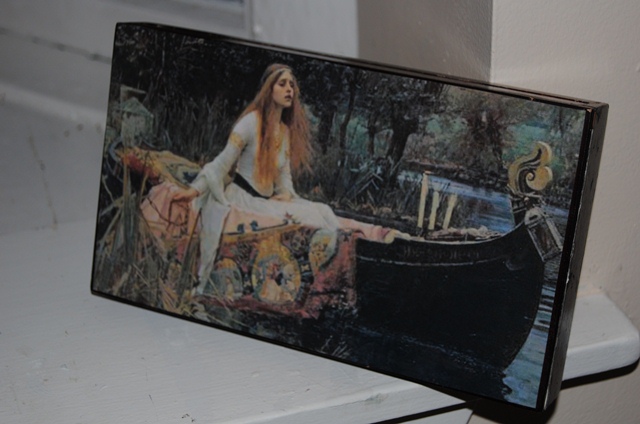
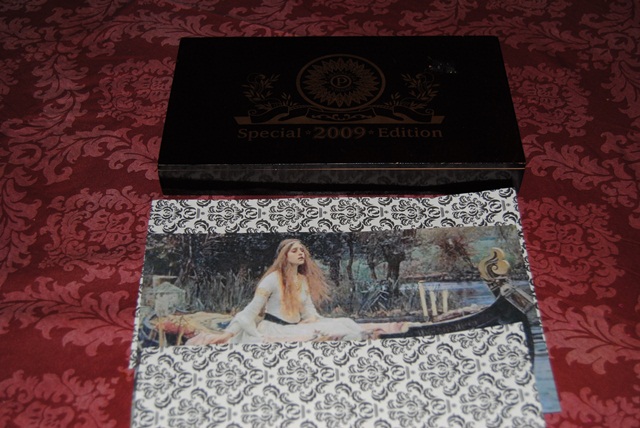
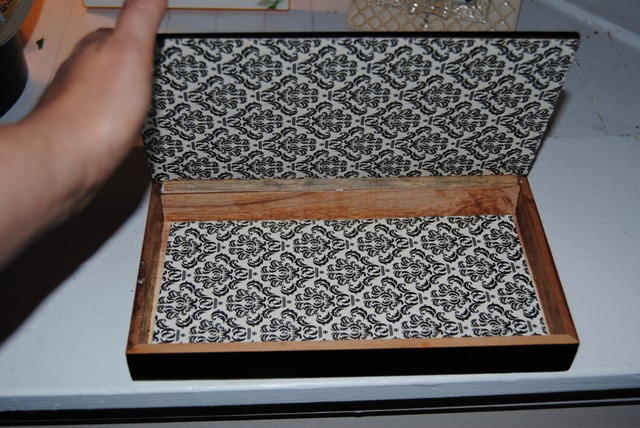
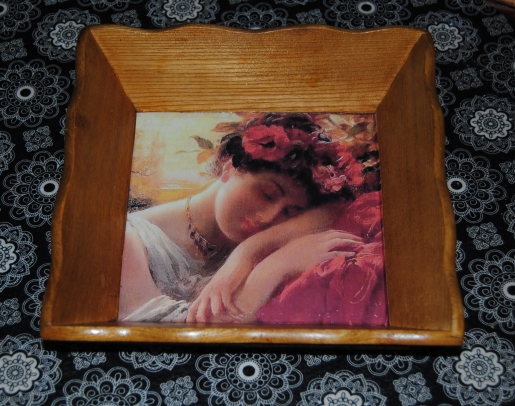
I picked this wooden tray up at A Goodwill store.  It was  marked with a red tag and on this day red tag items were 50% off.  This was a bargain item costing only 50 cents.  The wood on this piece was in very nice condition. I decided not to paint it, I chose a nice piece of Victorian Artwork and traced and cut the print to fit the inside of the tray.  I generously applied Mod Podge with a small foam craft brush to the inside of the tray.  I adhered the print carefully to the tray, smoothing the paper out as I applied it to the wood.  Once dry, I applied two coats of Mod Podge over top of the image to seal it. I used a paper towel and vaseline (works great on wood!) to shine and buff the wood.

Victorian Artwork Decoupage

Ah now that’s better!  Try a simple craft during a stressful day. You won’t regret it!

(and I think our Victorian model would agree!)
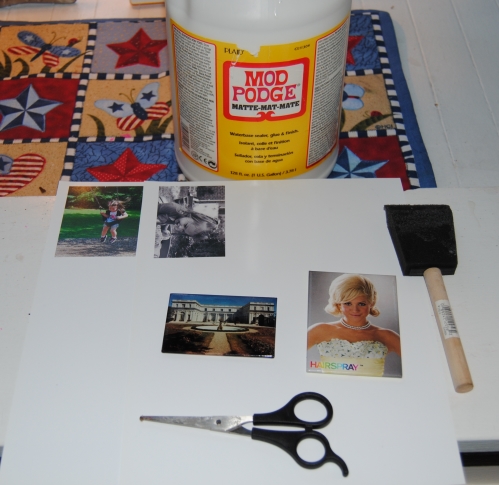
Materials:

Printed Art

Small Wooden Tray

Mod Podge

Scissors

Craft foam brush

Vaseline/cloth or paper towel

The Broken Chair Challenge: Upcycled Black and White Damask Chair

I spotted this chair in the back of a Goodwill store.  There were various miscellanies items piled on top of it, and It involved quite a bit of work to break this chair free. I was attracted to the chair design  ( The chair featured a fleur de lys) and I loved the detail.  The chair seat was in very rough shape and it would require re-upholstering.  The overall chair frame seemed like it was in ok shape, and I thought enough of this chair to assume the risk.  The chair was priced to sell at $3.99.

When I got it home,  I ripped the blue material off the seat and discovered the seat was broken and could not be repaired.  Now, I had to salvage another chair in order to repair this one!  My husband and I kept our eyes open for any “curbside” or “free” chairs, I prefered to use  a free chair and not purchase one, but months went by until I found a freebie chair that would be perfect, A lucky find at a thrift store. The chair seat would turn out to be a perfect replacement, and I have future plans to upcycle what’s left of the chair frame.  Stay tuned!

First, I cleaned the chair, and primed the chair frame with 2 coats of a white latex primer.  Once the chair was dry, I began to paint it in a white and black color scheme.  I used black and white acrylic paints to paint the entire chair.

This chair was quite a challenge to paint. The chair had a lot of cut-ins, and detail, and required a lot of patience when it came to the paint brush. I sat the chair in front of the fan until it was dry, and then added a layer of Mod Podge overtop to seal the chair.  It dried nicely.  Now I was ready to re- upholster the chair seat. The original fabric I chose was a black fabric with white roses.  When I placed it up against the chair, I despised how it looked!  So, It was back to the fabric store to pick out another style and I went with the Elegant look of Damask.  I used less than a yard of material and cut and traced it to fit the new seat, leaving extra material for underneath the seat.  I used an upholstery stapler and carefully stapled the material to the back of the chair seat.  Once I was done I screwed the seat back on to the chair.

This chair was not short in challenges, but in the end it was worth it. Looking at the finished chair,  I would say this chair turned out to be worth the risk, and a broken piece received an elegant new lease on life!

Upcycled Black and White Damask Chair

Back of B&W Damask Chair

Rear View of Black and White Chair

Before and After Chair Made with aint,cloth and Mod Podge

Before and After

Black and White Demask Upcycled Chair

Materials:

Roughed up chair

White Latex Primer

Black and White acrylic paint

Mod Podge

Damask Fabric

Brushes/Scissors

Upholstery stapler and staples

Screwdriver

Black Marker to trace seat to fabric

Epic Fail or Tiny Triumph: Upcycled Decoupage Cigar Box

I found this great cigar box during a quick walk through of a local Goodwill store. I considered it a win because I was able to get my Goodwill customer rewards card stamped (10 stamps and you save 20% off your total purchase and I only managed to spend $1.06 (with tax)  I had made a previous attempt to upcycle another cigar box and the whole project went terribly wrong!   I liked this box because unlike the failed project box, it was made only from wood.  The other cigar box was made from wood also; However it was coated in paper.  The Mod Podge adhered to areas like the lid creases and not realizing it also adhered to this “paper.” When I tried to open the lid it was glued to the box! Upon attempting to open it, the lid tore away from the box. Ouch!  That’s what I’d call an Epic Fail! I swore this cigar box upcycle would be different!  After all, decoupage boxes are usually fun and easy to make.

Wooden Cigar BoxFor the lid cover, I chose the John Waterhouse painting The Lady of Shalott.  My plan was to line the inside of the box with Ivory Damask scrapbook paper I had on hand.  First, I traced the box lid onto the back of the art print.  I then traced the bottom of the box, and inside lid onto the back of the scrapbook paper.  I then cut them out with scissors.  I applied Mod Podge with a foam brush to the lid and carefully adhered the print to the top of the box carefully, smoothing it out with my hands.  I allowed the box to dry, and repeated this process on the inside of the box using the scrapbook paper.

Once it was completely dry, I applied Mod Podge to the top and inside of the box.  I decided to leave the exposed natural wood on the edges inside.  I really love this box and as I always say “Now…. what shall I put in it?”

Decoupage Wooden Cigar Box Inside

The Lady of Shalott 1888Upcycle Cigar Box

The Lady of Shalott
1888 Upcycled Cigar Box

Materials:

Art Print to Decoupage

1 Sheet of Scrapbook paper

Mod Podge

Fine tip marker

Scissors

Foam Craft Brush

Super Hero Seat: Decoupage Justice League Of America Kids Chair

My husband and I are kids at heart, and when I told him my plans to creat a “super heroes” decoupage kids chair, he was excited to see the final result. After a trying week and a busy weekend, I figured it was a good idea to jump right back on the “crafting horse”, and keep the upcycle going.

I passed this chair up many times.  I stop by the Goodwill right down the street from our house periodically.  It is usually a quick walk through,  and this chair sat, un purchased through several of these “walk throughs”,  The chair was in very rough shape and was doused in a heavy lacquer finish, that I suspected, would not be easy to apply paint to. It is difficult for me to pass up kids furniture because I love it so much, so during this particular walk through with my daughter in tow, I finally decided to buy it.

Old Beat Up Kids Chair

First, I tightened the chair and legs,  and used sand paper to smooth any rough edges on the chair.  I cleaned it with a damp cloth to remove any dust and dirt, and boy this chair was very dirty!  Once that was done, I used a white, latex primer to paint the chair from top to bottom. This was essential and even with the chair’s lacquered finish, it covered nicely.

After the primed chair was completely dry,  I painted the chair with a red and blue color scheme to mimic the Justice League of America colors. The Justice league of America is great because it incorporates the best superhero characters from DC, Comics.

I applied Mod Podge to the chair seat with a large paint brush. I then placed the prints onto the chair seat, slowly smoothing it out with my hands to avoid wrinkles. I repeated the same process for the chair back,  I decoupaged the Justice League symbol and two additional characters I could not fit onto the chair seat, These characters were The flash and The Green Lantern. I cut them out with scissors and applied them so they would appear as though they were “leaping” off the chair seat.  I made three white, printer paper stars to add some “pop” to the top of the chair back.

I placed the chair in front of a stand up fan to dry.  The next day, I applied Mod Podge to the entire piece to seal it and repeated this process twice, allowing the chair to dry in between coats.

My husband loved how it turned out, and it was nice to complete a strictly “just for fun” project.  I hope you enjoy it too!

Justice League Of America Decoupage Kids Chair

Materials:

Kids Chair

Comic books,or Comic Prints

Mod Podge

Red and Blue Acrylic Paint

White Latex Primer

brushes, scissors, pen

sandpaper

Upcycled Pickle Jar Decorative Lamp- Part Two

It all began with three broken lamps up in our attic, and a spaghetti jar.  I had an idea jump into my head one day, to upcycle these broken lamps with glass jars. I decided to produce the first of what I was hoping would be three cloth-covered decorative lamps.  I was very happy with how  Upcycled Spaghetti Jar Decorative Lamp turned out so I decided to move forward with lamp # 2.  This time I wanted to use brightly colored fabric on the glass.  I had this great pickle jar that was slightly larger than the spaghetti jar I used previously.  I also had some left over fabric from a previous project called Upcycled Wooden Pedestal Bowl, and Restyled Side Table  that  was orange, red, yellow and black.

I cut a large piece of fabric, enough to wrap around the sides of the jar.  I traced the bottom of the jar, (which would be the top of the lamp) onto the fabric with a sharpie marker, and cut it out with scissors. I applied Mod Podge to the outside of the jar, and applied the fabric carefully around it.  I used twine to tie the fabric at the bottom.  This actually looked great and allowed the fabric to touch the base.  I then glued the rest of the fabric to the top of the lamp.  I allowed this to dry and then I applied the Mod Podge over the fabric.

Upcycled Pickle Jar Decorative lamp

I love the red hue the light gives off.  It was very difficult to get a picture of what the lamp actually looks like.  I had to play around quite a bit with the camera settings.  I have this on the fireplace mantel in our living room.  Stay tuned for lamp # 3!

Pickle Jar Lamp pictured with Upcycle Wooden Ped bowl

Upcycled Pickle Jar Lamp Pictured with Upcycled wooden Pedestal bowl.  Love this fabric!

“On The Upcycle” Featured In A New Book~”The Green Crafts Lifestyle”

I am excited to announce the arrival today of the new Amazon book for Kindle by the very talented Mahe Zehra Husain known by her fans as MZ.  She has an amazing green crafting company and website called Altered Upcycling.  Make sure and check it out!   “The Green Crafts Lifestyle”  is now available for download on Amazon for only $4.99!  I have been privileged enough to take a peek inside and it has some amazing green crafts, and features upcycling artists from around the world.  It also features artist bios and my very first step by step photo tutorial.  You can buy it here: 

Altered Upcycle Available on Amazon

Tomorrow’s blog will feature my “Secret Americana Project” An Upcycled, American classic, Windsor back chair.  A project that is debuted in the book. I was unable to share it with my readers…Until now!

When I started this blog back in April, I couldn’t have imagined having a oppurtunity such as this!  I am featured with some of the most talented and amazing artists, and quite frankly, I am not sure that I am even close to being in their league!  I feel very honored and grateful.

I would like to send out a special Thank You to Katherine from Pillows A-La Mode who encouraged me to “throw my hat into the ring” with this project. Make sure and visit her craft blog.  She is an amazing talent! It is an exciting first for me, just a simple working mom from NJ who loves to create!  Thanks also to all my readers for your support,  It means more than you know!

Checking In While Checking Out: Upcycled Photo Refrigerator Magnets

As I was on-line at the thrift store waiting to check out, I noticed they had a bunch of refrigerator magnets behind the counter. I began to drift off in thought and Then it hit me! I imagined these would make great DIY photo magnets and they were only .59 cents each! I decided to buy two of them for this project.

Image

I printed wallet sized photos on my printer I wanted to use. I then traced the magnet onto the back of the photos.  I cut them out with scissors, and set aside.  I applied the Mod Podge to the surface of the magnet, and carefully adhered the photo to the surface.  Once dry I applied the Mod Podge over top and allowed to dry in front of the fan.

This was a great Monday night project, simple and easy and there is no better way to upcycle old magnets then using family photos!

Image

Upcycled Tile Coasters Made With Mod Podge

The word has gotten out: I am a certified decoupage addict! The nice thing about this being public is people have brought me things out of the goodness of their heart for me to use for decoupage: scrapbook paper, fabric you name it!   I always appreciate when someone takes the time to pass something along they can’t use to someone else, as is the case with these really neat bird paper cut outs a friend at work passed along to me.

Avian paper cut outs


There were three just like this, and I couldn’t wait to use them.  They were very pretty, but very delicate and I was nervous handling them outside their plastic sleeves.

I had some left over tiles from my DIY Kitchen Backsplash, and thought they would make great coasters.  I also had some packing foam material, that came with a package that would work great when attached to the bottom of the coasters.

Materials


I placed the tiles on the foam and cut the foam to fit the bottom on the tile,  I applied Mod Podge to the bottom of the tile and adhered the foam to prevent scraping and skidding while using the coasters.  You can also use felt if you have it handy.  I applied the Mod Podge to the top of the tile.  I used outdoor Mod Podge, so it would be tougher if exposed to moisture from a sweaty drink. This is where things started to go terribly wrong.  The cut outs were very delicate and I had to be extra careful when placing on the tile.  I tried to apply the Mod Podge  carefully with a soft brush.  Despite this, the cut out’s ink ran and smudged the entire first tile, which could not be saved. Crafting is like life, it is unpredictable at times and does not always go according to plan.

And then there were two…

Now, I was really nervous! Looking back, It would have been better to use a spray adhesive instead, which Mod Podge makes.  I didn’t have this handy, so I tried very gently, and quickly to apply the Mod Podge.  Despite a slight change in the color, it didn’t smear this time and neither did tile # 3.  Phew!!  Once it was dry, I applied another coat, and no smeared color this time!  I was so glad these turned out and I was able to salvage this project.  I would have been disappointed if I didn’t get to upcycle these tiles!

upcycled tile coasters


Upcycled Spaghetti Jar Decorative Lamp

I was upstairs in the attic last night searching for a lost box of crafting materials, when I came across a box of light bases that were at one time,  miniature decorative table lamps. The glassware that was originally attached to them had broken.  I had forgotten I had kept these items.  I am sure at the time, I was thinking I may be able to utilize them in the future in some way. and then I thought to myself, the future is now!

One in particular caught my eye.  It was a black, metal, pedestal light base that utilized a night-light bulb. My initial idea was to utilize a glass jar to replace the broken glass. but several different glass items could be modified to use for this project. Ball jars, glass vases from the dollar store etc.  I just happened to have an old Spaghetti sauce jar in the recycle bin.  I happily removed it cleaning it with hot soapy water.  I placed it in a bucket of hot water to remove the jar label.

Broken Lamp and Glass Jar

Materials:

Mod Podge

Light Base

Fabric

Foam Craft Brush, Scissors

fine tipped marker

I had some great fabric left over from Ugly Accent Table Makeover.  If you are looking for something more colorful you can try holding  different fabrics up to the light.  That way, you can tell what the finished lamp will look like when the light illuminates it.  I took the fabric, and wrapped it around the glass jar so I knew how much fabric I would need.  I measured and cut and placed aside.  I wanted to also add fabric to the “bottom” of the jar, which would be the “top” of the lamp. I traced the jar onto the back of the fabric and carefully cut it out with scissors.  I cut inside the tracing to factor in the edges of the glass, so the fabric would not hang over.    I then applied  Mod Podge with a foam craft brush to the glass.  I applied and smoothed out the fabric, adhering it to the glass.  I applied another coat of Mod Podge over the top of the fabric.  In this case I applied a total of two coats allowing to dry throughly in between.  I couldn’t be more happy with the result!  A true upcycle and a great decorative lamp for a fraction of the cost!

Upcycled Spaghetti Jar Decorative Lamp

Spaghetti Jar Lamp Made with fabric and Mod Podge

It’s a Good Night To Be A Doll : Upcycled Wooden Doll Bed

I saw this nice little wooden doll bed propped up against a thrift store wall, and found myself compulsively reaching out, and placing it in my cart.  It was priced at only $2.99, and I am a total sucker when it comes to children and doll furniture.  It looked like it was lovingly hand crafted and bore the battle scars of previous use.  It had charm, and for these reasons I couldn’t resist it.

Image

I decided to go with scrapbook paper for the decoupage.  I picked these sheets up at Joann Fabric for a mere $.59 cents each.  The biggest challenge was cutting out the paper to fit around the tiny spindles.  I probably could have done this more cleanly in retrospect.  I decided to square them off and I filled in any bare spots with brown paint. Once the paper was trimmed to fit, I used Mod Podge to slowly glue the paper to the wood smoothing out any air bubbles in the process.  I allowed to dry and then applied another coat of Mod Podge over top of the paper and waited until the area was dry to begin painting.  I decided to go with the bright pink and brown color scheme.  I used two coats of pink and brown acrylic paint to paint the entire piece.  Once the paint was completely dry, I applied another coat of Mod Podge over the entire piece to seal it.  My plan is to add a doll pillow and an old receiving blanket for doll bedding. I would like to make one myself, but sewing is not one of my crafting strong points.

Image

Image

Now, my a little girl’s dolls have a stylish place to rest when in the world of my daughter’s imagination.

Materials:

Wooden Doll Bed

Mod Podge

Three sheets of scrapbook paper

Foam Craft Brush (to apply Mod Podge)

Pen/Scissors/paint brushes

Acrylic Bright Pink and dark brown paint