Inexpensive Storage Ideas: Repurposed Wooden Boxes

I am always on a mission to organize our family home, but with an active 2 year-old it is usually easier said then done.  When I come across wooden boxes, and any items I can upcycle into storage containers,  I jump at the chance to buy them.  Thrift Stores, or even items you already have in your home can be  altered to fit any style and repurposed into inexpensive storage containers.  Today, I chose to upcycle an ex Melissa and Doug Toy Box.  I believe at one time it housed an elaborate wooden puzzle, and somehow ended up a simple, empty,  wooden box on a thrift store shelf.  Our biggest storage issues at the moment are kids toys and books.  I decided to repurpose this into a kid’s toy storage/book box.  I had purchased this lettered scrapbook paper for a previous project, but decided not to use it. It was a perfect fit for this project.

Image

Materials:

Scrapbook paper

Box

Mod Podge

Scissors

Foam craft brush

Pink Acrylic paint/Brush

pen or pencil

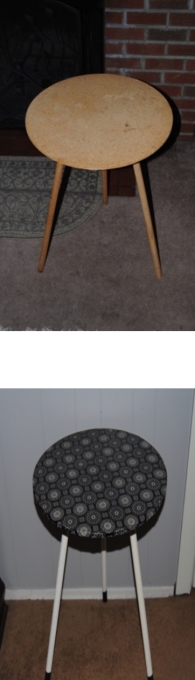
I traced the bottom of the box onto the back of the scrapbook paper cutting it out with scissors.  I applied Mod Podge with a foam brush and glued the scrapbook paper to the wood. while it dried, I painted the remainder of the box pink. Once the piece is completely dry,  A final coat of Mod Podge is all that is needed to seal the entire piece

Image

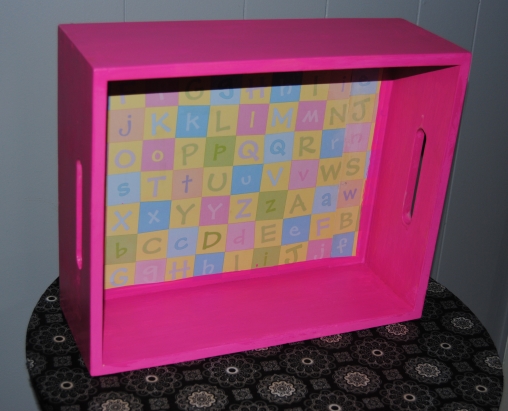
Colorful and Bright storage options at a fraction of the cost!

Expect The Unexpected: A Couple Of Weeks In The Life Of A Thrifter.

When thrifting, part of the excitement is, you never know what you are going to find. Sometimes you walk out a winner ,and other times the goat for having wasted precious time without reason. Lately, I  have been unable to come up with many upcycle project items. I have found some great pieces and items that were better left in their original state, so I am not exactly complaining!  Of course, Thrift stores are also never short on “interesting folk” for example who would have thought I would have struck up a conversation with the famous Woodbury Dancing Man ? Never a dull moment.  I can hardly call that a wasted trip!

I thought today, I would take a moment to share with you some interesting items I have picked up over the last couple of weeks.

Bert's Blockbusters

Who didn’t grow up and love Sesame Street? I jumped at the chance to buy this record from 1974 featuring the voices of the late great Jim Henson and the talented Frank Oz.  I am a small collector of records and still love listening to them on my vintage stereo. For me this was a must buy item~ The price for this lovely item you ask?  Just .99 cents!

DSC_1152

I came across this vintage wooden nut tray and didn’t think much of it at first until I took a 2nd look and was lured in by price a mere .99 cents! I could tell this tray was quality made and it was stamped on the bottom Weavewood Inc. Minneapolis.  After some research turns out trays like these are going for $ 15-$20 each on Etsy.

vintage pyrex glassware

Vintage Pyrex items are a rare find at best in my area, but I jumped at the chance to pick up this 1 1/2 court Pyrex bakeware item for $2.99 at Goodwill.  Of course, I was disappointed it did not have a lid, but the nostalgic gal in me couldn’t resist buying it anyway!  Who’s family did not have at least one piece of Classic Pyrex Glassware growing up?

VHS Disney Movie Collection

I am not ashamed to admit that we still have a VHS Tape player in our daughters playroom. While looking through Goodwill’s .99 cent video collection I noticed that they had most of all the classic Disney movies many of which I enjoyed myself as a much younger person. I couldn’t resist them at such a deeply discounted price, and jumped at the chance at building our daughter’s Disney movie collection. (Of course if you look closely I also couldn’t resist the classic Muppet Move in between Pinocchio and the Aristocats.) An amazing bargain! I got all of them for the price of one DVD!

Stay THRIFTY my Friends…..and happy hunting!

Old Timey Decoupage Lemonade Dispenser

We have been in the middle of an extreme heat wave for the past week. temperatures have reached 100 degrees and over.  Most people search for ways to beat the heat, and this made me think about a cold beverage I love : Lemonade. There is also nothing sweeter then a child’s lemonade stand. Someday, I hope to help my daughter build and run a stand when she is old enough.

I had a glass beverage dispenser that was in great shape, but was a little plain.  I have seen these in thrift stores for only a few dollars.

Image

I searched the internet for vintage lemonade images.  When I found the images I wanted to use, I printed them out on my color printer.  I also found some great lemon slice clip art to decoupage on the back of the dispenser.

Image

I cut out the images, and I decided to use Outdoor Mod Podge for this project.  Since this is a beverage dispenser, I wanted to use Mod Podge that was more water proof on the outside for when the dispenser needs rinsing or when condensation occurs.  I used a brush to apply the Mod Podge and applied the images to the outside of the glass.  I applied the lemon slices to the glass double-sided so the image would appear on the inside of the glass.  Once dry, I applied 2 coats over the images to seal them to the glass.  Now I have a great piece with a more vintage feel.

Image

Image

Ugly Accent Table Upcycle-A Little Fabric Goes A Long Way!

We have all seen these tables at various discount stores.  Made from wood and particle board, They are functional as an accent table/side table, but that is probably the only positive selling point (other than price.)  I would call this piece of furniture an”entry level” piece for those just starting out.  A new table sells for about $9.99 at Bed Bath and Beyond I think it is amusing that they describe this table as “decorative” I see nothing decorative about it!

Round Wooden Table

I picked up one of these tables at Goodwill, priced nicely at $2.99.  This table was screaming for a makeover.  Since the table is plain un lacquered wood and particle board, no priming or sanding is needed before you get started, so it is also a great first furniture upcycle project that can be completed during the course of an evening.

Materials:

Round Wooden Table

Mod Podge Matte Finish

Fabric of choice

Black and White Acrylic Paint

Scissors and a black fine tipped marker

Table Top

This table comes apart easily which is a definite plus.  I unscrewed the legs and put them aside. I traced the table top on to the fabric with a black, fine tipped marker (the side without the design)   I generously applied the Mod Podge to the table surface and carefully applied the fabric to the table top allowing about an extra inch of fabric to fall over the sides of the table.  I applied more Mod Podge to the top of the fabric to seal it. I placed the table top aside and allowed to dry under a stand up fan. I then painted the legs white with acrylic paint.  I love adding the black paint to the bottom portion of the legs to add additional “color pop” which I love.  Once the paint was dry, I covered the entire table with another layer of Mod Podge to seal it.

Now that’s what I would call decorative!

Restyled Side Table made with cloth and Mod Podge


Before and After:

Cheap wooden accent table upcycle before and after

Goodwill Lunches- A Vintage Wooden Bucket

It has become a bit of a ritual to “pop in” to a GoodWill store or two during my lunch break. Most times my trips consist of  a quick look around and leaving the store empty-handed.  I usually go in with a mission in mind, and gravitate toward certain areas: Housewares, Furniture, Records and Fabrics. Even though some days are disappointing, lately I have been running into an interesting phenomenon.  Great Vintage items simply in need of a little TLC.

It all started with the Vintage Dixie Seating Company Kids Rocking Chair. A great find at a great price only $4.99!

Then I noticed this Wooden Bucket with metal straps that looked like a vintage piece to me.  The price was right, only $3.99.

Vintage Wooden Bucket

It had a few scuffs, but was generally in great shape.  I found myself taking it home with no real plans on what I was going to do with it.  I just really liked it, and I have not seen a wooden bucket like this before.  I felt like it was best to keep the bucket in its original state. I cleaned it thoroughly with a damp cloth, removing any dust and dirt. Once dry,  I simply used petroleum jelly on a cloth to buff the entire piece. (This works great on wood surfaces) The Vaseline even removed some of the scuff marks and scratches.

Upcyled Wooden Bucket

It cleaned up great, and the inside is in excellent condition!  A great find that just needed a little love.

Wooden Bucket inside

The uses for this bucket are endless, but for the moment this sits on my fireplace mantle. It’s nice little finds like these that keep me coming back for Goodwill lunches!

Think before you Toss: Upcycled Product Boxes

I have started to look at things differently.  Most of the change has been born out of necessity. People all over the world have been struggling to make ends meet more than ever before.   We are certainty included in this, and I have made it my mission from both an economical and environmental standpoint to think before I throw something out.  The questions I ask myself are:  Can I re-purpose this item and make it into something beautiful?  Can I use this item to better organize my home? Obviously, not everything can be saved and shouldn’t be.  No one wants to enter “hoarders territory.”  That being said, I have simply modified my way of thinking.  Why go out and spend money on storage items, when plenty of these items can be re-purposed from previously used boxes and storage bags?  That is the question I ask myself.  When I was cleaning out my closet, I came across the box that my tablet PC came in.  It was made from a heavy laminated cardboard, with a magnetic closure. A perfect little box to store items in, all it needed was a bit of decoupage to make it pretty. I had some left over scrap-book paper from Lively Computer Tablet Makeover that was fun and thought it would be great for this. Upcycled Boxes

Materials:

Box

Scrapbook paper

Mod Podge

Scissors

Black felt tip marker

Foam Craft Brush

First, Use a marker to trace all sides of the box on the scrapbook paper. Trace on the blank side.  Then cut them out with scissors.  Apply the Mod Podge to the sides and lid and carefully glue the paper to the box, smoothing out any air bubbles as you go.  Once dry, apply the Mod Podge to seal the outside of the box. Simple, Stylish, Money Saving, and one less piece of garbage in the landfill. A win, win in my book! Upcycled Product Boxes Great for keepsake storage Decoupage Product box

Repurposed Umbrella Holder Made With Fabric and Mod Podge

I’ll admit even with all the rain lately, I never seem to have an umbrella handy. It was pouring when I left work earlier this evening and if it weren’t for the generosity of a friend, I would have been completely soaked! So, it would seem silly, that I would buy an umbrella holder.  It was sitting there mixed in with the lamps at a local thrift store.  I was at first, drawn to the shape of the item. Not to mention the price: Only $2.99!

I thought it would make a great toy holder.  Anyone with a little one knows  you can never have too much storage for toys and books. I also jumped at the chance to use the mod fabric I had left over from The 1960’s inspired Coffee Table Makeover , Step Stool Restyle, and Whimsical Garden Pig. When I purchased the fabric at Goodwill, I had no idea these textiles were created by artist and designer Helen Trast.  In 2007 she designed “Fredrika” line for Ikea.  I was originally attracted to the bright colors and retro feel of the fabric.  It would also match the coffee table in our playroom/family room.

First, I turned the piece on its side and traced the sides the fabric with a black marker. I repeated this step for all four sides.

DSC_1039

I cut the material with scissors and set aside.  I planned on painting the inside, so I used a white latex primer to prepare the item for painting.  While that was drying, I applied Mod Podge with a foam brush to each side of the piece applying the fabric panels, and smoothing out any wrinkles with my hands.

Decoupage with Mod Podge

I then painted the inside of the piece with three coats of red acrylic paint.  Once the entire piece was dry, It was time for more  Mod Podge.  Three full coats of it over the inside and outside of the piece.  After it was finished, I used an X-Acto knife to slice off any strings or fabric overlaps on the edges.

I then applied some additional Mod Podge to the areas where I trimmed away the excess fabric.

Repurposed umbrella holder

I may not be able to fill this box with umbrella’s but I have plenty of toddler toys to keep it full!

Toy Holder

To Upcycle or not to Upcycle. That is the question.

I’ll admit when I go thrifting I am attracted to certain items, but not for the reasons you may think.  Sure everyone dreams about finding the picture frame with a copy of the original US constitution in it resulting in the big “pay day”, but I am not always in it for what something is worth. I still have a lot to learn when it comes to determining what has the most value. More often than not, my choices are simply based on what I like.  I love anything retro, furniture, and fabric. I love to think outside the box when it comes to how I utilize these materials.

It was on one of many trips to the Goodwill that I came across this kids rocking chair:

Image

I saw it from a far and I didn’t waste anytime making my way over to it.  In my cart it went without hesitation. I didn’t even check the price at first.  Anytime I see kids furniture, I can restyle I buy it. Looking down at the tag I couldn’t believe my eyes.  I could tell it was a well made chair and it was only $5.99! I flipped the chair over and saw this:

Image

When I got the chair home, I did a little internet research on it and the company that made the chair. The Dixie Seating Company was founded in 1930’s and are known for making quality chairs and furniture for kids and adults. Most of these chairs are going for $76-$200 per chair online! I paid $5.99.  Except for some minor wear, the chair is in excellent condition.

After taking this all into consideration, I have put away the primer and I am instead taking out the Murphy’s oil soap. I am rethinking the upcycle and my decision is to leave the chair in it’s original state.

What do you think?  Have you ever decided not to upcycle an item because you were concerned  a redesign could effect value?  I would love to hear what others think on this.  Do you all think I made the right decision?

I e-mailed the company to try to gain more info on the chair including when the chair was made. They have not  have responded. The company started in 1934, but has changed owners a few times, and they had no information on this serial #.  They said best guess early 50’s. I believe the chair is at least  30 years old.  If anyone out there can offer any additional info on this chair, I would greatly appreciate and would love to hear from you!

Image

Wine Craft Wednesday: Upcycled Wine Bottle Garden Decorations

Image

There is nothing better than spending an evening decompressing after a long, hard day with a glass of wine.  Of course, even the occasional wine drinker is left to answer the question, “What do I do with all those empty wine bottles?” There are many great ideas out on the world-wide web for upcycling used bottles of all shapes and sizes.  Some of these projects call for “bottle cutting” and from what I have been reading online this is not always for the faint of heart. I wanted to do a wine bottle upcycle project that was simple and didn’t end with a trip to the Emergency Room.  I had decoupaged some bottles in the past, but I thought this time I would try something a little different.  I would attempt to make an outdoor garden marker using Outdoor Mod Podge and recycled gift bags.  First, I filled up a large pot with hot tap water.  I filled the wine bottles with hot water so they would submerse,  and placed them in the pot.  I let them sit for about and hour or until I could easily remove the wine labels.  While they dried I gathered the materials I needed.

Gift Bags

Scissors

Outdoor Mod Podge

Foam brush

I cut out the images I wanted to decoupage.  I turned the bottle upside down bottom of the bottle facing up.  I glued the images to the bottle using the Mod Podge and a foam brush.  I used my hands to smooth out the images and placed the  bottles under a stand up fan to dry.  Once dry, I applied 3 coats of Outdoor Mod Podge over the top of the image to seal. The instructions on the bottle of Outdoor Mod Podge say to let the piece dry indoors for about 72 hours.  An alternative use would be larger garden markers.  You could decoupage an image of a vegetable for example to label plants in the garden. The bottle neck acts as a stake to anchor the bottle into the ground.  Nowyou can kick back in the yard with that glass wine and admire your upcycle!

Image

Upcycled Wine Bottle Garden Markers

Living On The Upcycle: Money Saving Tips and More!

For those of you who have decided to follow my little DIY Blog, I can’t thank you enough.  It’s been about two months now since I started blogging, and I have really enjoyed the sense of online community here on Word Press.  Those of you who have been following me and my decoupage obsession have seen me use scrapbook paper on many of my projects.  I wanted to share with you the book of papers featured on my blog.  I purchased this scrapbook paper book at AC Moore for about $12.99 and it features damask and other patterns in mostly black and white.  I still have some sheets left, but have used many of the patterns featured inside.

Image

Recently, I had to purchase more Mod Podge Matte as I was in danger of running out.  We all know Mod Podge can be expensive.  When you restyle a lot of bigger projects such as furniture you can end up using a lot of the stuff.  I have been to a few craft stores locally, and so far the only one I have seen that sells Mod Podge by the gallon is AC Moore.  A gallon of Mod Podge is priced at $36.99!  Ouch!  The key is to wait until they feature the 50% off one regular priced item coupon. On a recent trip with the store coupon I saved over $18.00 off the price!  When the cashier keeps saying “Wow you saved a lot!” you know you got a great deal!  For current coupons and deals visit AC Moore Online

Mod Podge by the Gallon

Lastly, I have been working on an “On The Upcycle”  Logo.  I want to say thanks to Re:Retro for posting her blog entry Retro Office Stuff  featuring the retro Dymo label maker. I am a sucker for old, retro things and I just happened to have a Dymo label maker that I hadn’t used in a really long time.  Her blog entry inspired me to knock off the dust, have some fun, and use it again.  I came up with these logos.  To me it says what is old can be new again : )

On the Upcycle logo


On the Upcycle BW