Character Fabric Fun: Star Wars Candle Made With Mod Podge

Recently, I posted a kids chair project dedicated to the eternal kid in me.  A part of me that lives on despite my quickly advancing age. The chair was based on a favorite movie of my husband and I, The George Lucas Sci Fi classic Star Wars.  I always wanted to make an item dedicated to the classic movie, but I had no idea of what direction to go in. The thrift store circuit is hit or miss and lately I have been off the mark.  To pass the time, I have been browsing around a Joann Fabric store during my lunch break.  I tend to stay away because buying fabric in such a setting can get expensive. I like to keep project costs at the very minimum and recycle as much as I can.  Even when I chose only to browse I was often inspired by all of the fabric colors and creative possibilities.  All the choice and accessibility can be hard to resist!

It was to my amazement one day that I stumbled upon character fabric.  They have everything from Hello Kitty, Marvel, Family Guy, just to name a few, and best of all they had three different styles dedicated to Star Wars!  The fabric was a bit pricey ($14.99 a yard), but as luck would have it,  I was able purchase a large”scrap” piece for just under five dollars! I finally had my idea and “Star Wars Kid’s Chair” was born.

Star Wars Fabric Decoupage Kids Chair

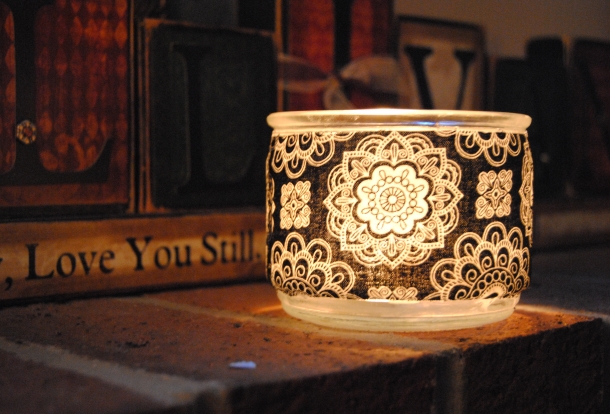
What to do with the extra fabric?  I actually have quite a bit of it left, and I decided to use a smaller piece and make my hubby a Star Wars candle. Then it hit me!  With the holiday’s quickly approaching,  character candles made with fabric make fun gifts.  The best part about the candle is when lit it illuminates the characters and they glow, once again fun for the kid in all of us.

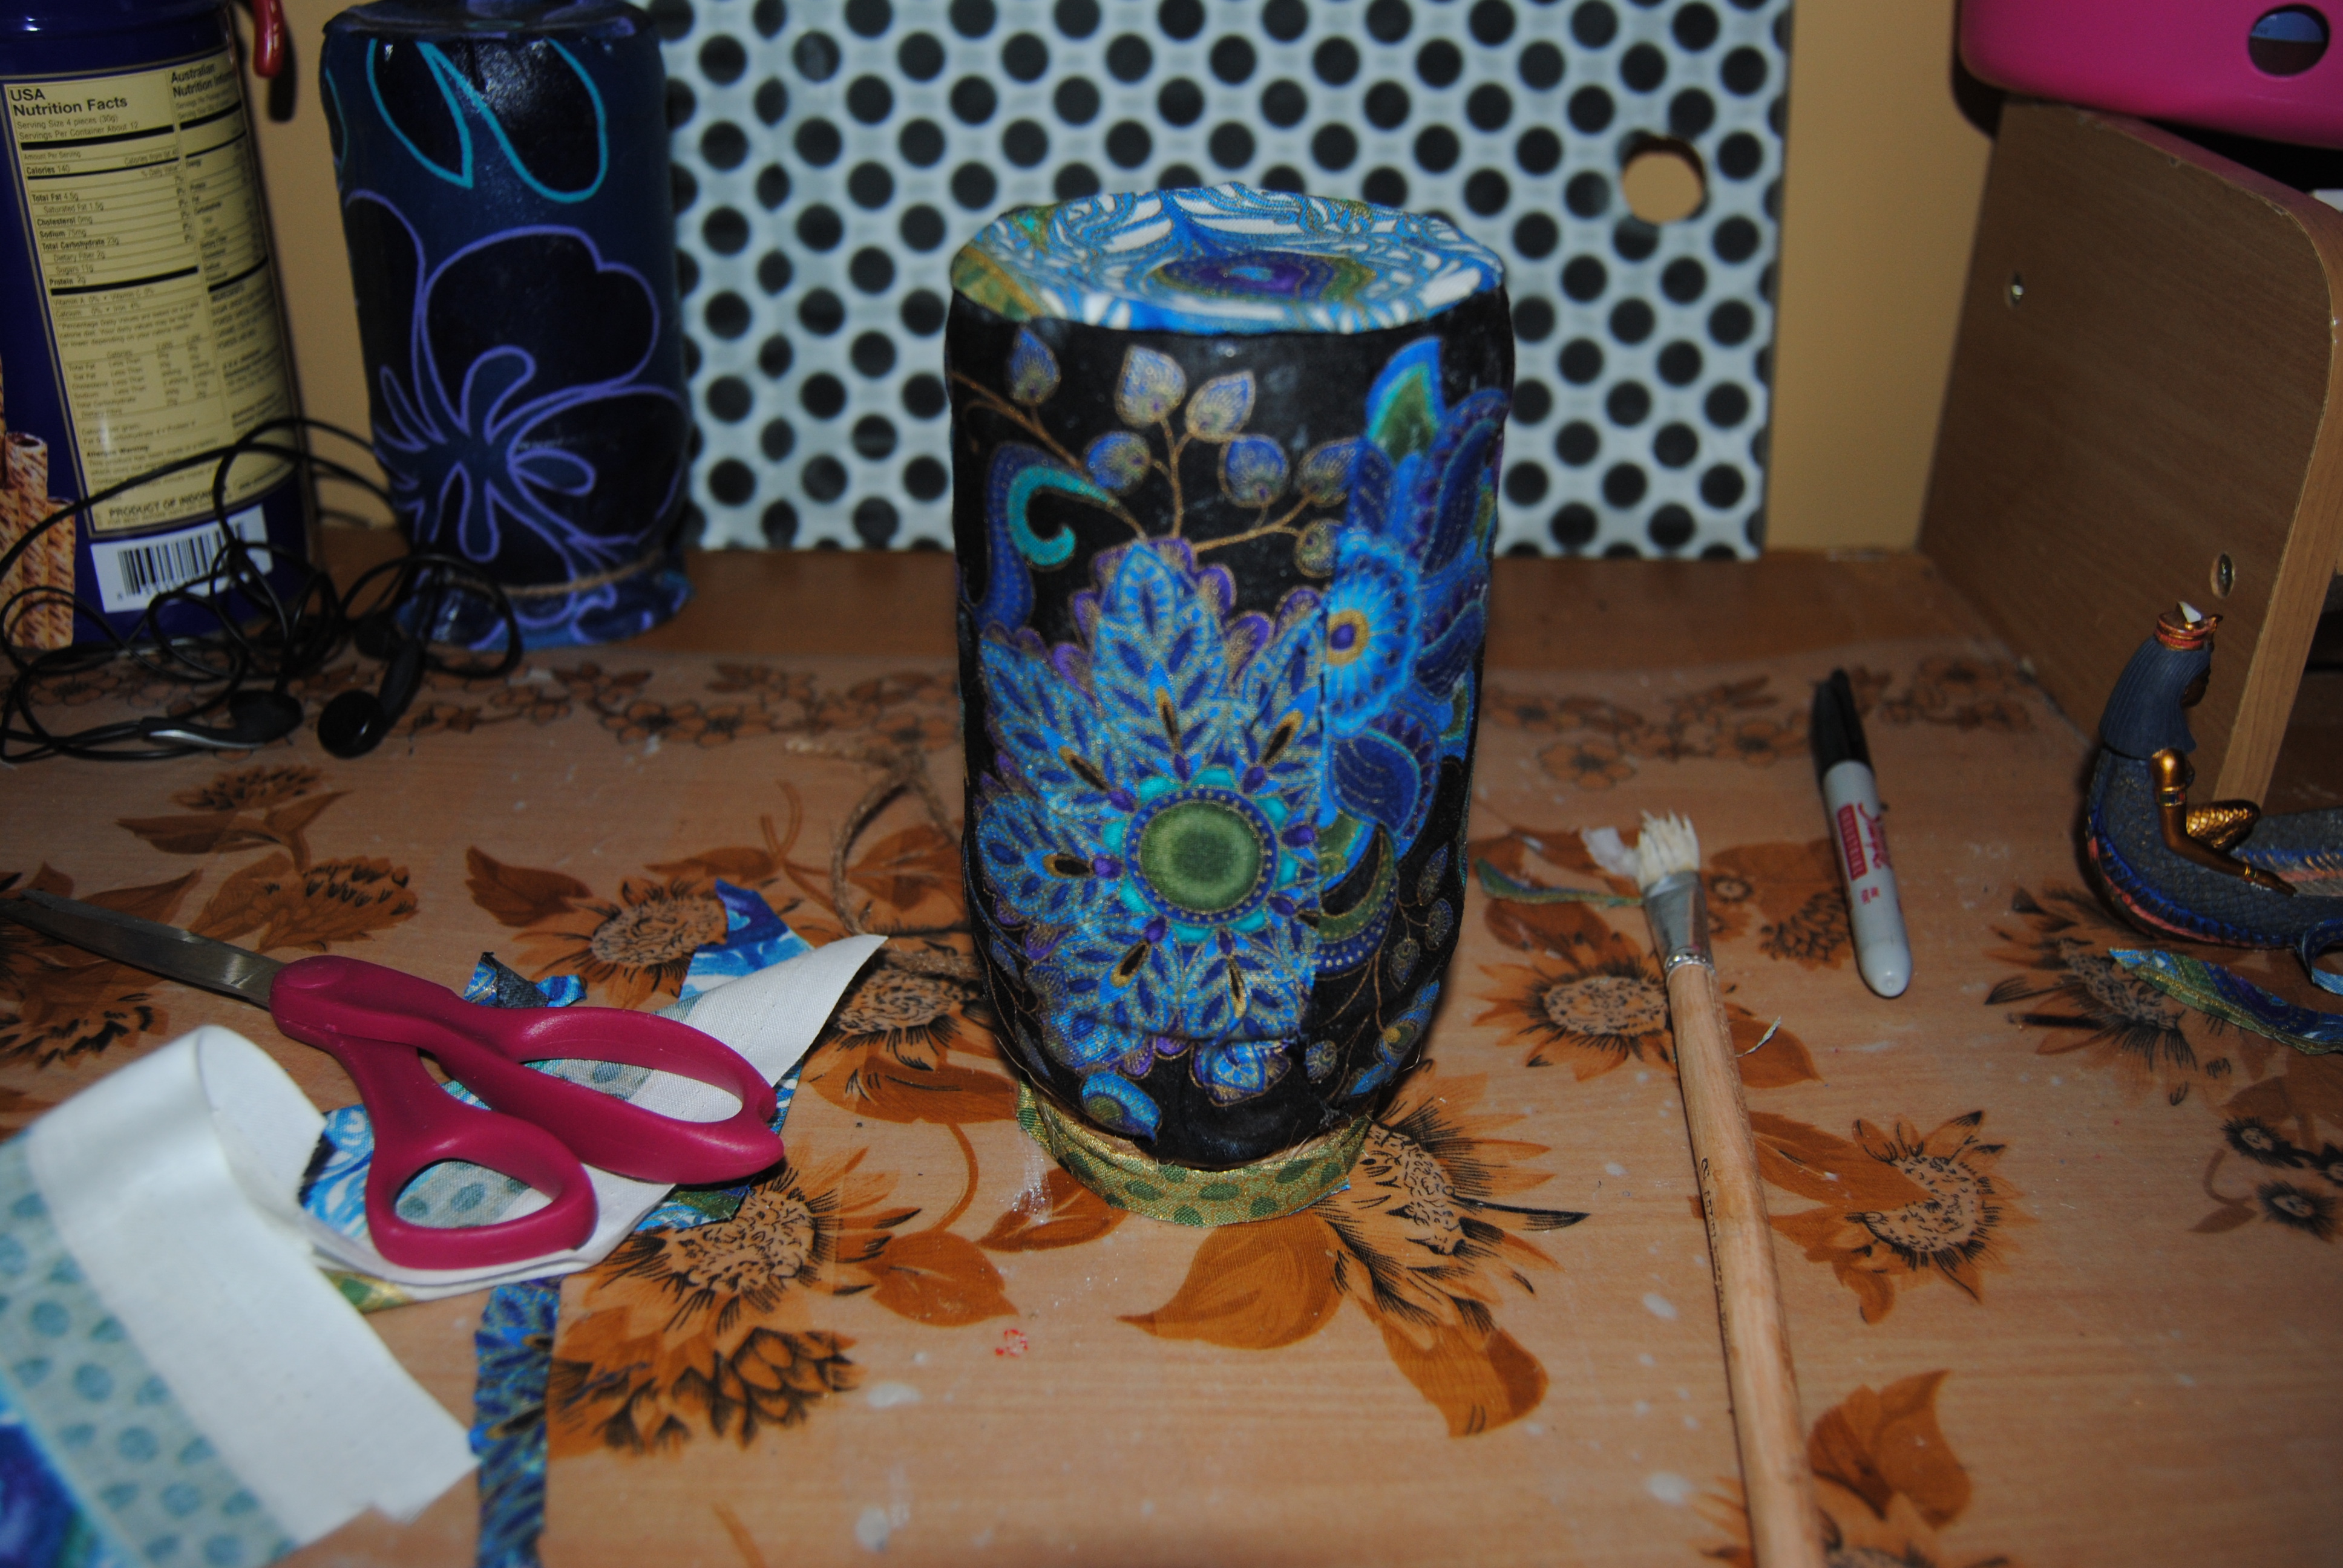
I purchased a few glass pillar candles from the dollar store and applied Mod Podge to the outside glass.  I trimmed a piece of fabric large enough to wrap the candle, but with minimal over lap. Any seams or overlapping of fabric will be visible once the candle is lit. I applied the fabric to the glass and applied a layer of Mod Podge over it to seal it onto the glass.  Allow to dry and it is ready to light!  Once the candle is used up, just remove any excess wax and drop a tea light in to illuminate it.

Star Wars Mod Podge candle chracter fabric

If  Star Wars isn’t your thing, no need to worry because with all the character fabric out there, you can make any novelty candle you like! May the force be with you….

“On The Upcycle” Top 5 Free Kids Craft and Educational Websites

Recently, I find myself  seeking out new ideas and activities for my two year-old that are both educational and fun.  My daughter loves to draw, play on the computer and sing along to music, Old McDonald Had A Farm, Elmo’s Song and Twinkle Twinkle Little Star just to name a few!  Incorporating the activities she loves and enjoys with learning has proved to be a very effective.  There are many sites on the web dedicated to educating through various activities and games.  Some websites require fees while others are totally free!

Today, I share with you my top five favorite kids websites in no particular order, but equally wonderful!

leading to reading_thumb[1]

Leading to Reading: is a child education site for children from 0-5 that offers games, online activities and resources for grown-ups.  They encourage language developement and learning through reading.

abcya_logo

ABCya.com: is a free educational site for kids ages 5 and up.  This free site features computer games and educational activities. All of the activities on the site were created or approved by school teachers!

2013-hoawg-logo-200

Hands On As We Grow: This blog style site is packed with kids craft ideas and activities.  What better way to explore a child’s imagination than by making crafts together? This site promotes sensory, and creative development through fun family arts and crafts.

sesame_street_wallpaper_1278413620

Sesame Street.Org: Monsters, Muppets and Friends Oh My!  The gang from Sesame Street, (my personal favorite) promote learning through free games and activities, such as word and number games, and online coloring and painting.

bg-logo

Super Simple Learning and Songs: A wonderful website featuring both free and paid content, my favorite part of this site is their You Tube channel, packed with simple songs for you and your toddler to sing along with together that promote learning and language skills.

My daughter’s personal favorite? Twinkle Twinkle Little Star

Scrap Fabric Upcycled Candle/Tea Light Holders

There is nothing I love more than decorative lighting and candles!  They help create a cozy, relaxing environment in any room and some candles are aromatic as well.  I especially enjoy the pumpkin and apple pie scented candles.  Once the candles burn down, you are left with the glass and some left over wax.  Sadly, these items often get discarded, but each of these can be restyled into decorative tea light holders using a bit of Mod Podge and fabric scraps.

First, I used a butter knife to carefully chip away at the leftover wax.  Once the wax was removed I used a damp paper towel to clean the inside.  I applied Mod Podge to the outside of the candle holder with a paint brush.  I cut a small piece of scrap fabric measured to fit the outside of the candle.    I wrapped the fabric around the outside of the glass and applied Mod Podge over top of the fabric to seal it.  These are simple to make and are a great way to recycle used candles and fabric scraps.

Recycled Candles made into decorative tea light holders

Upcycled Candle holders made with fabric and Mod Podge

Purrific Candy Cats: Upcycled Halloween Candy Tray

While I was out thrifting yesterday, I picked up this great little wicker tray with a hard unfinished wooden bottom, and two handles. This tray was stamped underneath as made by Corning.  It was a bit of a mystery as to what this tray was used for in its current state.  It was certainly priced right and stamped with a red tag marked 50% off and cost only $1.00.

Mystery Wicker Tray

I had an idea since it is close to Halloween to repurpose this item into a Halloween candy tray.  Using a flat tray instead of a deep one, enables the kids to pick the candy that they like best.  I had some great left over Halloween themed spooky black cat fabric I purchased at Joann Fabric.  The same fabric I used for DIY Upcycled Decorative Halloween Lamp.  I gathered the materials needed for this project.

Wooden Tray

Mod Podge

Black Acrylic Paint

Spooky Halloween Fabric

Paint Brush/Fine Tipped Marker

Foam Craft Brush/Scissors

First, I painted the tray areas that would not be covered by fabric with a medium-sized paint brush,  I used a couple of coats and allowed it to dry thoroughly between coats.

Painted Tray

Once dry, I traced the bottom of the tray on to the back of the fabric with the black fine tipped marker.  I carefully cut the fabric out with a pair of scissors.  I placed the fabric aside and applied Mod Podge to the tray surface with a foam craft brush.  I carefully placed the fabric on the tray surface and smoothed out any wrinkles with my hands.  I allowed this to dry and then applied Mod Podge over the painted areas, and the fabric surface.

Upcycled Halloween Candy Tray-Black Cats

Now the hubby and I can pass out candy in spooky black cat style! This can also be used as a serving tray for ghastly goodies. What crafts do you have planned this Halloween?

Halloween Tray made with Mod Podge

Upcycled Coffee Cans and Glass Jars

It has been a hectic few weeks and my upcycling ways have suffered a bit.  My free time has consisted of some travel, household chores, decorating for fall and getting my craft space in order.  I have a few projects in the works, but lately I feel like I am coming up mostly empty-handed during my Goodwill lunches.   During these lean crafting times, I try to work on the craft room.   I am hoping to share it one day, but alas it is far from finished.  I am still finding ways to organize supplies, and just hung some shelves: Progress!

A great way to organize paint brushes and general supplies are old coffee cans and glass jars.  I like to cover them with fabric using Mod Podge.  Glass covered jars not only make great lamps, they also are a decorative way to organize craft room supplies. Simply measure the fabric, cut,  and apply the Mod Podge and fabric to the outside of the coffee can.

DSC_0106

DSC_0754

Similar method can be used to apply fabric to glass jars, such as pickle jars, and spaghetti jars.  The possibilities and uses for these items are endless, and it is a great way to repurpose and recycle throw away items. What’s better than craft room storage for free?

DIY Children’s Playroom Art Display

Two of the toddler apprentice’s favorite activities are drawing and painting.  As a proud mom, I consider all of her drawings mini masterpieces.  I like to keep and display her artwork, but the refrigerator door was becoming too crowded. I decided to display them on the playroom wall via a “mini” clothes line. (minus the clothes of course!)

DSC_0724

Materials needed to make an “Art” line:

string/twine

2 small metal hooks

scissors

clothes pins

I used two mini metal hooks, hanging them on opposite ends of the wall.  I measured out the twine and cut to the desired length with the scissors. I tied the twine to the metal hooks allowing a bit of sag on the twine.  I then hung all of my daughter’s art on the line with clothes pins.

Kids art display

Finger Painting Artwork

What a great way to display her art, a simple DIY solution !

It’s Raining Black Cats: DIY Upcycled Decorative Halloween Lamp

Hands down, Autumn is my favorite time of year.  From Pumpkin coffee to homes decorated with colorful mums, It is apparent fall is here and Halloween is just around the corner.  What better way to celebrate the most fun and certaintly most spookiest of holidays than with an upcycle craft celebrating All Hallows Eve?

I visited Joann Fabric and picked up some festive material featuring very scary black cats in different poses.  I thought the orange-colored background would look nicely when the lamp light shines through it.

DSC_0746

Materials:

Halloween fabric of choice

Small lamp base

Dollar Store Glass Vase (You can also use a glass jar)

Mod Podge

Scissors/Paint Brush/thin tipped black marker

Twine/String

First, I wrapped the fabric around the outside of the vase and trimmed with scissors.  I traced the bottom of the glass vase on the back of the fabric.  I cut the circle of material out and placed it aside,  I applied Mod Podge to the outside of the glass with a brush and carefully wrapped the material around it smoothing it out with my hands.  I cut a piece of twine off the spool and tied it around what would be the base of the lamp.  Doing this helps add a decorative touch and holds the fabric in place while drying,

DSC_0747

I  stood the vase up and applied the last piece of fabric to what would be the top of the lamp.  Once applied, I covered the entire outside with Mod Podge.

DSC_0750

Once the piece was dry, I added one additional coat of Mod Podge to the lamp and fabric.  What is great about these lamps is the capability to use one lamplight base and switch out different decorated glass jars and vases to create new decorative lighting looks.

DIY Decorative Halloween lamp made with Mod Podge and fabric

Hope you enjoy my festive feline Halloween lamp!  ahhh I can taste the candy corn now!

Restyled Polka Dot Cutting Board

I have a glass cutting board I used for cutting paper and crafts.  I have several cutting boards, and did not have a use for this one in the kitchen so,  I used it for crafting on and cutting paper.  I was sitting at my work station one day and decided to “dress it up” a little.  I had this great black and white polka dot scrapbook paper.  Since the cutting board was made from a clear glass, the idea was to adhere the paper to the back, and allow the polka dot image to appear through the glass without affecting the usable surface.

DSC_0642

I applied Mod Podge to the back of the cutting board  with a foam craft brush and adhered the scrapbook image facing out. I then trimmed the paper around the glass.  I carefully matched the polka dots up so the pattern appeared as seamless as possible.  I applied Mod Podge on the back of the paper to seal it.  If I were to use this as a real cutting board, I would use outdoor Mod Podge to seal the back for added protection.  This cutting board will be used for cutting, but not used around water so I used Mod Podge matte finish to seal it.

DSC_0645

Just think of the possibilities!  It also would make a nice decorative piece also if not used as a cutting board.  You could Mod Podge any image and photos behind the glass!

Stepping through time: DIY Cemetery Flowers And A walk through St Peter’s Cemetery, Staten Island, New York

Yesterday, my daughter and I took a trip to visit my aunt in New York.  During the trip, my sister and I traveled over to St. Peter’s Cemetery in Staten Island to visit several ancestors memorials.  I called the cemetery office and spoke with Pat who was wonderful!  I e-mailed her with a list of names I suspected were interred at the cemetery. She responded back with several and provided the grave plots and locations along with a cemetery map.  I planned on photographing the graves, but also wanted to leave something for them out of respect.

I found some old artificial flowers and glass candle holders in our attic as well as some left over styrofoam packing materials.  I decided to use these items to come up with a small tribute to each grave as I visited.

DSC_0574

I had to create five total and did not have enough styrofoam for the bases.  I used two glass candle holders instead with a small piece of styrofoam inside to attach the flowers.  I used scrap fabric, paint and hot glue to put these together.  I was also stopping by to visit my grandparents and made a special one for them with my daughter’s picture in it.

Repurpused Grave Memorial Flowers

DSC_0579

My daughter visiting her great grandparents

Stay tuned for more of the genealogy series!

Just For Fun: Rainbow Brite Decoupage Tote Bag

I have been intrigued recently by the idea of using decoupage on purses and suitcases. This requires me to work with different materials I have not tried before, and overcoming certain obstacles such as shape, texture and overall size. I thought this tote bag would be a great practice project, and a cute item to carry/store my daughter’s toys in.

DSC_0570

Their was an overall texture to the bag and I was not sure how the Mod Podge would adhere to it. I was concerned at the possibility that the texture underneath the paper would make the decoupage appear wrinkled.  I printed out an image of the Rainbow Brite characters.  I trimmed the image with a pair of scissors.   I applied Mod Podge to the bag surface with a foam craft brush carefully smoothing out any wrinkles in the paper.  Once dry,  I applied multiple coats of Mod Podge over the image. (The more coats on synthetics/plastics, the better the bond) It appeared to adhere to the bag well, but I have been burned by plastic/synthetic surfaces before.  The Mod Podge simply does not adhere well to these surfaces. Through constant use by two year-old hands, only time will tell the durability of this project. I would guess that canvas would be a bit more “user friendly” The decoupage looks great and the surface does not appear to have affected the paper much.  I hope my toddler appreciates Rainbow Brite as much as her mommy does!

Rainbow Brite Decoupage Tote bag

Materials:

Tote bag

Print for decoupage

Mod Podge

Scissors

foam craft brush