Think before you Toss: Upcycled Product Boxes

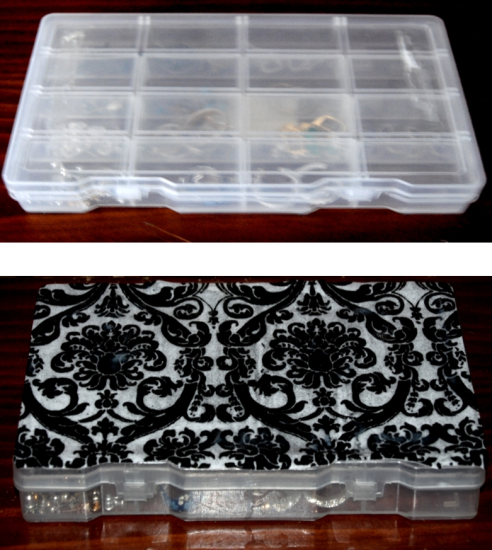
I have started to look at things differently.  Most of the change has been born out of necessity. People all over the world have been struggling to make ends meet more than ever before.   We are certainty included in this, and I have made it my mission from both an economical and environmental standpoint to think before I throw something out.  The questions I ask myself are:  Can I re-purpose this item and make it into something beautiful?  Can I use this item to better organize my home? Obviously, not everything can be saved and shouldn’t be.  No one wants to enter “hoarders territory.”  That being said, I have simply modified my way of thinking.  Why go out and spend money on storage items, when plenty of these items can be re-purposed from previously used boxes and storage bags?  That is the question I ask myself.  When I was cleaning out my closet, I came across the box that my tablet PC came in.  It was made from a heavy laminated cardboard, with a magnetic closure. A perfect little box to store items in, all it needed was a bit of decoupage to make it pretty. I had some left over scrap-book paper from Lively Computer Tablet Makeover that was fun and thought it would be great for this.
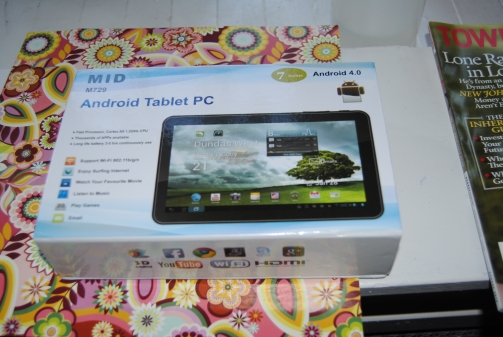
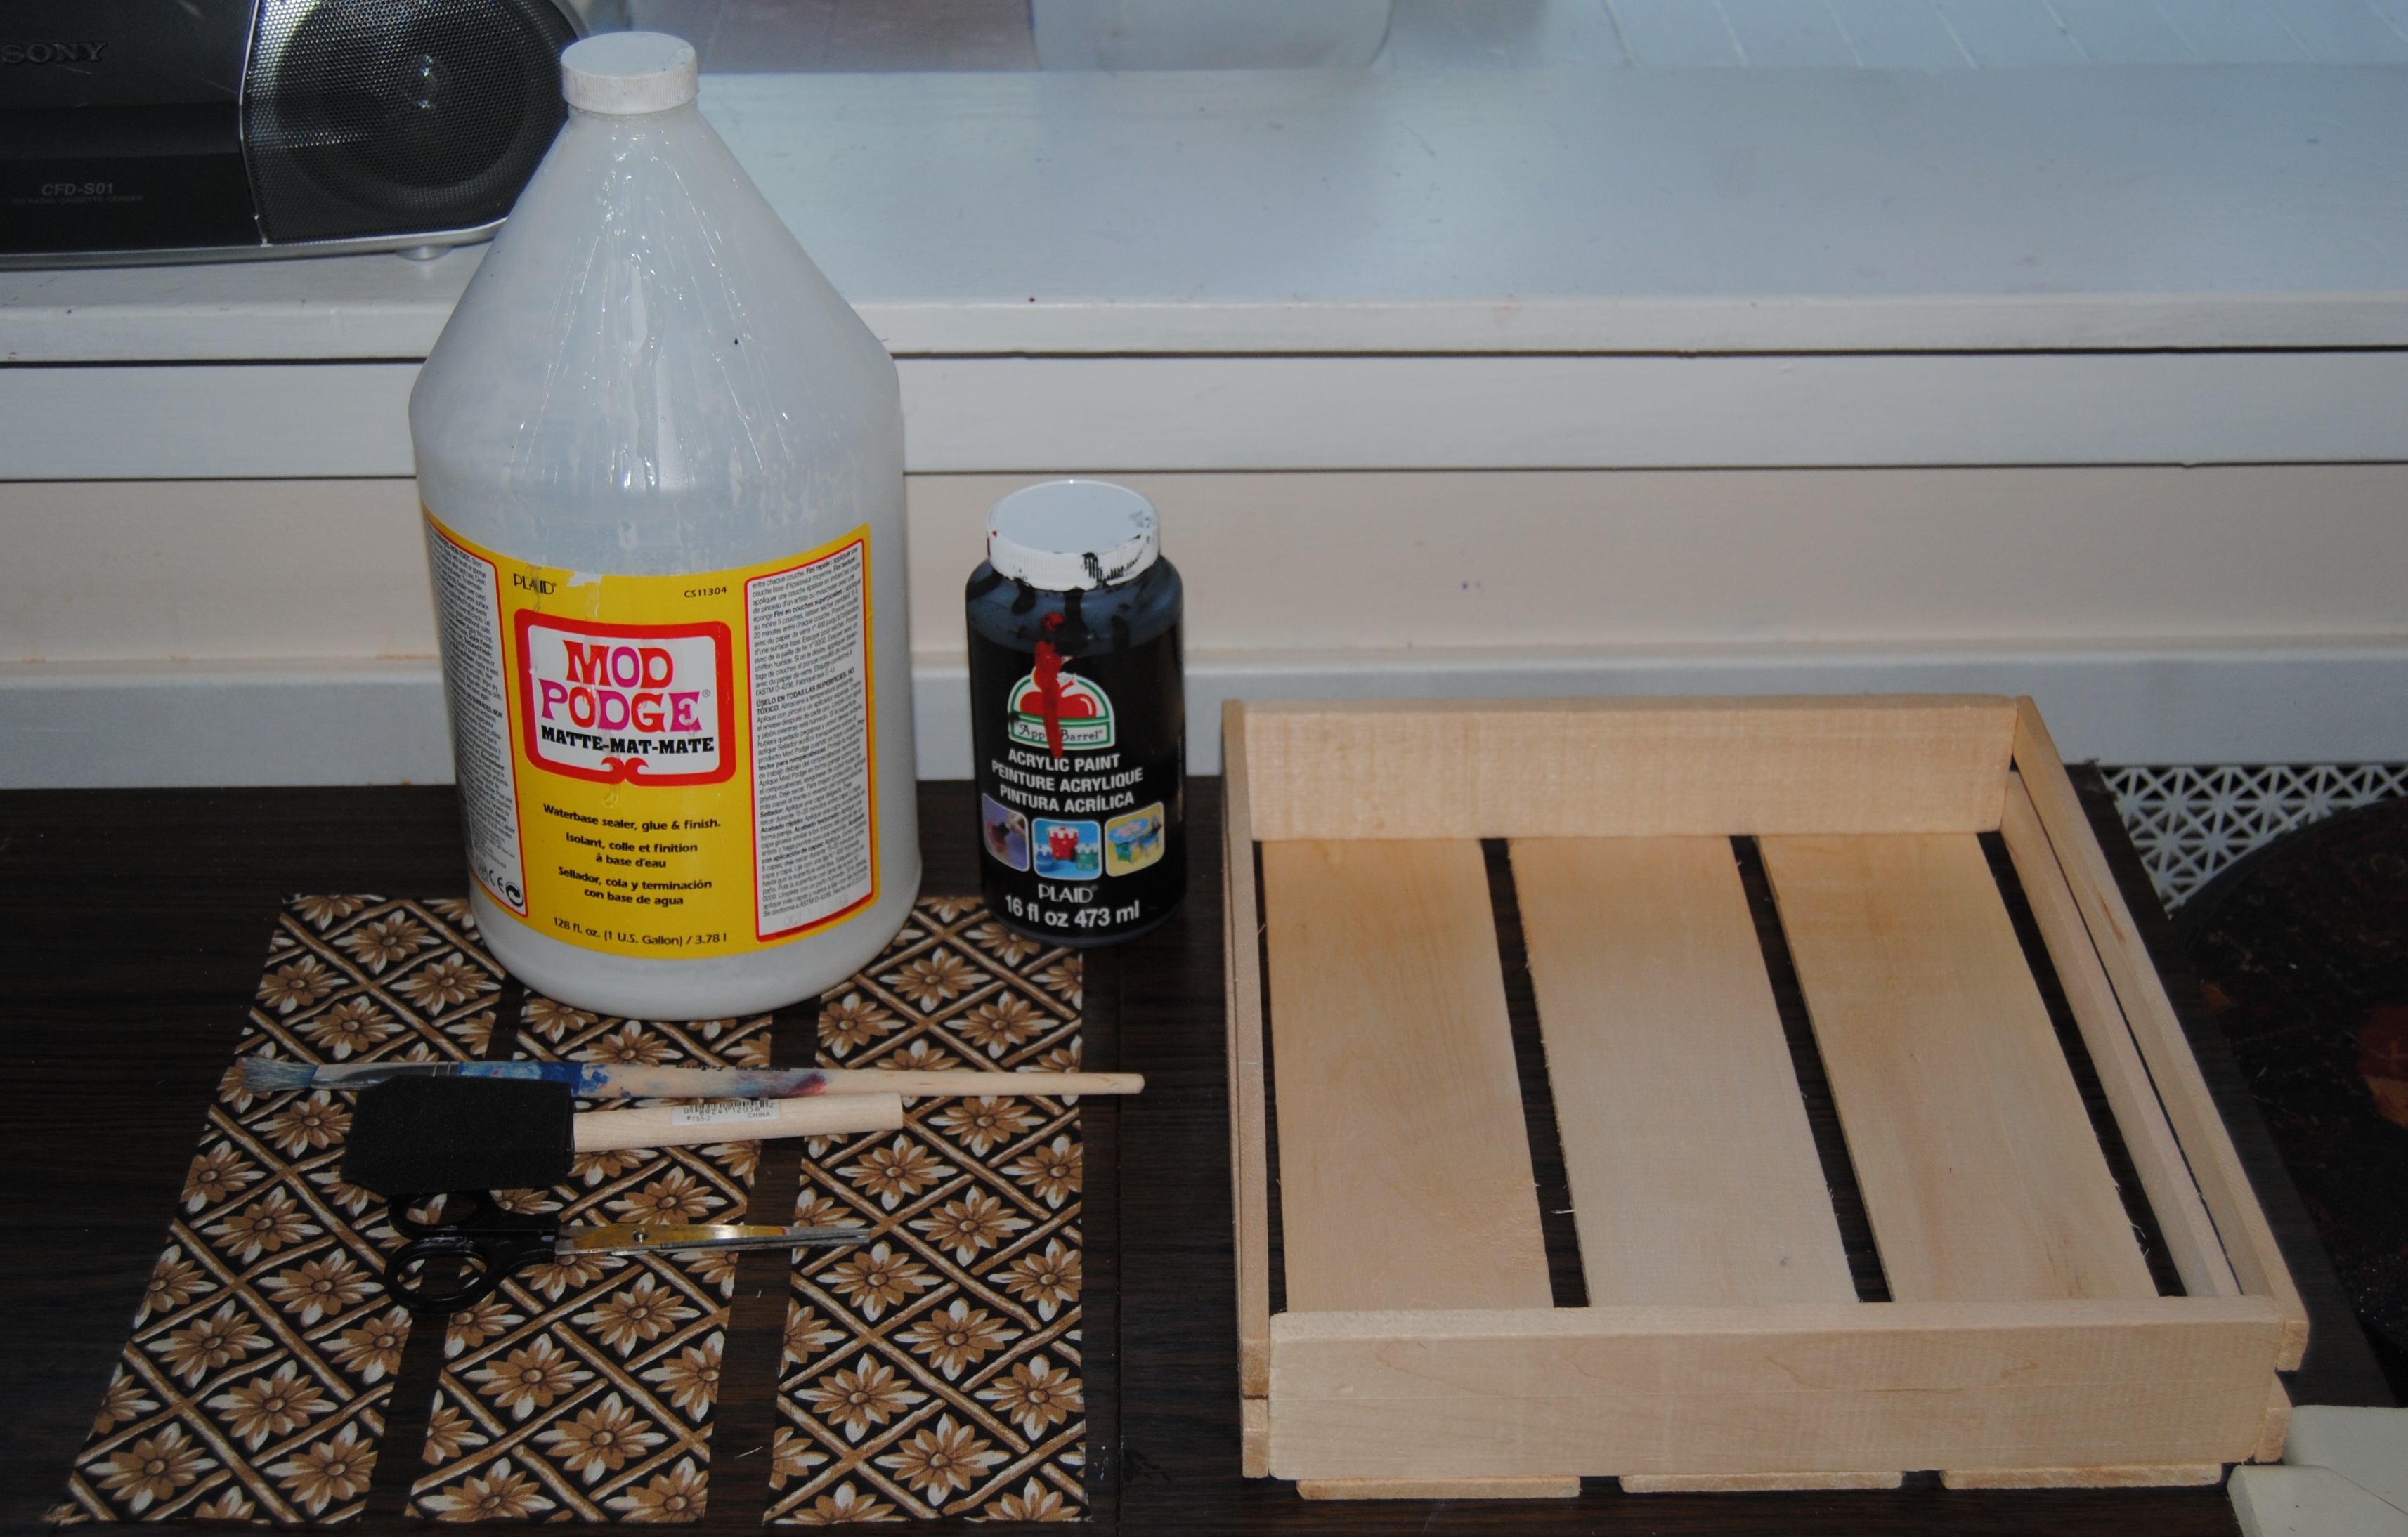
 Upcycled Boxes

Materials:

Box

Scrapbook paper

Mod Podge

Scissors

Black felt tip marker

Foam Craft Brush

First, Use a marker to trace all sides of the box on the scrapbook paper. Trace on the blank side.  Then cut them out with scissors.  Apply the Mod Podge to the sides and lid and carefully glue the paper to the box, smoothing out any air bubbles as you go.  Once dry, apply the Mod Podge to seal the outside of the box. Simple, Stylish, Money Saving, and one less piece of garbage in the landfill. A win, win in my book! Upcycled Product Boxes Great for keepsake storage Decoupage Product box

Image

So Happy Together! 1960’s Mod Style Coffee Table And Mini Toy Box.

So Happy Together!  1960's Mod Style Coffee Table And Mini Toy Box.

I spent most of the day today getting our daughters playroom together, running errands and trying to sort through a craft room that consists of more junk than crafts. I am hoping one day it will be pretty enough to share with you, but my guess is that is a bit farther into the future. Needless to say, I didn’t have much time to craft today, but I wanted to share this snap shot of my daughter’s playroom coffee table and toy box. I love how the bright fabric brings color and “pop” into our red family room. I have a new appreciation of fabrics and textiles and how much they can bring to a space.  The Coffee table surface is also holding up nicely and I use a baby wipe to clean it and it works great.


Repurposed Umbrella Holder Made With Fabric and Mod Podge

I’ll admit even with all the rain lately, I never seem to have an umbrella handy. It was pouring when I left work earlier this evening and if it weren’t for the generosity of a friend, I would have been completely soaked! So, it would seem silly, that I would buy an umbrella holder.  It was sitting there mixed in with the lamps at a local thrift store.  I was at first, drawn to the shape of the item. Not to mention the price: Only $2.99!

I thought it would make a great toy holder.  Anyone with a little one knows  you can never have too much storage for toys and books. I also jumped at the chance to use the mod fabric I had left over from The 1960’s inspired Coffee Table Makeover , Step Stool Restyle, and Whimsical Garden Pig. When I purchased the fabric at Goodwill, I had no idea these textiles were created by artist and designer Helen Trast.  In 2007 she designed “Fredrika” line for Ikea.  I was originally attracted to the bright colors and retro feel of the fabric.  It would also match the coffee table in our playroom/family room.

First, I turned the piece on its side and traced the sides the fabric with a black marker. I repeated this step for all four sides.

DSC_1039

I cut the material with scissors and set aside.  I planned on painting the inside, so I used a white latex primer to prepare the item for painting.  While that was drying, I applied Mod Podge with a foam brush to each side of the piece applying the fabric panels, and smoothing out any wrinkles with my hands.

Decoupage with Mod Podge

I then painted the inside of the piece with three coats of red acrylic paint.  Once the entire piece was dry, It was time for more  Mod Podge.  Three full coats of it over the inside and outside of the piece.  After it was finished, I used an X-Acto knife to slice off any strings or fabric overlaps on the edges.

I then applied some additional Mod Podge to the areas where I trimmed away the excess fabric.

Repurposed umbrella holder

I may not be able to fill this box with umbrella’s but I have plenty of toddler toys to keep it full!

Toy Holder

What is it? The 50 Cent Wooden Mini Pallet Makeover

Buy now ask questions later! The price was certainly right, only 50 cents, but what was this item and what was it’s original use?  It looked like a miniature pallet, but felt a little like a tray. Whatever it was didn’t really matter. I loved the fact that it was a fresh unstyled piece and I was determined to give it a new look. After searching the Goodwill shelves a bit more and leaving disappointed, I took a trip down the fabric aisle and found a nice old bed skirt with a triangular pattern that would be a perfect restyle fabric.

I gathered the materials I would need. Firstly, I traced the pallet slats onto the fabric with a black sharpie marker. I repeated this a total of 3 times once for each slat.  I then cut the fabric out with scissors.

Image

I applied the Mod Podge to each slat with a foam brush and glued down the fabric smoothing it out gently with my hand.  I used black acrylic to paint the non decoupaged areas. Once the piece was completely dry, I applied Mod Podge over the entire tray to seal it.  Not bad for 50 cents!

Before/After:

Image

Image

Wine Craft Wednesday: Upcycled Wine Bottle Garden Decorations

Image

There is nothing better than spending an evening decompressing after a long, hard day with a glass of wine.  Of course, even the occasional wine drinker is left to answer the question, “What do I do with all those empty wine bottles?” There are many great ideas out on the world-wide web for upcycling used bottles of all shapes and sizes.  Some of these projects call for “bottle cutting” and from what I have been reading online this is not always for the faint of heart. I wanted to do a wine bottle upcycle project that was simple and didn’t end with a trip to the Emergency Room.  I had decoupaged some bottles in the past, but I thought this time I would try something a little different.  I would attempt to make an outdoor garden marker using Outdoor Mod Podge and recycled gift bags.  First, I filled up a large pot with hot tap water.  I filled the wine bottles with hot water so they would submerse,  and placed them in the pot.  I let them sit for about and hour or until I could easily remove the wine labels.  While they dried I gathered the materials I needed.

Gift Bags

Scissors

Outdoor Mod Podge

Foam brush

I cut out the images I wanted to decoupage.  I turned the bottle upside down bottom of the bottle facing up.  I glued the images to the bottle using the Mod Podge and a foam brush.  I used my hands to smooth out the images and placed the  bottles under a stand up fan to dry.  Once dry, I applied 3 coats of Outdoor Mod Podge over the top of the image to seal. The instructions on the bottle of Outdoor Mod Podge say to let the piece dry indoors for about 72 hours.  An alternative use would be larger garden markers.  You could decoupage an image of a vegetable for example to label plants in the garden. The bottle neck acts as a stake to anchor the bottle into the ground.  Nowyou can kick back in the yard with that glass wine and admire your upcycle!

Image

Upcycled Wine Bottle Garden Markers

Repurposing Glass Bottles: Celestial Dish Soap Dispenser

While at the new Joann Fabric Store the other day, I found this great little glass bottle with a liquid dispenser top.  It was a bargain at only .99 cents!  Seeing the dispenser, reminded me of a wine bottle re-purpose I saw on Pinterest from the  Mom 4 Real Blog.  It took a wine bottle and restyled it into a liquid dish soap dispenser.  I thought this was pure genius and it looked great!  The only problem for  me was counter top space, so rather than use a wine bottle for my attempt at the project, I decided to use this smaller square glass bottle. A simple decoupage restyle was in order! I gathered up the items I would need to make this project happen.  I decided to go with a celestial themed print I loved, and it matched the colors in my kitchen perfectly!

Image

I decided to use Outdoor Mod Podge for this project.  My reasoning behind this was the close proximity  this bottle would be to the sink.  I thought it might hold up better with the added protection.  I simply printed the image, cut it out, and glued it to the glass with the Mod Podge.  Once dry, I then added 2 more coats over the image to seal it.  I believe the liquid/stopper/dispensers are sold separately so any glass bottle in which one of these stoppers would fit the opening would work for this project, a wine bottle is a fine example of that. I posted a photo below of the finished product.  This was an easy project and I am loving the whimsical celestial imagery!

Image

DIY Recycled Wooden Photo Plaque

We have all seen them at the thrift stores and swap meets, and outdoor flea markets.  They are wooden plaques with various images painted or printed on them.  Sure, you can purchase wooden plaques at your local craft store brand new, but this one cost only .99 cents and I rescued it from a possible trip to the landfill.  Purchasing “pre -owned, only added one additional step to the project. I had to use a white, latex primer first before I could paint the plaque black with acrylic paint.   As far as projects go, it doesn’t get any easier than this!   This is a great beginner project if you are using Mod Podge for the first time.

First, I formatted and cropped the black and white photo into an oval shape and printed it out on photo paper.   I can’t afford photo shop, but there are plenty of free great photo editing software on the web.  I use  Paint.net .  This is my one of my favorite photo’s.   I took this when my daughter was only two days old.  Amazing how those days go by so quickly!  Even more reason to immortalize these special  moments  in time.  I left some time for the ink to dry on the paper and cut out the image carefully with a pair of scissors leaving a white border around it.  This I thought  would make the photo stand out from the black plaque.  I then glued the photograph down to the plaque using Mod Podge Matte finish.  Once dry, I covered the photo plaque with two coats of Mod Podge allowing the plaque to dry between coats.  The nice thing about recycled plaques are often times than not, they come ready to hang on the wall!  I was more than happy to add this Photo Plaque to our photo wall leading upstairs.

Image

Image

Pictured above Before and After

Materials:

Wooden Plaque/New or Recycled

Mod Podge Matte Finish

Printed Photo to decoupage

Scissors, Paint brush

Black Acrylic Paint

White Latex Primer

Image

Nuts and Bolts: Re-Purposed Plastic Container Earring Box

Image

We have all seen them in hardware stores, or down the home improvement aisle. Those nifty assorted nail, nut and bolt sets housed in those plastic containers. I had purchased one some time ago and after using most of the nails, I was left with the plastic box.  I held onto it thinking I would eventually use it for something. After some thought,  I had the perfect use for it, an earring holder.  Sure, I have a jewelry box, but the nice thing about this plastic box were all the individual compartments.  There is nothing worse than digging through a jewelry box drawer trying to find a matching pair of earrings.  Using this box would eliminate that problem.  It worked great, but lacked an aesthetic appeal, so I decided to do a simple restyle.  I traced the top of the box onto the scrapbook paper, then used Mod Podge Matte finish to glue the paper to the top of the lid. Once dry I used two coats of Mod Podge to seal the lid and the paper.  This was a very simple project, and works great!

Image

Image

The Gift Bag Makeover: Wooden Box Re-purposed and Restyled with decoupage

Utensil Holder Repurpose with Decoupage

Some time ago my husband purchased a box of silverware from JC Penney for me as a birthday gift.  We had just started hosting Christmas at our house and we realized we did not have enough place settings  for everyone when it came to eating utensils.  I was so happy to get these!  I finally had a matching set.  I love getting new things for the house.  They came is a wooden box with a felt/cardboard insert inside for storage,  I knew I would simply just store the spoons, forks and knives in my kitchen drawer for everyday use so I didn’t really need the box.  I didn’t want to throw it away so I did the thing I always do, put it up in the attic.  It then resurfaced on one of my “attic shopping trips”  I thought I could repurpose it to store things in.  Sewing supplies, stationery, arts and crafts, you name it.  You can never have enough storage boxes.  It was fairly easy to rip out the inside once this was done, I lined the inside with scrap-book paper and Mod Podge.  Any areas that were unpainted inside once I ripped out the utensil holder I painted black.  I then moved on to the outside.  I had this wonderful gift bag.  I held onto it for quite sometime I thought it would be perfect for this project.  I cut it measured it, and applied Mod Podge to the surface gluing down the gift bag.  I then sealed with three layers of Mod Podge Matte finish. Now I just have to decide what I will put in it!

Gift Bag

Wooden Box

Black Paint/Brushes

Scrapbook paper

Scissors

Mod Podge