When Crafts Go Wrong: Restyling the Upcycle

On May 12th, I posted a Time Out chair I restyled.  Truth is I was never happy with how it turned out.  I think I know why it didn’t turn out as I planned.  I forced it. I was determined to finish the project even when I felt I should put it aside.  One thing I lack is patience and that can be a crafter’s undoing.  Sometimes it is just better to set a project that is frustrating aside to finish at a later date.The Time Out chair is an example of restyling a restyle.(You could say)

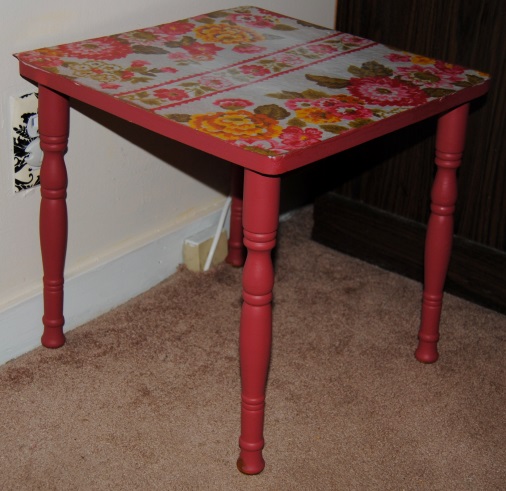
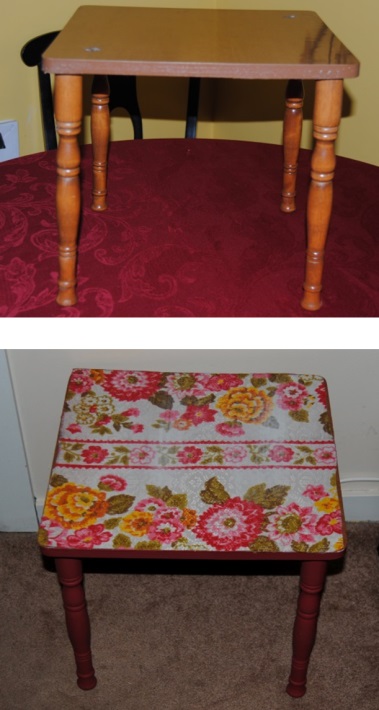
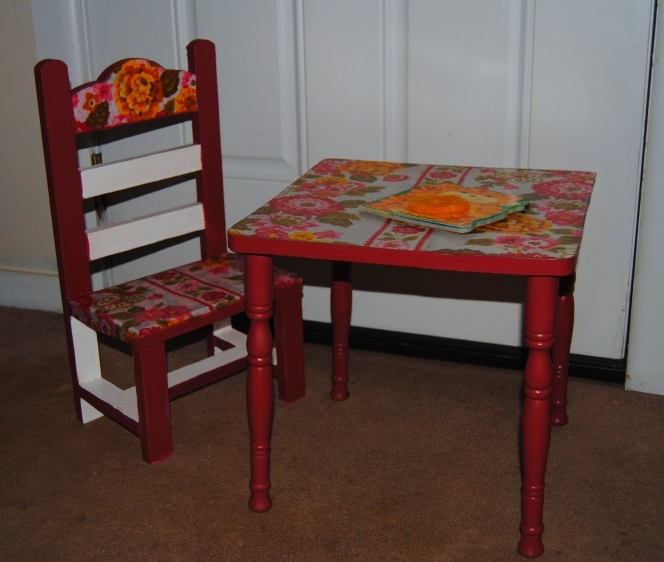
My upcycled 70’s inspired girls table has so far been Erin’s favorite.  It is the perfect size table, but lacked a chair.  We caught her pulling the table up to the step in an attempt to sit at the table. That is when I thought of the time out chair. We are very blessed so far.  We rarely have to put her in Time Out, so we haven’t really used the chair, and I thought if I restyled the chair, it would go great with the table.  I used the same 70’s fabric as the table, and re-painted the chair to match. Now Erin has the perfect place to sit and read her book, and I have a chair I can live with!

70's inspired KidsTable and Chair

Wooden Basket Restyle using Mod Podge

I like little wooden baskets.  They can be used for just about anything and hold a variety of objects.  When I came across this one for 50 cents, I thought I could redesign and repurpose it.  The price was certainly right.  It appeared to have been an Easter basket.  It had blue rabbits painted on it’s side.

I had this nice red and black floral print I wanted to use.  I traced the bottom of the basket with a black marker onto the print.  I cut it out and glued it down to the inside of the basket with Mod Podge.  I then painted the entire basket with acrylic paint following the red and black color scheme.  Once dry I applied three more coats of Mod Podge.  Gotta pick more of these baskets up if I see them!  I love how this project turned out and I have so  many uses for them!!

Restyled Wood Basket


Materials:

Mod Podge Matte

Red and black acrylic paint

Printed paper for decoupage

scissors and a black marker

Paint brushes


Before and After…


wood basket

Upcycled Little Girls 1970’s inspired side table

I have been blogging for over a month now and I am so thankful to you all for the encouraging words and thoughts.  I am also blown away by the amount of talent and creativity I have seen from others on here! Creativity is key!  For me, things don’t always work out as you envision them.  This forum allows me to feel free and unafraid even if I make a mistake!  For that I am grateful!

I am back from my two day hiatus; However a lot of craftiness and shopping has taken place in those days!  The family went thift shopping yesterday, two Goodwills and a Walmart! It was a very productive day!  I picked up a few future projects, and pined and dreamed over other future projects that I could not fit in our little Hyundai!

I saw this little brown, particle board,  table and I picked it up,  I am obsessed with small furniture, as I am always thinking about items that Erin can use that are perfect for toddlers just starting to utilize furniture. She also loves to imitate us and it is wonderful seeing Erin sitting at her kid’s table reading a book like the little person she is becoming.

I also found this great funky floral fabric that screamed 1970.  In it’s previous incarnation it was a window drape.  I can’t imagine! A bit too funky for curtains according to my taste, but not funky enough to use to redo kids furniture!

Materials:

$5.99 table

Fabric

Mod Podge

paint brushed various sizes

acrylic paint

black marker

scissors

First, I turned the table upside down onto the fabric and traced with a black felt tipped marker.  I carefully cut out the fabric.  I then used Mod Podge Matte finish to glue the fabric to the table top.  I set aside to dry.  I wanted the paint the table pink to match part of the fabric, but I didn’t have any pink handy.  I was able to mix red, purple, and yellow, and came up with the color you see here! I primed the piece and then covered the legs and sides with pink paint. Once dry I used Mod Podge to seal the entire piece using about three coats total.

Image

Before and After:

Image

Our cat Nucky seemed to be fascinated with what I was doing.  He was my cat apprentice as Erin was napping at the time!

Image

Bedside table restyled with decoupage

In this little table, I saw much hidden potential.  I can’t remember how I came across it.  I found it up in our attic. It was the perfect little project.  I brought it down, and it sat in my bedroom, waiting it’s turn to be upcycled.  Tonight seemed like the perfect night!  While the little toddler apprentice slept, I gathered all my materials together.  (Including my mess of a table cloth strewn with paint and Mod Podge of projects past.)

Image

First I tightened the table and cleaned it removing any dust or dirt.  Once dry, I primed the areas I planned to paint with a latex primer. I put aside the table to dry.  I took the scrapbook paper and cut it into the various sizes,  In this case the drawer could not be removed.  I could remove the knob,  so I pressed the paper up against the outside of the drawer creating a crease in the paper where it would need to be cut. Once the paper was cut I glued it down to the surfaces I wanted to decoupage.  I then painted the remaining areas black with black acrylic paint.  Once the entire piece was completely dry, I  covered the entire piece with Mod Podge Matte finish.  I used a medium sized paint brush for the larger areas and a smaller brush for the smaller areas.  Once dry, I applied two coats to the smaller painted areas and four coats to the decoupaged areas. The result is what you see here:

Image

Little tip: I had a few air bubbles appear on the table surface.  I used a sewing needle, poking a tiny hole in the air bubble.  I  smoothed it out and then applied more Mod Podge over top of it. Definitely helped!

Before and after:

Image

Upcycled Wine Cork Garden Markers Made with Outdoor Mod Podge

This weekend my little toddler and I planted our first vegetable garden together.  She loves playing in her sandbox so I had no doubt she would love digging in the dirt.  When I began digging, she grabbed her plastic shovel and pretended to dig.  She was fascinated by the whole gardening process.  I wanted to start out small.  I did some hunting  in our side yard and found some plastic fencing.  It was enough to keep our little Bichon Frise at bay, as well as keeping Miss little legs from crushing the plants. I bought three plants, a tomato, cucumber and red pepper. (I know this will barely make a salad!) At little E’s age it is more the concept of a garden that is most important.  I have seen various tutorials on the internet on how to make garden markers.  The spoon markers are adorable, and I loved the wine cork ideas.  So, I am throwing my virtual hat in the ring and gave the idea a try.   Here is my take on the wine cork markers.  I painted each a different color with acrylic paint.  I let dry.  I found pics of veggies online and added text in word.  I then printed out those vegetable images on photo paper.  I used the contact sheet setting on my printer and this small photo size worked perfectly.  I cut the pictures out and glued them to the corks with outdoor Mod Podge.  I repeated this process several times coating the entire cork.  One finished I inserted a bamboo skewer in the cork to anchor the markers into the ground.  A cute little detail in the garden.  Never hurts to add a little color!


Materials used:

Wine Corks

Outdoor Mod Podge

Vegetable images/Printables

Bamboo Skewers

Scissors

Acrylic paint

Image

Welcome to our mini garden!

Image

A toddler in the garden

What’s in the glove, Love?

Crafting is worth the Risk! Restyle your Smart Phone with Decoupage

Restyle your cell phone/smart phone

I was driving into work the other day and this crazy thought popped into my head.  What if I could decoupage my smart phone?  Sure it may seem like a strange and risky idea at first and If I had a super fancy expensive phone I may reconsider.  I have an entry level phone so I felt I  had nothing to lose. I had gone through about six different cell phone covers.  Many cases never correctly fit the phone and the others broke easily.  I popped the back cover off and thought to myself I could do this!  First, I tried using wrapping paper.  It was a nice pattern I bought from the dollar store.  It proved hard to work with because it was super thin and I scrapped that idea after a failed attempt left tears and wrinkles.  I used instead, scrapbook paper which is thicker and more durable.  I traced the phone cover onto the paper making sure to trace the various openings on the phone.  I used an x acto knife to cut the tracing, carefully cutting the openings for the camera and speaker on the phone. I used Mod Podge Matte finish to adhere the scrapbook paper to the phone cover smoothing out the edges.  I then sealed the outside of the cover with seven layers of Mod Podge allowing each layer to dry thoroughly between applications. I was pleasantly surprised with the result!

Image

Materials used:

Mod Podge Matte Finish

X Acto knife

black fine tip marker or pencil

Scrapbook paper (design of your choice)

Medium sized artist paint brush

Sesame Street: Abby Cadabby Decoupage Jewelry Box

I had this piece for a while as I was not sure what I wanted to do with it.  I picked it up at Goodwill for $2.99.  The last week has been focused mostly on my daugter’s birthday party.  It was a nice smaller project for me.  Most of this project was completed before she woke from her afternoon nap.

As my daughter gets older, she is accumulating quite a bit of jewelry, hair bows and other various adornments.  I thought this box would be great because it consisted of three fairly deep drawers for storage.  I wanted to make it girly and restyle it using a character that Erin loves.  I chose Abby Cadabby from Sesame Street.  I love the pink and purple colors that make up her character. I printed out some Abby images along with a nice purple and pink floral inspired background on photo paper.  I removed the drawers.  I had already primed this piece previously, so it was ready to paint.  I painted the top surface dark purple and the sides pink with acrylic paint. I set aside and to dry.  I cut out the Abby images first and glued them to the drawer using Mod Podge Matte Finish.   I then measured out the floral background.  The biggest challenge was applying the paper around the knob.  The knobs on the drawers did not appear removable so I lined it up with the paper and cut a small round hole carefully feeding the knob through.  I then used a smaller paint brush and applied the Mod Podge to glue the paper down to the drawer surface.  Once dry, I applied the Mod Podge generously over the drawer and photo surface and the painted  jewelry box.  This seals the entire piece.  I used several coats to seal.  Letting dry between coats.  I usually sit them in front of a fan to speed up the drying process.   The result is what you see here and I like overall how it turned out.  For some reason when taking a picture it appears more blue than purple!

Abby Cadaby Girls Jewelry box

Materials used:

Mod Podge Matte

Old wooden jewelry box

Scissors

smaller artist paint brushes

paper for decoupage

pink and purple acrylic paint

Abby Girls Jewelery box

DIY Walkway Character Happy Birthday Signs

What a day yesterday! There is nothing like a 2 yr old’s birthday party! Fun and Exhausting.  Certainly worth it to make our daughter’s day as special as possible!  Our theme this year was “American Sprout”  My daughter is a HUGE fan of the PBS run Sprout channel.  http://www.sproutonline.com/

Since it was Memorial Day weekend, we decided to incorporate her favorite Sprout characters with a Patriotic Theme.  Our original plan was to have an outdoor BBQ.  We changed this because as incredible as this may sound, It was cold and windy outside!  (Yes, I did say it was Memorial day weekend!)  Not very summer like weather.  Of course the kids could still play outside, but not your typical summer activities. It became an indoor/outdoor event. The kids didn’t seem to mind.

One of the home made decorations I wanted to share with you are the Sprout character pathway signs.  I was very happy with how these turned out and they held up extremely well despite the windy weather.  I found some great birthday character pictures.  I used cardboard, cutting the pieces into squares.  I painted the front various colors (Erin’s theme was red, white and blue) and the backs I painted black for continuity and to cover the cardboard.  I glued the images to the cardboard.  In this case, since I had the Mod Podge handy I used a light coating to glue them down.  I then tried to think of a way to anchor them into the ground and I am not sure what made me think of it, but I had these wooden BBQ skewers that I thought would work perfectly!  They are basically just a long toothpick and I slipped the skewer through the middle of the cardboard leaving half exposed to go into the ground no glueing required!

Image

I also recycled some some old party decorations.  I made this Birthday sign featuring Chica from the Good Morning Show and Jim Henson’s The Pajanimals.

Image

Remember that Mod Podge character tray?  Well it went to good use and the cupcakes didn’t last very long!

Image

It was a great time to celebrate Erin!  Happy Birthday to me XOXOXO

P.S. Do you like the dress?  Another money saving tip: Once Upon A Child. Great bargains on kids clothes and toys gently used.  Erin is wearing spring dress with detachable bolero jacket and  pink tights only $9.50 at Once Upon a Child http://www.onceuponachild.com/ check them out!

Image

Restyled Celestial Decoupage Portable Lap Top Desk

Image

Their is nothing I love more than trolling around in our attic!  I call it re-shopping. Before I go out and buy something new, I always check in our attic for items that have long been forgotten, stored away and are one step away from the trash can.  It was on this day that I came across an ugly old lap top desk.  I find myself more often times than not, blogging from my bed on my laptop . This would be perfect, but boy was it an ugly eye sore! Mod Podge to the rescue!  I had these cool celestial prints I had printed out and had no idea what to do with them!  I like the pattern and thought I would tuck them away and use someday.  I thought to myself someday is now!  You can use wrapping paper, scrapbook paper, magazine cut outs, the possibilities are endless! It really depends on your personality! The biggest challenge with this project was the size of the laptop table surface.  Matching up the design was a challenge as was gluing the paper to the curved edges of the surface.  Otherwise this was a fairly simple project.

Materials used:

Old laptop desk

Mod Podge Matte Finish

Paper of choice to decoupage

Scissors and a marker for tracing

Mod Podge rubber smooth out tool

Restyled LapTop Desk

DIY Kitchen Sink Backsplash

Image

One day, my neighbor (gotta love him) offered me some free tiles.  He had just finished a project of his own and had extra tile he didn’t plan on using.  Of course I can never turn anything “free” down, so I happily accepted them and thanked him graciously.  Of course at the time, I had no idea what I was going to do with them.  I always wanted a kitchen backsplash, but I had never worked with tile before.  He had more faith I could do it than I had in myself.  He told me it was a relatively easy project to do.  My neighbor had suggested that I buy the adhesive and grout in one.  It worked out great and was simple to use.  The tiles my neighbor gifted to me were plain white.  I wanted to add more color, so I went to Home Depot, and purchased smaller blue mosaic tiles.  I laugh at this now, but I had no idea I could cut and glue and apply them on the mesh sheet they come on.  So, yes (are you ready to laugh at me and learn from my rookie mistake?)  I took every tile off and applied them individually!  This took forever and I wish I knew then what I knew now… It would have cut the project time in half!  It also would have been easier to measure and keep the tile from being applied crooked.  I had to fight to keep it straight.  You live and you learn!  I used a tiling trowel to spread out the grout adhesive.  I them applied the tiles.  I used the same mixture to grout the tiles and fill in the spaces in between.  Luckily, I didn’t need a tile cutter, which was a good thing, because I didn’t buy one!  Did it come out perfect? No, but it wasn’t terrible and gave me the confidence to try other things.  So I would say overall it was a success and cost under $50.00.

Since discovering Mod Podge I am thinking about decoupaging a few of the tiles to add more pop, but I just haven’t gotten around to it yet!  If I do, I will be sure and share.