Upcycled Pickle Jar Decorative Lamp- Part Two

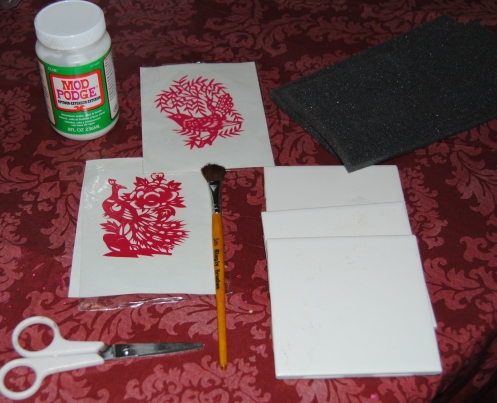
It all began with three broken lamps up in our attic, and a spaghetti jar.  I had an idea jump into my head one day, to upcycle these broken lamps with glass jars. I decided to produce the first of what I was hoping would be three cloth-covered decorative lamps.  I was very happy with how  Upcycled Spaghetti Jar Decorative Lamp turned out so I decided to move forward with lamp # 2.  This time I wanted to use brightly colored fabric on the glass.  I had this great pickle jar that was slightly larger than the spaghetti jar I used previously.  I also had some left over fabric from a previous project called Upcycled Wooden Pedestal Bowl, and Restyled Side Table  that  was orange, red, yellow and black.

I cut a large piece of fabric, enough to wrap around the sides of the jar.  I traced the bottom of the jar, (which would be the top of the lamp) onto the fabric with a sharpie marker, and cut it out with scissors. I applied Mod Podge to the outside of the jar, and applied the fabric carefully around it.  I used twine to tie the fabric at the bottom.  This actually looked great and allowed the fabric to touch the base.  I then glued the rest of the fabric to the top of the lamp.  I allowed this to dry and then I applied the Mod Podge over the fabric.

Upcycled Pickle Jar Decorative lamp

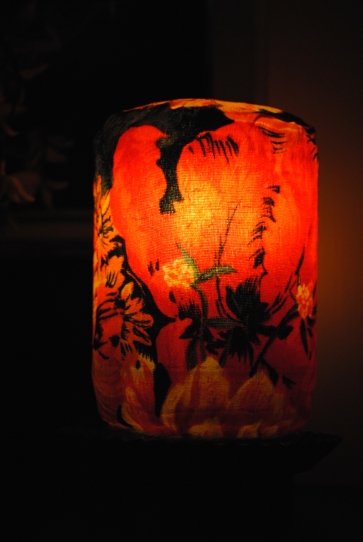
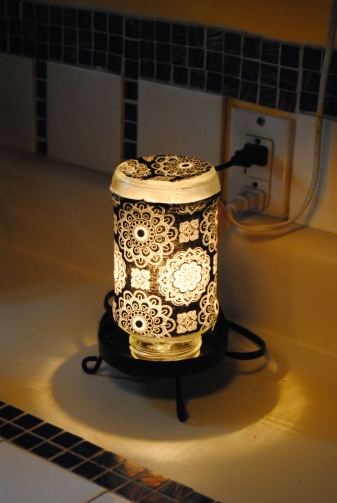
I love the red hue the light gives off.  It was very difficult to get a picture of what the lamp actually looks like.  I had to play around quite a bit with the camera settings.  I have this on the fireplace mantel in our living room.  Stay tuned for lamp # 3!

Pickle Jar Lamp pictured with Upcycle Wooden Ped bowl

Upcycled Pickle Jar Lamp Pictured with Upcycled wooden Pedestal bowl.  Love this fabric!

“On The Upcycle” Featured In A New Book~”The Green Crafts Lifestyle”

I am excited to announce the arrival today of the new Amazon book for Kindle by the very talented Mahe Zehra Husain known by her fans as MZ.  She has an amazing green crafting company and website called Altered Upcycling.  Make sure and check it out!   “The Green Crafts Lifestyle”  is now available for download on Amazon for only $4.99!  I have been privileged enough to take a peek inside and it has some amazing green crafts, and features upcycling artists from around the world.  It also features artist bios and my very first step by step photo tutorial.  You can buy it here: 

Altered Upcycle Available on Amazon

Tomorrow’s blog will feature my “Secret Americana Project” An Upcycled, American classic, Windsor back chair.  A project that is debuted in the book. I was unable to share it with my readers…Until now!

When I started this blog back in April, I couldn’t have imagined having a oppurtunity such as this!  I am featured with some of the most talented and amazing artists, and quite frankly, I am not sure that I am even close to being in their league!  I feel very honored and grateful.

I would like to send out a special Thank You to Katherine from Pillows A-La Mode who encouraged me to “throw my hat into the ring” with this project. Make sure and visit her craft blog.  She is an amazing talent! It is an exciting first for me, just a simple working mom from NJ who loves to create!  Thanks also to all my readers for your support,  It means more than you know!

Checking In While Checking Out: Upcycled Photo Refrigerator Magnets

As I was on-line at the thrift store waiting to check out, I noticed they had a bunch of refrigerator magnets behind the counter. I began to drift off in thought and Then it hit me! I imagined these would make great DIY photo magnets and they were only .59 cents each! I decided to buy two of them for this project.

Image

I printed wallet sized photos on my printer I wanted to use. I then traced the magnet onto the back of the photos.  I cut them out with scissors, and set aside.  I applied the Mod Podge to the surface of the magnet, and carefully adhered the photo to the surface.  Once dry I applied the Mod Podge over top and allowed to dry in front of the fan.

This was a great Monday night project, simple and easy and there is no better way to upcycle old magnets then using family photos!

Image

Upcycled Tile Coasters Made With Mod Podge

The word has gotten out: I am a certified decoupage addict! The nice thing about this being public is people have brought me things out of the goodness of their heart for me to use for decoupage: scrapbook paper, fabric you name it!   I always appreciate when someone takes the time to pass something along they can’t use to someone else, as is the case with these really neat bird paper cut outs a friend at work passed along to me.

Avian paper cut outs


There were three just like this, and I couldn’t wait to use them.  They were very pretty, but very delicate and I was nervous handling them outside their plastic sleeves.

I had some left over tiles from my DIY Kitchen Backsplash, and thought they would make great coasters.  I also had some packing foam material, that came with a package that would work great when attached to the bottom of the coasters.

Materials


I placed the tiles on the foam and cut the foam to fit the bottom on the tile,  I applied Mod Podge to the bottom of the tile and adhered the foam to prevent scraping and skidding while using the coasters.  You can also use felt if you have it handy.  I applied the Mod Podge to the top of the tile.  I used outdoor Mod Podge, so it would be tougher if exposed to moisture from a sweaty drink. This is where things started to go terribly wrong.  The cut outs were very delicate and I had to be extra careful when placing on the tile.  I tried to apply the Mod Podge  carefully with a soft brush.  Despite this, the cut out’s ink ran and smudged the entire first tile, which could not be saved. Crafting is like life, it is unpredictable at times and does not always go according to plan.

And then there were two…

Now, I was really nervous! Looking back, It would have been better to use a spray adhesive instead, which Mod Podge makes.  I didn’t have this handy, so I tried very gently, and quickly to apply the Mod Podge.  Despite a slight change in the color, it didn’t smear this time and neither did tile # 3.  Phew!!  Once it was dry, I applied another coat, and no smeared color this time!  I was so glad these turned out and I was able to salvage this project.  I would have been disappointed if I didn’t get to upcycle these tiles!

upcycled tile coasters


Upcycled Spaghetti Jar Decorative Lamp

I was upstairs in the attic last night searching for a lost box of crafting materials, when I came across a box of light bases that were at one time,  miniature decorative table lamps. The glassware that was originally attached to them had broken.  I had forgotten I had kept these items.  I am sure at the time, I was thinking I may be able to utilize them in the future in some way. and then I thought to myself, the future is now!

One in particular caught my eye.  It was a black, metal, pedestal light base that utilized a night-light bulb. My initial idea was to utilize a glass jar to replace the broken glass. but several different glass items could be modified to use for this project. Ball jars, glass vases from the dollar store etc.  I just happened to have an old Spaghetti sauce jar in the recycle bin.  I happily removed it cleaning it with hot soapy water.  I placed it in a bucket of hot water to remove the jar label.

Broken Lamp and Glass Jar

Materials:

Mod Podge

Light Base

Fabric

Foam Craft Brush, Scissors

fine tipped marker

I had some great fabric left over from Ugly Accent Table Makeover.  If you are looking for something more colorful you can try holding  different fabrics up to the light.  That way, you can tell what the finished lamp will look like when the light illuminates it.  I took the fabric, and wrapped it around the glass jar so I knew how much fabric I would need.  I measured and cut and placed aside.  I wanted to also add fabric to the “bottom” of the jar, which would be the “top” of the lamp. I traced the jar onto the back of the fabric and carefully cut it out with scissors.  I cut inside the tracing to factor in the edges of the glass, so the fabric would not hang over.    I then applied  Mod Podge with a foam craft brush to the glass.  I applied and smoothed out the fabric, adhering it to the glass.  I applied another coat of Mod Podge over the top of the fabric.  In this case I applied a total of two coats allowing to dry throughly in between.  I couldn’t be more happy with the result!  A true upcycle and a great decorative lamp for a fraction of the cost!

Upcycled Spaghetti Jar Decorative Lamp

Spaghetti Jar Lamp Made with fabric and Mod Podge

It’s a Good Night To Be A Doll : Upcycled Wooden Doll Bed

I saw this nice little wooden doll bed propped up against a thrift store wall, and found myself compulsively reaching out, and placing it in my cart.  It was priced at only $2.99, and I am a total sucker when it comes to children and doll furniture.  It looked like it was lovingly hand crafted and bore the battle scars of previous use.  It had charm, and for these reasons I couldn’t resist it.

Image

I decided to go with scrapbook paper for the decoupage.  I picked these sheets up at Joann Fabric for a mere $.59 cents each.  The biggest challenge was cutting out the paper to fit around the tiny spindles.  I probably could have done this more cleanly in retrospect.  I decided to square them off and I filled in any bare spots with brown paint. Once the paper was trimmed to fit, I used Mod Podge to slowly glue the paper to the wood smoothing out any air bubbles in the process.  I allowed to dry and then applied another coat of Mod Podge over top of the paper and waited until the area was dry to begin painting.  I decided to go with the bright pink and brown color scheme.  I used two coats of pink and brown acrylic paint to paint the entire piece.  Once the paint was completely dry, I applied another coat of Mod Podge over the entire piece to seal it.  My plan is to add a doll pillow and an old receiving blanket for doll bedding. I would like to make one myself, but sewing is not one of my crafting strong points.

Image

Image

Now, my a little girl’s dolls have a stylish place to rest when in the world of my daughter’s imagination.

Materials:

Wooden Doll Bed

Mod Podge

Three sheets of scrapbook paper

Foam Craft Brush (to apply Mod Podge)

Pen/Scissors/paint brushes

Acrylic Bright Pink and dark brown paint

Inexpensive Storage Ideas: Repurposed Wooden Boxes

I am always on a mission to organize our family home, but with an active 2 year-old it is usually easier said then done.  When I come across wooden boxes, and any items I can upcycle into storage containers,  I jump at the chance to buy them.  Thrift Stores, or even items you already have in your home can be  altered to fit any style and repurposed into inexpensive storage containers.  Today, I chose to upcycle an ex Melissa and Doug Toy Box.  I believe at one time it housed an elaborate wooden puzzle, and somehow ended up a simple, empty,  wooden box on a thrift store shelf.  Our biggest storage issues at the moment are kids toys and books.  I decided to repurpose this into a kid’s toy storage/book box.  I had purchased this lettered scrapbook paper for a previous project, but decided not to use it. It was a perfect fit for this project.

Image

Materials:

Scrapbook paper

Box

Mod Podge

Scissors

Foam craft brush

Pink Acrylic paint/Brush

pen or pencil

I traced the bottom of the box onto the back of the scrapbook paper cutting it out with scissors.  I applied Mod Podge with a foam brush and glued the scrapbook paper to the wood. while it dried, I painted the remainder of the box pink. Once the piece is completely dry,  A final coat of Mod Podge is all that is needed to seal the entire piece

Image

Colorful and Bright storage options at a fraction of the cost!

Old Timey Decoupage Lemonade Dispenser

We have been in the middle of an extreme heat wave for the past week. temperatures have reached 100 degrees and over.  Most people search for ways to beat the heat, and this made me think about a cold beverage I love : Lemonade. There is also nothing sweeter then a child’s lemonade stand. Someday, I hope to help my daughter build and run a stand when she is old enough.

I had a glass beverage dispenser that was in great shape, but was a little plain.  I have seen these in thrift stores for only a few dollars.

Image

I searched the internet for vintage lemonade images.  When I found the images I wanted to use, I printed them out on my color printer.  I also found some great lemon slice clip art to decoupage on the back of the dispenser.

Image

I cut out the images, and I decided to use Outdoor Mod Podge for this project.  Since this is a beverage dispenser, I wanted to use Mod Podge that was more water proof on the outside for when the dispenser needs rinsing or when condensation occurs.  I used a brush to apply the Mod Podge and applied the images to the outside of the glass.  I applied the lemon slices to the glass double-sided so the image would appear on the inside of the glass.  Once dry, I applied 2 coats over the images to seal them to the glass.  Now I have a great piece with a more vintage feel.

Image

Image

Ugly Accent Table Upcycle-A Little Fabric Goes A Long Way!

We have all seen these tables at various discount stores.  Made from wood and particle board, They are functional as an accent table/side table, but that is probably the only positive selling point (other than price.)  I would call this piece of furniture an”entry level” piece for those just starting out.  A new table sells for about $9.99 at Bed Bath and Beyond I think it is amusing that they describe this table as “decorative” I see nothing decorative about it!

Round Wooden Table

I picked up one of these tables at Goodwill, priced nicely at $2.99.  This table was screaming for a makeover.  Since the table is plain un lacquered wood and particle board, no priming or sanding is needed before you get started, so it is also a great first furniture upcycle project that can be completed during the course of an evening.

Materials:

Round Wooden Table

Mod Podge Matte Finish

Fabric of choice

Black and White Acrylic Paint

Scissors and a black fine tipped marker

Table Top

This table comes apart easily which is a definite plus.  I unscrewed the legs and put them aside. I traced the table top on to the fabric with a black, fine tipped marker (the side without the design)   I generously applied the Mod Podge to the table surface and carefully applied the fabric to the table top allowing about an extra inch of fabric to fall over the sides of the table.  I applied more Mod Podge to the top of the fabric to seal it. I placed the table top aside and allowed to dry under a stand up fan. I then painted the legs white with acrylic paint.  I love adding the black paint to the bottom portion of the legs to add additional “color pop” which I love.  Once the paint was dry, I covered the entire table with another layer of Mod Podge to seal it.

Now that’s what I would call decorative!

Restyled Side Table made with cloth and Mod Podge


Before and After:

Cheap wooden accent table upcycle before and after

Image

So Happy Together! 1960’s Mod Style Coffee Table And Mini Toy Box.

So Happy Together!  1960's Mod Style Coffee Table And Mini Toy Box.

I spent most of the day today getting our daughters playroom together, running errands and trying to sort through a craft room that consists of more junk than crafts. I am hoping one day it will be pretty enough to share with you, but my guess is that is a bit farther into the future. Needless to say, I didn’t have much time to craft today, but I wanted to share this snap shot of my daughter’s playroom coffee table and toy box. I love how the bright fabric brings color and “pop” into our red family room. I have a new appreciation of fabrics and textiles and how much they can bring to a space.  The Coffee table surface is also holding up nicely and I use a baby wipe to clean it and it works great.