One Lucky Little Upcycle Blog…

liebsteraward

I would like to say a long overdue “Thank you” to Crafty Madre who has a wonderful craft blog by the same name. Be sure and stop by and visit her idea filled blog. A true crafting artist!  She nominated “On The Upcycle” for the Liebster award, Which is given to blogs who have reached the 100 plus readership mark, A goal this blog recently reached.  The word Liebster means ” dearest” in German. Awwe *Shucks*

I have to be honest I am a bit of a “newbie”  When it comes to this or any similar blogger awards.  I did a bit of research on the award rules and am a bit unsure of what the official rules are, I am sure of one thing: I wanted to thank Crafty Madre for taking the time to send some encouragement to your humble blog author and Mod Podge maniac.  Most of the blogs I follow are way beyond the 100 readership mark so I am unsure as far as nominations, but I follow so many great blogs and wish I could recognize each and every one of you!  All of you are “dearest” blogs in my eyes!

Hooray for Cloth Covered Galvanized Buckets!

I picked up this little galvanized metal bucket for a couple bucks at Goodwill.  As mentioned in a previous post, I am working on creating a small crafting space in our spare bedroom.  At the moment,  I am particularly interested in items that can assist in organizing this space. Although many of these storage items can be made from cans, jars, and boxes,  I couldn’t resist this cute little bucket. Organizing this room is not an easy task as the job requires moving a few larger items from the room and up into the attic, small steps…

I decided to try to decoupage this bucket.  I saw some examples online and liked the look.  I realize some may prefer the bucket without decoupage, but since I was making it for a craft room, I wanted to make it fun and experiment.  It also gave me the opportunity to use Mod Podge for the first time on metal.  I had this great old bed sheet, colorful and fun.   I thought it would be perfect for this bucket and would contrast nicely with the silver metal.

I cut off a piece of fabric and wrapped it around the bucket and trimmed off any access fabric.  I used a foam craft brush to apply Mod Podge to the outside of the bucket.  I then very slowly applied the fabric smoothing it out with my hands,  after it dried I applied 4 coats of Mod Podge allowing to dry between coats.  It dried with a few wrinkles, but it was a bit of a challenge due to the handles to perfectly wrap the fabric around the bucket.  Despite this, the bucket will come in handy for various craft supplies and provide the durability of galvanized metal.

Decoupage Galvanized Buckets

A Perfect Pair: Fabric Decoupage Book Ends

I found these ordinary bookends in the housewares aisle at a thrift shop near home.  It was the only item I felt compelled to buy on this day, and they were priced right at $1.99.  Lately, I have made it a goal to begin to organize my crafting space, and these little book ends would help alleviate some of “the bookcase overload” this room is experiencing. Of course they were in need of a little restyling flare. Right now the craft room is more of a storage room, so these book ends are a very small step in the right direction, but  I am determined.  Stay tuned!

Fabric Decoupage Book Ends


Materials:

Fabric of choice cut and traced to size

Pair of bookends

Mod Podge

Scissors, Black Marker

OOPS! Not Pictured

Foam Craft Brush, Paint Brush

Black Acrylic paint

I had fabric that I did not use from another project that I thought would look lovely on this project.  I traced the book ends on the back of the fabric.  I used scissors to carefully cut along the traced line.  I set aside while I applied Mod Podge to the inside and outside of the book ends.  I carefully applied the fabric to the bookends smoothing out and wrinkles with my hands.  I then painted the edges where the fabric did not cover with black acrylic paint.  I allowed the bookends to dry.  Once dry, I applied 2 coats of Mod Podge to seal them.  Now, A close up of a finished one of the finished book ends! A great beginner Mod Podge project!

Fabric Decoupage Book Ends (2)


The Green Crafts Lifestyle (and their special promotion starting this Friday . . . and a new call for submissions!)

Thanks again to Katherine at Pillows ALA Mode.  Today, I feature her blog  to help spread the word about green crafting.  Be sure and check out this amazing free e-book! The Green Crafts Lifestyle FREE TO DOWNLOAD 8/16 thru 8/18 on Amazon! CLICK HERE! To download your copy!

This book Features “On The Upcycle” projects, along with other amazing crafts from upcycling artists from around the world. Don’t miss out!

Pillows A-La-Mode's avatarPILLOWS A-LA-MODE

Book CoverIn June, I wrote in this post about our crafty upcycling friend Mahe (aka MZ) that included a call for submissions for her new upcycled craft book. The Green CraftsLifestyle is now out, and it’s amazing! It includes sections on paper, plastic, wood, metal, and fabric and has projects from 20 artists around the world, including four of my bloggy friends:

Along with 35 projects detailed on nearly 200 pages of photographs and step-by-step directions, you’ll find author bios and photos with links to their blogs, websites, and other online contacts.

Now for the promotion! To provide all crafters with a chance to learn from these techniques, Mahe’s Altered Upcycling business will provide unlimited…

View original post 194 more words

The Broken Chair Challenge: Upcycled Black and White Damask Chair

I spotted this chair in the back of a Goodwill store.  There were various miscellanies items piled on top of it, and It involved quite a bit of work to break this chair free. I was attracted to the chair design  ( The chair featured a fleur de lys) and I loved the detail.  The chair seat was in very rough shape and it would require re-upholstering.  The overall chair frame seemed like it was in ok shape, and I thought enough of this chair to assume the risk.  The chair was priced to sell at $3.99.

When I got it home,  I ripped the blue material off the seat and discovered the seat was broken and could not be repaired.  Now, I had to salvage another chair in order to repair this one!  My husband and I kept our eyes open for any “curbside” or “free” chairs, I prefered to use  a free chair and not purchase one, but months went by until I found a freebie chair that would be perfect, A lucky find at a thrift store. The chair seat would turn out to be a perfect replacement, and I have future plans to upcycle what’s left of the chair frame.  Stay tuned!

First, I cleaned the chair, and primed the chair frame with 2 coats of a white latex primer.  Once the chair was dry, I began to paint it in a white and black color scheme.  I used black and white acrylic paints to paint the entire chair.

This chair was quite a challenge to paint. The chair had a lot of cut-ins, and detail, and required a lot of patience when it came to the paint brush. I sat the chair in front of the fan until it was dry, and then added a layer of Mod Podge overtop to seal the chair.  It dried nicely.  Now I was ready to re- upholster the chair seat. The original fabric I chose was a black fabric with white roses.  When I placed it up against the chair, I despised how it looked!  So, It was back to the fabric store to pick out another style and I went with the Elegant look of Damask.  I used less than a yard of material and cut and traced it to fit the new seat, leaving extra material for underneath the seat.  I used an upholstery stapler and carefully stapled the material to the back of the chair seat.  Once I was done I screwed the seat back on to the chair.

This chair was not short in challenges, but in the end it was worth it. Looking at the finished chair,  I would say this chair turned out to be worth the risk, and a broken piece received an elegant new lease on life!

Upcycled Black and White Damask Chair

Back of B&W Damask Chair

Rear View of Black and White Chair

Before and After Chair Made with aint,cloth and Mod Podge

Before and After

Black and White Demask Upcycled Chair

Materials:

Roughed up chair

White Latex Primer

Black and White acrylic paint

Mod Podge

Damask Fabric

Brushes/Scissors

Upholstery stapler and staples

Screwdriver

Black Marker to trace seat to fabric

Image

Take Me Out To The Ballgame.

Take Me Out To The Ballgame.

Nothing beats a beautiful summer night at the ballpark with the family. We headed toward the shore to attend Irish Heritage Night and catch a Lake wood Blue Claws Game. While there, we saw the most beautiful sunset over the ballpark. The night ended with fireworks. a wonderful time!

DSC_0013

A Friendly Following: DIY Blog Promotion

Image

I was at the fabric store today buying fabric for a chair I am currently working on, and I struck up a conversation with two very nice ladies buying fabric at the counter.  I was telling them what I planned on doing with the fabric I was buying, and we started talking about Mod Podge and all the great things you can make with it.  Sometimes it is easier for others to visualize what you are trying to explain, so  I showed them a picture on my phone of one of my upcycled chairs.  They were interested in seeing more of what I do. I scrambled for a piece of paper and managed to write my website info on the back of a n old coupon.   I am interested in reaching as many creative people as I can.  It is not unusual for people to come up and start talking to me.  I am generally a friendly person and I guess I have a friendly face because it happens a lot!  I am always happy to share ideas with like-minded people.   It made me think, I needed something a bit more professional to spread the word about “On The Upcycle.” I used Microsoft Word Starter Software to make these cards. I was able to download a business card template and insert the “On The Upcycle” logo and text.  I printed the cards out on my printer, and the result is what you see above.  What do you think?  Does anyone have business cards that spread the word when it comes to your blog?

Lastly, I want to shout a big “Thank you!” to all 101 of you who have chosen to follow me on my humble little blog. It means so much and inspires me to keep creating. Nothing beats the WordPress Community!

Epic Fail or Tiny Triumph: Upcycled Decoupage Cigar Box

I found this great cigar box during a quick walk through of a local Goodwill store. I considered it a win because I was able to get my Goodwill customer rewards card stamped (10 stamps and you save 20% off your total purchase and I only managed to spend $1.06 (with tax)  I had made a previous attempt to upcycle another cigar box and the whole project went terribly wrong!   I liked this box because unlike the failed project box, it was made only from wood.  The other cigar box was made from wood also; However it was coated in paper.  The Mod Podge adhered to areas like the lid creases and not realizing it also adhered to this “paper.” When I tried to open the lid it was glued to the box! Upon attempting to open it, the lid tore away from the box. Ouch!  That’s what I’d call an Epic Fail! I swore this cigar box upcycle would be different!  After all, decoupage boxes are usually fun and easy to make.

Wooden Cigar BoxFor the lid cover, I chose the John Waterhouse painting The Lady of Shalott.  My plan was to line the inside of the box with Ivory Damask scrapbook paper I had on hand.  First, I traced the box lid onto the back of the art print.  I then traced the bottom of the box, and inside lid onto the back of the scrapbook paper.  I then cut them out with scissors.  I applied Mod Podge with a foam brush to the lid and carefully adhered the print to the top of the box carefully, smoothing it out with my hands.  I allowed the box to dry, and repeated this process on the inside of the box using the scrapbook paper.

Once it was completely dry, I applied Mod Podge to the top and inside of the box.  I decided to leave the exposed natural wood on the edges inside.  I really love this box and as I always say “Now…. what shall I put in it?”

Decoupage Wooden Cigar Box Inside

The Lady of Shalott 1888Upcycle Cigar Box

The Lady of Shalott
1888 Upcycled Cigar Box

Materials:

Art Print to Decoupage

1 Sheet of Scrapbook paper

Mod Podge

Fine tip marker

Scissors

Foam Craft Brush

The Genealogy Series “A Typical English Girl”: Eva Daisy Long

As much as I enjoy crafting, I also am passionate when it comes to my family history and genealogy.  I started my family quest back in November of 2009, after re-discovering a box of old family heirlooms and an autograph book from my Great Aunt Eva.  With the advent of the internet, researching one’s family history has become easier than it was previously. Record Items once attainable only by visiting local county vital statistics offices, and via library micro film are now available on many online records websites such as Ancestory.com.

Today, I am beginning a new feature on my blog called the Genealogy Series.  My goal is to feature  biographies on various ancestors of my daughter, and family. I also want to place them within the history of the time in which they lived.  This, I believe is a fitting tribute to all of those ancestors who are not much different then ourselves, except for the times in which they lived. It is also a wonderful project to share with you when I am in between various art projects.- Like now.

My first biography features the relative who started it all.

Eva Long

Eva Daisy Long was born in Nottingham, England in June of 1906 to parents Harry Long an Engineer, and Daisy Plummer.  Eva worked a job as a stenographer (typist) in England before coming to the United States with her family and her brother (Vincent Long born in 1909, my maternal grandfather) Eva was 19 when the family sailed together to America in 1925 aboard the USS Ohio.  Upon arrival, they settled in Woodside, Long Island, (Queens) NY.

In 1927, At the age of 21, Eva was diagnosed with advanced stage Tuberculosis. TB, was the biggest health crisis in the UK and around the world at that time.  During the 1920’s, treatment options were limited, and the disease often times proved fatal. Effective antibiotics to fight the disease did not become available until quite a few years later.   Upon the families request,  Eva was admitted to The Reception Hospital in the town of Saranac Lake, NY.  At the time Saranac Lake, NY a small town nestled in the Adirondack mountains,  was known for it’s cutting edge treatment of TB.    It was believed that the colder air in the New York Mountains, was more breathable and helped in healing and treatment of the disease.

Eva Long Admission Card, 1927

Above: Eva Long’s admission card to a sanitorium at Saranac Lake, NY.

It was while Eva was here she kept an autograph book from 1927-1929.  The book also has entries from 1925, before she left England for the United States.:

Family History 047

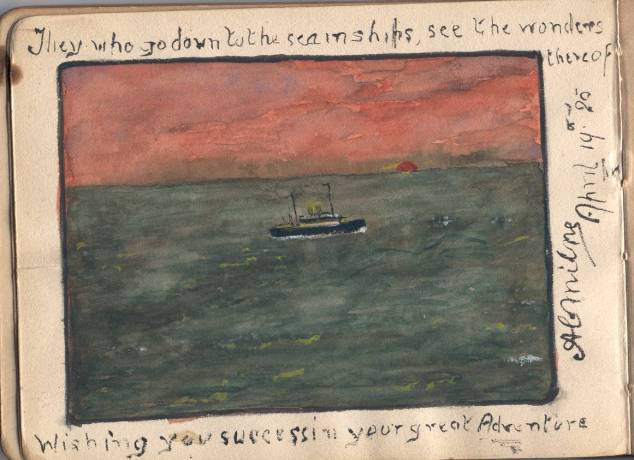
Journal entry dated April 14th 1925 wishing Eva well on her journey from a family friend

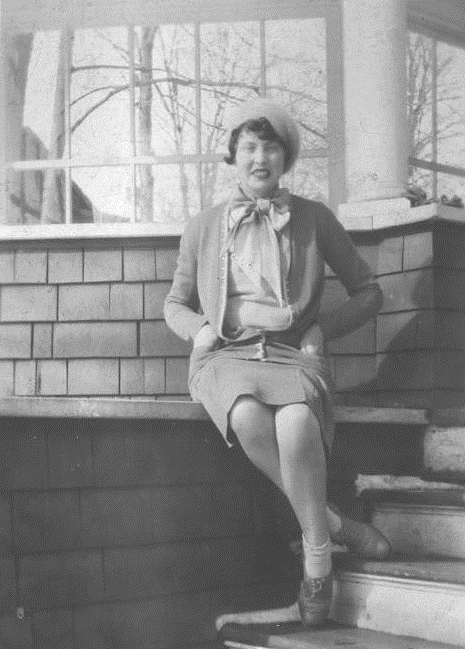
She was referred to in her autograph book as”A Typical English Girl”, and dressed the part in  flapper style clothing popular during that era. She also wore her hair short.  A modern look at the time that according to family lure, my great-grandmother “despised”!

Photo’s of Eva:

Eva Long Saranac Lake, NY

Eva and friends taken at Saranac Lake, NY

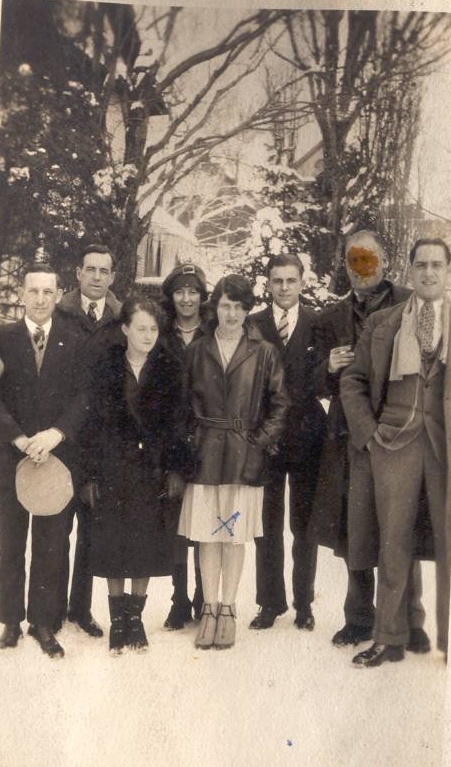
Above: Eva Pictured with Friends Saranac Lake, New York

Eva’s last autograph book entry is in 1929.  What happened to Eva after this time is unclear; However I think it is safe to assume her disease had progressed, and at this time could no longer live life to the fullest.  She made many friends at Saranac Lake, and appeared as though she enjoyed her time here.  Sadly her life was cut short on March 24, 1931 at age 24.  She passed away in Saranac Lake, NY and is buried next to her father, Harry Long at Brookside cemetary, Englewood, NJ,

It is unclear if Eva ever got to return home to her family.  My grandfather was very close to his sister, and suffered from TB himself, but he recovered.  He found it hard to talk about these events according to my mom.  He held on to her personal items, until he passed away himself in 1985.  I have many memories of my grandfather, but an interesting memory is, he always kept a separate fork, knife and spoon that only he ate from,certainly a fear of spreading his TB to others he loved remained throughout his life.

Autograph Book Entry

One of many entries in Eva’s autograph book featuring hand drawn artwork

Family History 009

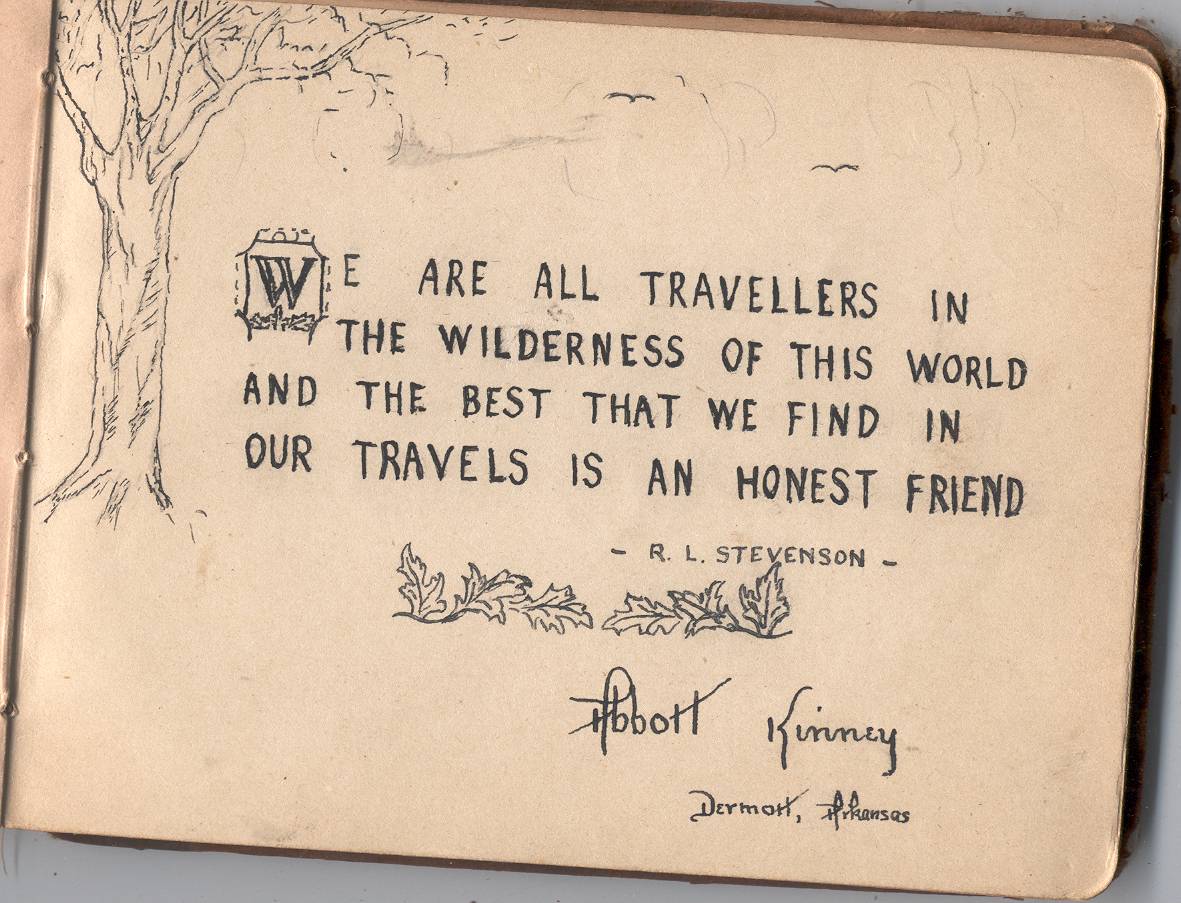
An entry from a  friend who resided with her Abbott Kinney (listed with her on 1930 census records) notice the quote from Robert Louis Stevenson, a famous resident of Saranac Lake, NY

See more of the “Eva Long Autograph Book” uploaded to the digital archives of the Saranac Lake NY Historical Society Wiki an amazing site run by wonderful folks.  Be sure and check it out!

Anyone else have a similar ancestor in their tree?  I would love to hear about it!

Super Hero Seat: Decoupage Justice League Of America Kids Chair

My husband and I are kids at heart, and when I told him my plans to creat a “super heroes” decoupage kids chair, he was excited to see the final result. After a trying week and a busy weekend, I figured it was a good idea to jump right back on the “crafting horse”, and keep the upcycle going.

I passed this chair up many times.  I stop by the Goodwill right down the street from our house periodically.  It is usually a quick walk through,  and this chair sat, un purchased through several of these “walk throughs”,  The chair was in very rough shape and was doused in a heavy lacquer finish, that I suspected, would not be easy to apply paint to. It is difficult for me to pass up kids furniture because I love it so much, so during this particular walk through with my daughter in tow, I finally decided to buy it.

Old Beat Up Kids Chair

First, I tightened the chair and legs,  and used sand paper to smooth any rough edges on the chair.  I cleaned it with a damp cloth to remove any dust and dirt, and boy this chair was very dirty!  Once that was done, I used a white, latex primer to paint the chair from top to bottom. This was essential and even with the chair’s lacquered finish, it covered nicely.

After the primed chair was completely dry,  I painted the chair with a red and blue color scheme to mimic the Justice League of America colors. The Justice league of America is great because it incorporates the best superhero characters from DC, Comics.

I applied Mod Podge to the chair seat with a large paint brush. I then placed the prints onto the chair seat, slowly smoothing it out with my hands to avoid wrinkles. I repeated the same process for the chair back,  I decoupaged the Justice League symbol and two additional characters I could not fit onto the chair seat, These characters were The flash and The Green Lantern. I cut them out with scissors and applied them so they would appear as though they were “leaping” off the chair seat.  I made three white, printer paper stars to add some “pop” to the top of the chair back.

I placed the chair in front of a stand up fan to dry.  The next day, I applied Mod Podge to the entire piece to seal it and repeated this process twice, allowing the chair to dry in between coats.

My husband loved how it turned out, and it was nice to complete a strictly “just for fun” project.  I hope you enjoy it too!

Justice League Of America Decoupage Kids Chair

Materials:

Kids Chair

Comic books,or Comic Prints

Mod Podge

Red and Blue Acrylic Paint

White Latex Primer

brushes, scissors, pen

sandpaper