Rescued Vinyl And The Magic of Mod Podge

With the holidays officially over and the New Year off to a rather frigid start, I share with you the last project on my Christmas list this year.  Late last month, I posted a tutorial for Sports Inspired TV Trays which have turned out to be a popular item among family and friends. The beauty of restyling these tables are the limitless possibilities.

TV Tray before

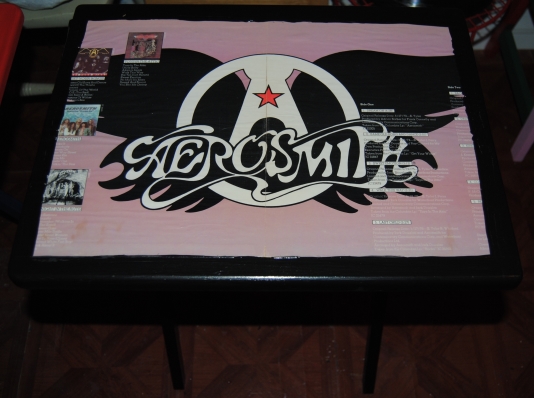
These tables are neutral and relatively easy to work with.  One of my upcycled gift recipients is not big on sports, so I thought she might like to have a TV table, but with an alternate theme.  A while back, I created a table from an old record, and a plant stand. I used Aerosmith’s greatest hits record.  The record was not in playable shape, so I decided to recycle the LP and use it for a upcycle project. The family member receiving the gift is a huge Aerosmith fan, and I decided to use the album cover and decoupage it to the table top. Upon further inspection, the cover was in pretty rough shape, so in the end I decided not to use it.  The liner notes; however were in great shape, and a colorful purple with the Aerosmith winged symbol in the middle.

DSC_1270

This seemed perfect for decoupage while incorporating something she and I hold close to our hearts~ records.  I have a collection too, mostly stocked through bargain bins.  It is not always easy to tell if a record is playable before purchase, and every so often you wind up purchasing a damaged record.  Not only can you reuse the record itself, but the artwork is perfect for decoupage.  Another example of this can be seen here from a previous post. Long live the LP!

DSC_1269

For a full tutorial and some examples of TV tray table redesigns click here and here.

Happy New Year from On The Upcycle!

Happy New Year

I want to take the opportunity to wish all of my readers a very safe and prosperous New Year!  As with most years of my life 2013 has been filled with many good times and some “not so good” times.  In April 2013, I began this humble little blog with zero expectations, and since then I have received over 25, 600 total page views, (and counting) and in December, 2013 On The Upcycle reached a milestone of over 200 followers.  I had the opportunity of being featured in two digital craft books on Amazon, The Green Crafts Lifestyle, and The Green Crafts Lifestyle Christmas edition.  I was also a guest blogger for the first time this year, contributing a project for Geek Week, On Elise’s Cheeky Geeks Blog.   As crazy as it sounds, I was also contacted regarding a crafting reality show!  Don’t expect to see yours truly on TV anytime soon, but it was all still very flattering.   Also, a special thank you to those who became involved with the “Upcycle” and brought me items to restyle from attics, trash bins , yard sales and thrift shops.

On the Upcycle was also very lucky this year and won two prize drawings.  I would like to send out a BIG THANK YOU to Diana at  Ray’s So Crafty Blog and Kathy and Deb over at Second Hand Roses  for their generosity and appreciation of their readers by sponsoring these giveaways.  I would also like to send ”Congratulations” to Daniella Joe’s Blog who won On The Upcycle’s very first prize giveaway.   A  very special “Thank you” to Katherine at Pillows Ala Mode, who welcomed me to the Word Press community by sharing my blog with her readers, and nominating On The Upcycle for the good neighbor award. I wish I could thank everyone who helped me along the way. Thanks to all my readers who took the time to comment and “like” my posts.  Everyone here has kept me inspired even when I felt I did not have much to give.

As with any New Year, 2014 is filled with mystery.  I am hoping to continue the Upcycling mission in 2014, and be the best mother and wife I can.  My resolution this year, is to treat myself better both physically and emotionally.  This will be my greatest challenge.  As with many of you out there, it is easiest to neglect yourself, when making sure everyone else’s needs are met.  This will be my goal  for 2014 and beyond.  Let’s hope I can make it happen!

May all your wishes and dreams come true in 2014!

easter2013m

DIY Decoupage Novelty Candles and Tea Light Holder

Looking for a great “personalized” gift that will keep you within your shopping budget? The holiday’s, and birthday’s can be tough, and it is more important than ever to get the most out of every penny. At the same time, It is also important to let those close to you know that they are appreciated throughout the year. I try to keep my ears and eyes open as to what matters to friends and family, by soaking in all of their interests and hobbies. I file these ideas away, and when I am trying to come up with gift ideas, I refer back to them.

As our extended families and circle of friends continue to grow, and the holiday’s become more and more about the children (As it should be, of course) It has become at times, a challenge to come up with gifts for friends and the adults in the family. This year, I decided to make personalized candles for some of those on my Christmas list. You can purchase candles anywhere, and they are reasonably priced. This year, I had many music lovers on my list, so I decided to decoupage some candles featuring the recipients favorite musical artists.   The possibilities are truly endless.  You can personalize and create any type of candle that you want.  For the non-music lovers on my list, I refashioned the candles with fabric, or with a family photo.  Making these is a simple process. I applied Mod Podge to the outside of the candle with a foam craft brush. I searched the internet for the images I planned to use and printed them out on my printer (the size of the images I used was 4×6) I trimmed the images to fit, and carefully applied them to the candles, smoothing any wrinkles. You can add Mod Podge over top of the image, but it is not needed. If you are looking for a shinier finish, you will need to complete this step. Once dry they are ready to be gifted!

Decoupage Candles

Rock N’ Roll Inspired Candles

\Grateful Dead tea light holder

Repurposed Candle made into a Tea Light Holder

I got a fever for Pringles Can Crafts!

I saw on Pinterest  recently many uses for all those left over Pringles Chips cans. Through the magic of decoupage, these cans can be transformed from downright ugly to lovely!  They can be used to store various items and are a great way to gift Christmas cookies for the holidays.

Pringles-Gift-Box-Fun-Holiday-Crafts

Like these cookie containers from Cheap Crafting.Com

Today, I share with you a Pringle can kid’s craft.  My daughter loves to listen to music, but loves to make music even more!  I love to get her involved in the process and creating music together has been a wonderful Mother and Daughter bonding experience.  I cleaned out the can first.  You can fill the cans with dry pasta or dried beans.   I would fill the can up about half way.  To secure the lid, use a hot glue gun to adhere the lid permanently to the can.  Once the lid is secure, you can use either scrapbook paper or fabric and decoupage the outside of the can.  (This is necessary only if you want it to look “pretty”)  Apply the Mod Podge with a foam craft brush and wrap the fabric or scrapbook paper around the outside of the can.  This is also a great way to get use out of those old pieces of scrap fabric, that may be a bit small for other projects.  My daughter loves “shaking” her new percussion instruments. These “instruments” are a great way to encourage sensory development while at the same time encouraging fun!

DSC_1147

Kids instrument made from the smaller Pringles can.

Free Amazon Download starts TODAY! The Green Crafts Lifestyle: Christmas Edition!

The Green Crafts Lifestyle – Christmas Edition – Make Christmas Decor, Cards and Gifts!

1451464_674360959264580_1206827235_n

I have had the pleasure once again to be a part of the second installment of “The Green Craft Lifestyle”.  The new Christmas Edition is jam packed with green Christmas crafts from around the world.  The very talented Mahe Zehra Husain (MZ) is giving away free copies for download from the 30th of November to the 4th of December you can find it here: http://www.amazon.com/dp/B00GXE82S4 and http://www.amazon.co.uk/dp/B00GXE82S4. On Facebook?  Join the free event here. Don’t have a Kindle?  Download Kindle Cloud Reader for your Laptop!

I’ll be trying to tackle holiday decorating today…Thanks Mahe for the freebie!

Happy Crafting Holidays!

The Green Craft Lifestyle Christmas Addition: Free Amazon Download begins This Saturday, November 30th!

Pickled Lamp: “On The Upcycle” Christmas Craft full tutorial featured in today’s newly released “The Green Craft Lifestyle: Christmas Edition”

Image

The Green Crafts Lifestyle – Christmas Edition – Make Christmas Decor, Cards and Gifts!

1451464_674360959264580_1206827235_n

I have had the pleasure once again to be a part of the second installment of “The Green Craft Lifestyle”.  The new Christmas Edition is jam packed with green Christmas crafts from around the world.  The very talented Mahe Zehra Husain (MZ) is giving away free copies for download from the 30th of November to the 4th of December you can find it here: http://www.amazon.com/dp/B00GXE82S4 and http://www.amazon.co.uk/dp/B00GXE82S4. On Facebook?  Join the free event here. Don’t have a Kindle?  Download Kindle Cloud Reader for your Laptop!

Image

The “On The Upcycle” family want to wish everyone a very safe and happy Thanksgiving day Holiday!

Can You Spare A Square? Repurposed Toilet Paper Roll.

Ok, so we have all been there.  Through the years, I have learned to look before I leap.  I always check the bathroom stall before I get down to business and make sure the toilet paper roll is full. I considered myself lucky on this day.  When I walked in the stall, I noticed right away all these empty cardboard toilet paper rolls. I did not spot any TP, so I moved on to the next stall, but I couldn’t get those cardboard rolls out of my mind. These rolls are larger than average and are made from a thick cardboard.  It got me thinking, these cardboard rolls could be useful and had repurpose potential.  I took one of them home as an experiment.

I am still in the process of organizing my craft space, and  I thought it would make a perfect pen/supplies holder.  I found an old pickle jar lid that fit the circumference of the roll perfectly.

DSC_1107

I used a hot glue gun to permanently adhere the lid to the bottom of the toilet paper roll.

DSC_1109


I had some left over fabric from a previous project that I thought would be perfect.  I traced the jar lid on the back of the fabric with a marker and cut it out with a pair of scissors.

DSC_1110


I applied Mod Podge to the lid with a foam craft brush, applying the fabric tracing over it.  I then applied Mod Podge to the entire outside of the roll.

DSC_1112

I  wrapped the fabric around to roll and carefully smoothed out any wrinkles and matching up the seam.  I overlapped the fabric where the base met the cardboard.

DSC_1113

I painted the inside with brown acrylic paint to match the fabric.  Once dry, I applied Mod Podge to the entire roll inside and out to seal it.

DSC_1122


Now the hamster wheel in my brain is turning!  I have a feeling this will not be the last project utilizing these rolls!

Stay tuned!

A Frugal Feline: Make A Cat Bed In A Pinch

About 2 months after the birth of our daughter, I noticed a stray cat hanging around the neighborhood that I hadn’t seen before.  He was very thin and unusually friendly.  I saw the sad state he was in, took pity in him and began feeding him.  He would stay in the backyard lounging on our outdoor chairs, and greet us at our front door when we arrived home.

Summer Stray

After a few months, and the threat of winter approaching, we scheduled a visit through our local animal shelter’s Spay Our Strays program.  He was vaccinated and turned out to already be neutered a sure sign that at one time, he was someone’s pet.  I searched the local lost animal websites, and checked with shelters, but no one seemed to be missing him.  My husband and I decided to take him in.  He was great, but my younger male cat did not approve and started picking fights with him.  Until I could find him a suitable home, he would have to stay in our basement.  I created quite the feline bachelor pad for him.  A cat tree in front of the window, complete with futon bed,  private litter box and a never-ending supply of food and water.  He continues to thrive, after many attempts at finding him a permanent home and attempting to integrate him into the household have failed.  He resides in our basement laundry and remains sweet and content with his life.  He comes upstairs to visit and then goes back down to the basement where he is king and lives in peace by himself.  Just look at him now and how much weight he has gained! It is hard to believe this is the same cat that showed up in our yard on the brink of starvation!..

Nucky

Recently, we were forced to discard the futon in the basement. Removing this piece of furniture removed precious lounging space for our poor “Nucky” (named after the character in HBO’s Boardwalk Empire.) I searched the house for suitable items that I could repurpose into a cat bed.  I came across a large wicker basket that I had stored in our attic.  I found an old couch pillow as well as an old pillow case.  I stuck the pillow in the case, and tucked it inside the basket.  I used some fabric scraps to add some detail to the basket handle.  Cat bed in a pinch was born!  A much less expensive and greener alternative to purchasing a new cat bed.  Nucky loves it and has been sleeping in it every night since it was quickly thrown together!

DSC_0933

You had me at “Half Table” Yard Sale Table Rescue

I was excited when a friend of mine from work approached me about a table she had spotted at a yard sale.  She had arrived toward the end of the sale and the family was packing things up that hadn’t sold.  She informed my friend that she was taking most of what didn’t sell and was placing it out on the curb for the trash collectors.  She was nice and asked my co-worker if she wanted to take anything at no charge since it would end up in the trash anyway.  This is the part of the story I am truly thankful for!  She spotted a little half-moon table and thought of me and how much I love to upcycle.  She thought it would be a perfect candidate and that I could “do something” with it.  I was so excited when she brought the table to me. She had no idea the love I have for these little tables!  I had come across a half table previously at a thrift store and snatched it up! That post was called Crazy for Half Tables! so you can see she had me at half table!  I snatched this table up happily and decided to use the table in our living room.  I decided to match the table design to our damask black and white chair which is one of my favorite upcycled chairs to date.

Yard Sale Half Table Before

The table finish was rough and ready for priming.  I cleaned the table and placed it upside down on to the fabric I was going to use.  I traced the table surface with a black felt tipped marker.

DSC_0942

I carefully cut out the tracing and placed the fabric aside.  I primed the table with a white latex primer and allowed the table to dry,  If you are working with a dark piece of furniture and lighter fabric  it is especially important to prime it because the darker color will bleed through the fabric from underneath and may appear darker than desired.  I learned this myself in the past the hard way!

Apply fabric and Mod Podge

I applied Mod Podge to the surface of the table, applying the fabric slowly to avoid and wrinkles or air bubbles.  Once the fabric was smoothed out, I applied Mod Podge over it with a foam craft brush.  Allowing it to dry.

Painted legs

While the Mod Podge was drying,  I used acrylic paint going with the black and white alternating theme.  Once the piece was completely dry I used a coat of polyurethane sealer to “seal the deal”  Now the piece was allowed to dry overnight.

Restyled Half Moon Table using Mod Podge and Fabric

Thanks again to my awesome like-minded friend who saw the possibilities in this piece! Someone’s trash truly is to another a treasure!  Now my damask chair has a friend and my living room is all the better for it!

Upcycled chair with half moon table

Purrific Candy Cats: Upcycled Halloween Candy Tray

While I was out thrifting yesterday, I picked up this great little wicker tray with a hard unfinished wooden bottom, and two handles. This tray was stamped underneath as made by Corning.  It was a bit of a mystery as to what this tray was used for in its current state.  It was certainly priced right and stamped with a red tag marked 50% off and cost only $1.00.

Mystery Wicker Tray

I had an idea since it is close to Halloween to repurpose this item into a Halloween candy tray.  Using a flat tray instead of a deep one, enables the kids to pick the candy that they like best.  I had some great left over Halloween themed spooky black cat fabric I purchased at Joann Fabric.  The same fabric I used for DIY Upcycled Decorative Halloween Lamp.  I gathered the materials needed for this project.

Wooden Tray

Mod Podge

Black Acrylic Paint

Spooky Halloween Fabric

Paint Brush/Fine Tipped Marker

Foam Craft Brush/Scissors

First, I painted the tray areas that would not be covered by fabric with a medium-sized paint brush,  I used a couple of coats and allowed it to dry thoroughly between coats.

Painted Tray

Once dry, I traced the bottom of the tray on to the back of the fabric with the black fine tipped marker.  I carefully cut the fabric out with a pair of scissors.  I placed the fabric aside and applied Mod Podge to the tray surface with a foam craft brush.  I carefully placed the fabric on the tray surface and smoothed out any wrinkles with my hands.  I allowed this to dry and then applied Mod Podge over the painted areas, and the fabric surface.

Upcycled Halloween Candy Tray-Black Cats

Now the hubby and I can pass out candy in spooky black cat style! This can also be used as a serving tray for ghastly goodies. What crafts do you have planned this Halloween?

Halloween Tray made with Mod Podge