Decoupage To The Rescue! Lost Basement Table Gets A Makeover

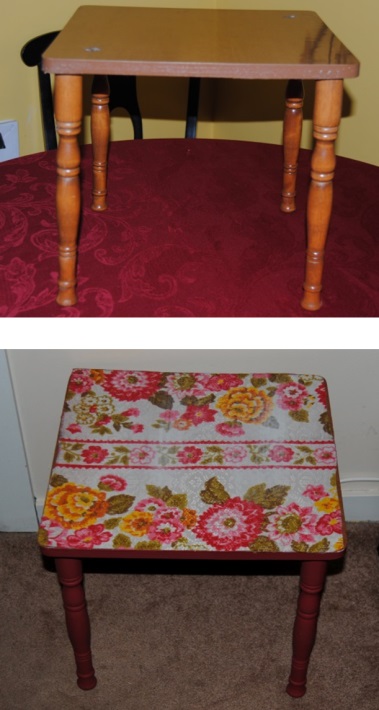
Last stop before curbside in our house has always been the basement.  This poor glass table had been banished to the basement for seven years, the entire time we have lived in our house!  It was pushed in a corner and with flower pots and miscellaneous basement junk stacked on top of it and covered in spider webs. My husband and I try to keep the basement clean, and clutter free, but it is not always easy.  As much as we dislike our basement’s dampness, cement walls and floors, the spiders seem to love it! That’s good because they help control the other bugs crawling around down there! yuck!  If any item deserved a little TLC, and a makeover it was this table! I cleaned it in our utility sink and brought it upstairs.  The glass was easily removable, and the table cleaned up nicely.

Basement Rolling Glass Table Rescue

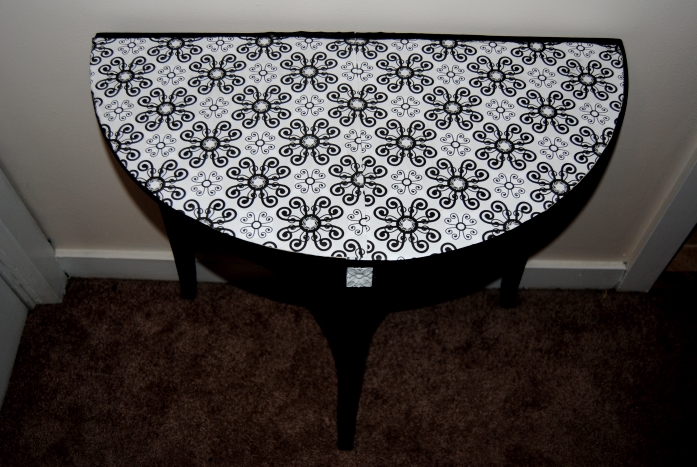
I laid out the fabric,  I was using on the floor and traced the glass on to the back of the fabric with a fine tipped marker.  I cut the tracings with scissors, and set the fabric aside. It is amazing that a pair of curtains bought at Goodwill, and originally sold by Ikea has been used in 5 previous projects on this blog! These curtains were a great buy and I still have scrap pieces left.  When I started doing this, I was shocked at the high cost of fabric. I always make sure I take a walk by the linens aisle at the thrift stores. Old bed sheets and curtains are great for  furniture re-styles because of their durability and come in great patterns.  You can still purchase this fabric called “Fredrika” through Ikea here.  I love it! For me, Even though it is modern made, it has a 60’s flower power appeal, and I love the colorful textiles from that era.

DSC_0211

I generously applied the Mod Podge, with a paint brush to the outside of the glass.

DSC_0212

Then, I carefully applied the fabric to the glass, smoothing it out with my hands.  I repeated this three times once for each piece of glass.  I allowed the pieces to dry in front of a fan. Once dry,  I applied Mod Podge over the top of the fabric to coat the surface.  I applied 3 coats to each table top.

DSC_0214

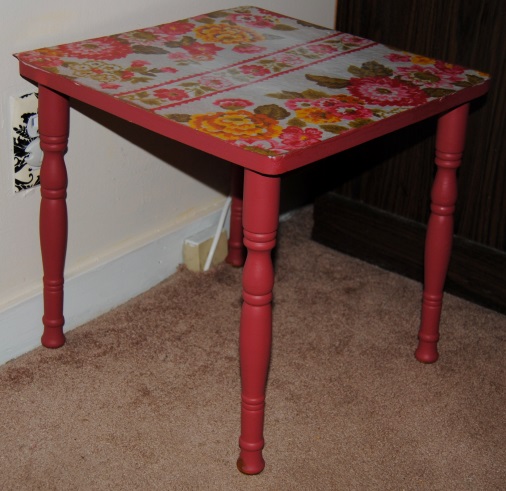
Ta da! The colorful fabric turned a dirty and dusty table bound for the junkyard, into a colorful, and fun piece!  A true basement rescue!

Upcycled Rolling Glass Table Restyled with Ikea Fabric

A Piece Of Americana: Upcycled Windsor Back Chair

Since I began upcycling, crafting, and decoupaging, I have wanted to make an Americana art piece.  I was uncertain as to what the object would be.  I was waiting to see what life, or thrifting was going to place in my path.  Then one day, I spotted this chair in a Goodwill Store.  The chair needed a bit of TLC, and had some issues.  Most of the finish was worn off the chair, and the spindles and legs were loose.  The chair passed “the sit test” I sat on it and I didn’t end up on the floor! Nothing I thought a little love and wood glue wouldn’t fix. Despite it’s problems, I knew this chair was something special.  The chair displayed several design elements I found intriguing, and the chair style looked very “American” to me.  I will be honest, I  didn’t actually know anything about this chair, but I knew one thing- I liked it.

A woman behind me saw me looking at it ,and said “That’s a Windsor Back Chair.”  She was from New England and these chairs are popular in that area. Then she simply walked away.  She was eyeing it up, but I had a tight grip on it.  By now the chair was in my cart and rolling with me out of the store.  The chair cost $5.99, but for this I think I would have paid a little more, so it was a great deal!

Windsor Chair

When I got home, I did some research on the chair and It had several of the Windsor Chair Design elements.  I found this great website for a company that makes these chairs Gummel Chair works and they feature an interesting history of these Windsor Chairs Beginning with their origins during the reign of King George in England to the shores of New England and the Early American Colonies.  It also states it became “preferred” in some circles to paint these chairs to bring out their unique design qualities.   This made me feel better about painting the chair, and since I did not have the space to keep the chair out year round, I thought it would be a nice to showcase the chair during the patriotic holidays.  Having a reproduction in need of some work seemed exciting and the “perfect” Americana project candidate,  It also happened to come along at the perfect time.  The July 4th holiday was quickly approaching, and I had to submit an original project for the new Green Crafting Book The Green Crafts Lifestyle .

Materials Used:

Red, White and Blue Acrylic paint

Decal, Print, Patriotic decorations for decoupage

Foam Brush to apply Mod Podge

Paint Brushes of various sizes

Scissors

I cleaned the chair before I got started with a damp cloth.

I primed the chair with two coats of a white latex primer.

Chair Materials

I applied the Mod Podge with a foam brush to the seat surface generously.  I took the patriotic image I was using and carefully glued the image to the seat.  I used my hand to smooth out any wrinkles or air bubbles.  If you have one available, you can also use the rubber Mod Podge, or roller tool to do this as well. Once dry, I applied a layer of Mod Podge with a foam brush over the image to seal it.  Now it was time to paint the chair.  I used a red white and blue color scheme and continued the pattern featured on the patriotic image for the chair seat.  Once the visible parts of the chair were dry, I flipped the chair over and painted underneath.  I then cut out some small white stars I wanted to decoupage to the top of the chair to add some additional flare.  I applied Mod Podge to the top of the chair with a smaller paint brush and applied the stars to the chair.

Once the chair was dry, I carefully inspected the chair for any painted areas that needed touching up, and added additional paint needed to these areas.  I allowed the chair to dry thoroughly overnight in front of a stand up fan. The next day,  I applied 2 coats of Mod Podge over the entire piece using the foam brush for larger surfaces, and a smaller paint brush on the smaller areas and chair legs.

An Upcycled Windsor Chair draped in Americana Decoupage:

Patriotic Windsor Style Chair:

Before and After:

Patriotic decopage Painted chair before and after

Image

So Happy Together! 1960’s Mod Style Coffee Table And Mini Toy Box.

So Happy Together!  1960's Mod Style Coffee Table And Mini Toy Box.

I spent most of the day today getting our daughters playroom together, running errands and trying to sort through a craft room that consists of more junk than crafts. I am hoping one day it will be pretty enough to share with you, but my guess is that is a bit farther into the future. Needless to say, I didn’t have much time to craft today, but I wanted to share this snap shot of my daughter’s playroom coffee table and toy box. I love how the bright fabric brings color and “pop” into our red family room. I have a new appreciation of fabrics and textiles and how much they can bring to a space.  The Coffee table surface is also holding up nicely and I use a baby wipe to clean it and it works great.


It’s Sunday, Have a Seat: Upcycled, Hand Painted Decoupage Football Lover’s Chair

I can assure you this will not be the last chair upcycle you will see on this blog.  I have really grown fond of Upcycling old chairs.  Not only do they look great when finished, They are a manageable pieces of furniture that fit easily in my smaller car. (I dream of someday having a truck or van to go for the bigger pieces) They also tend to be priced right.  Many of them are chair orphans separated from their original set.  On this day of thrifty shopping I came across two chairs priced very reasonably at $5.99 each. My husband had suggested since the Sports Team TV Trays turned out great, to do a matching sports themed chair.  Of course me being me I said sure!  I had picked up a perfect X back chair that would work well  for this latest project.

First, I cleaned the chair removing any dust or dirt.  I then painted the entire chair with a white latex primer.  I applied two coats of primer total. This was important since I did not sand the chair and it had a bit of a lacquer finish.  The Latex primer helps the paint to adhere to the chair better.  While the chair dried I prepared The Philadelphia Eagles logo I had printed.  I cut out the image.  Once the seat was dry I used Mod Podge Matte to glue the decal to the seat carefully smoothing out any air bubbles. I then added a few layers of Mod Podge over top of the decal.  When you hand paint using brushes sometimes the paint will splatter.  Protect your decal by covering it with Mod Podge (Once dry any paint can be wiped away with a wet cloth.) Or cover it with a plastic shopping bag.

Image

Now it was time to paint the chair.  The Philadelphia Eagles colors are Hunter Green, Black and White and those are the colors I wanted to use for this chair. I used about 2 coats of Acrylic paint allowing to dry thoroughly between coats in front of a stand up fan.

The next day, I used the Mod Podge Matte to completely cover the chair to seal it to prevent chipping.  I covered the chair in 2 coats of Mod Podge and the seat received 4 coats. I always add a bit of extra protection in areas I know will get the most use.

Before and After:

Image

Recap of Materials Used:

Chair

Mod Podge Matte

Sponge Brush to apply Mod Podge

Print Sports Team Decal of your choice

Scissors

Acrylic Paint/Various sized brushes

Image

Sports ChairSports Fan Chair Made with Mod Podge-On The Upcycle

The Pillow Case Makeover: Upcycled, Pink and Brown Hand Painted Decoupage Chair

Image

I am always attracted furniture bargains.  On this day, as I often do, I took a quick look around the local Goodwill on my lunch break. It just so happened that all red tagged items were 50% off.  In the corner, toward the back of the store,  I noticed a wooden chair with a ladder back, red sticker taped on the front.  It was a little diamond in the rough.  I was surprised the original price was only $4.99, and with the discount this chair would only cost $2.50!  I had been wanting to try a full-sized chair project for a while, and this chair seemed like the perfect candidate.

It just so happened my sister had noticed some of my furniture projects the last time she was over the house. She asked me to make her something, but was not sure what she wanted.  When she saw this chair among the other furniture candidates, she thought perhaps I could design it based on her bedroom which is pink and brown.  It was then I came across a pink and brown flowered pillow case while looking through used textile bin and I thought it would be perfect for this project.  I texted her a picture of it to see if she liked it, and she did. I then began to plan…

Image

Fast forward to today…I went to JoAnn fabrics and bought some Apple Barrel Acrylic paint.  I matched the pink and brown pretty well against the pillow case.   The pink appears slightly darker in person than in the photos and matched it nicely.  My daughter managed to open one of the bottles of pink paint with the plastic still intact!  Thank goodness the store had wipes handy!  It was some sort of miracle she only managed to get it on her hands and avoided her clothes entirely!

When we got home, I put the princess down for a nap, and got to work.  I traced the chair seat onto the fabric with a black marker.  I carefully cut the tracing with a sharp pair of scissors.  I then applied Mod Podge, using a medium-sized paint brush to the seat.  I spread the fabric out over the seat stretching and smoothing out any creases with my hands.  Once dry, I applied another coat of Mod Podge over the top of the fabric.  While this dried, I used a white latex primer to paint the chair so that I could apply the acrylic paint onto a good base.    I then carefully hand painted the chair and used several coats until I achieved my desired result.

I sat the chair in front of a fan to dry and waited.  Once the paint was dry, I could apply the Mod Podge.  I  allowed it to dry between coats.  This chair needed about three coats over the entire piece to seal it.  I am hoping my sister likes the result!  I had seen the color dipped legs online, on other crafted chairs and I  love this design! I decided to incorporate it into this chair.  Now she has a stylish place to sit and read or put on a favorite pair of shoes, and it perfectly matches her bedroom decor!

$2.50 chair Before and after:

Image

Upcycled chair

Materials:

Wooden Chair

Pillow Case for decoupage

Mod Podge Matte Finish

Scissors/Fine Tipped Marker

Pink and Brown Acrylic Paint

Paint brushes various sizes

DSC_0555

Crazy For Half Tables: Table Restyle using Mod Podge

Image

I love half tables!  I was so excited when I found this one at a thrift store while shopping one weekend with the family.  It was the first item in my cart.  I was also ecstatic over the reasonable price- only $5.99! I knew exactly where I would put this table in our house, at the base of our stairs.  Space is limited in this area and this half table would be a perfect space saver.

I searched through my available scrapbook paper and went through several styles before I settled on this one.  I turned the table upside down onto the backside of two sheets of paper and traced the table top onto the paper.  I cut the tracing and used Mod Podge Matte Finish to glue the paper to the table top. I used my rubber Mod Podge tool and my hand to gently smooth out any air bubbles.  While the table top dried, I painted the rest of the table black with acrylic paint. One of the things I like about this table is, it had some etched details on the legs and top.  I accentuated this by painting the floral etching white.  Once all the paint dried I used about 4 coatings of Mod Podge to seal the piece.  I skipped priming the piece because the table felt rough almost like it had been lightly sanded before I bought it. The paint covered well with about two coats. I was happy with the design and the neutral black and white design goes well with our living room walls which are painted with Behr paint and primer in one sandstone color.

before and after

Image

Materials:

Two pieces of scrapbook paper design of choice

Black Acrylic paint

Mod Podge Matte Finish

Rubber Mod Podge

Scissors, Paint Brushes, Black Marker

Table top close up

When Crafts Go Wrong: Restyling the Upcycle

On May 12th, I posted a Time Out chair I restyled.  Truth is I was never happy with how it turned out.  I think I know why it didn’t turn out as I planned.  I forced it. I was determined to finish the project even when I felt I should put it aside.  One thing I lack is patience and that can be a crafter’s undoing.  Sometimes it is just better to set a project that is frustrating aside to finish at a later date.The Time Out chair is an example of restyling a restyle.(You could say)

My upcycled 70’s inspired girls table has so far been Erin’s favorite.  It is the perfect size table, but lacked a chair.  We caught her pulling the table up to the step in an attempt to sit at the table. That is when I thought of the time out chair. We are very blessed so far.  We rarely have to put her in Time Out, so we haven’t really used the chair, and I thought if I restyled the chair, it would go great with the table.  I used the same 70’s fabric as the table, and re-painted the chair to match. Now Erin has the perfect place to sit and read her book, and I have a chair I can live with!

70's inspired KidsTable and Chair

Upcycled Little Girls 1970’s inspired side table

I have been blogging for over a month now and I am so thankful to you all for the encouraging words and thoughts.  I am also blown away by the amount of talent and creativity I have seen from others on here! Creativity is key!  For me, things don’t always work out as you envision them.  This forum allows me to feel free and unafraid even if I make a mistake!  For that I am grateful!

I am back from my two day hiatus; However a lot of craftiness and shopping has taken place in those days!  The family went thift shopping yesterday, two Goodwills and a Walmart! It was a very productive day!  I picked up a few future projects, and pined and dreamed over other future projects that I could not fit in our little Hyundai!

I saw this little brown, particle board,  table and I picked it up,  I am obsessed with small furniture, as I am always thinking about items that Erin can use that are perfect for toddlers just starting to utilize furniture. She also loves to imitate us and it is wonderful seeing Erin sitting at her kid’s table reading a book like the little person she is becoming.

I also found this great funky floral fabric that screamed 1970.  In it’s previous incarnation it was a window drape.  I can’t imagine! A bit too funky for curtains according to my taste, but not funky enough to use to redo kids furniture!

Materials:

$5.99 table

Fabric

Mod Podge

paint brushed various sizes

acrylic paint

black marker

scissors

First, I turned the table upside down onto the fabric and traced with a black felt tipped marker.  I carefully cut out the fabric.  I then used Mod Podge Matte finish to glue the fabric to the table top.  I set aside to dry.  I wanted the paint the table pink to match part of the fabric, but I didn’t have any pink handy.  I was able to mix red, purple, and yellow, and came up with the color you see here! I primed the piece and then covered the legs and sides with pink paint. Once dry I used Mod Podge to seal the entire piece using about three coats total.

Image

Before and After:

Image

Our cat Nucky seemed to be fascinated with what I was doing.  He was my cat apprentice as Erin was napping at the time!

Image

Bedside table restyled with decoupage

In this little table, I saw much hidden potential.  I can’t remember how I came across it.  I found it up in our attic. It was the perfect little project.  I brought it down, and it sat in my bedroom, waiting it’s turn to be upcycled.  Tonight seemed like the perfect night!  While the little toddler apprentice slept, I gathered all my materials together.  (Including my mess of a table cloth strewn with paint and Mod Podge of projects past.)

Image

First I tightened the table and cleaned it removing any dust or dirt.  Once dry, I primed the areas I planned to paint with a latex primer. I put aside the table to dry.  I took the scrapbook paper and cut it into the various sizes,  In this case the drawer could not be removed.  I could remove the knob,  so I pressed the paper up against the outside of the drawer creating a crease in the paper where it would need to be cut. Once the paper was cut I glued it down to the surfaces I wanted to decoupage.  I then painted the remaining areas black with black acrylic paint.  Once the entire piece was completely dry, I  covered the entire piece with Mod Podge Matte finish.  I used a medium sized paint brush for the larger areas and a smaller brush for the smaller areas.  Once dry, I applied two coats to the smaller painted areas and four coats to the decoupaged areas. The result is what you see here:

Image

Little tip: I had a few air bubbles appear on the table surface.  I used a sewing needle, poking a tiny hole in the air bubble.  I  smoothed it out and then applied more Mod Podge over top of it. Definitely helped!

Before and after:

Image

Restyled Side Table

100_6249

Their is nothing I love more then a good side table.  They can add so much to a room if you can find one with the right look.  I purchased this side table at Walmart for under 20 dollars more than 6 years ago.  Sure, the table served it’s purpose well, but was far from anything special. I decided to give it a new look, but what to do?  These days, I find myself looking at things differently.  When I am out and about,  I am always looking for fabric, textiles that stand out in the crowd.  Mod Podge and fabric are great for revamping furniture.

On this day I found a really nice woman’s scarf for 99 cents at the thrift store. It was perfect to cover the table top of a smaller piece of furniture.  I primed the table using my trusty latex primer.  Once the table was dry, I painted the entire table with black acrylic paint.  Several coats were required.  I turned the table upside down and carefully traced with a black sharpie marker, onto the scarf material.  I used scissors to cut the fabric.  Now I was ready for Mod Podge!  I covered the table top with Mod Podge and glued down the material.  Through experience I find different materials are better in this process than others.  This scarf because of it’s texture was difficult to smooth out the air bubbles.  I wish I could tell you the materials make up , but the tag was cut off the item.

Once the piece was dry, I coated the entire table with 4 coats of Mod Podge. The result is what you see here and I love it especially the splash of colors (Did I mention I LOVE COLOR)

In the end, The table top had a rougher finish than I preferred so you may want to try using the gloss finish to add a bit more sheen. I generally use Matte finish in most of my projects and it is fine, but sometimes the material you use makes a difference.

side table made with Modge Podge