Good Golly! Miss Molly!

Yesterday the family drove three hours to Maryland for my niece’s 7th Birthday Party.  It was a great time especially watching the kids play musical chairs, and I got to talk upcycling with my sister’s fabulous neighbor!  My daughter loved the swing errr maybe a little two much *insert two-year old temper tantrum here* It was not pretty when we tried to take her off.

My sister also just added a new four legged member to their family. She is a sweet beagle/lab mix named Molly….

Molly

Doesn’t she have the sweetest face?  Hope you all had a great weekend and are enjoying these final days of summer with family and friends….

Now back to the Upcycle!

Danielle

Decoupage To The Rescue! Lost Basement Table Gets A Makeover

Last stop before curbside in our house has always been the basement.  This poor glass table had been banished to the basement for seven years, the entire time we have lived in our house!  It was pushed in a corner and with flower pots and miscellaneous basement junk stacked on top of it and covered in spider webs. My husband and I try to keep the basement clean, and clutter free, but it is not always easy.  As much as we dislike our basement’s dampness, cement walls and floors, the spiders seem to love it! That’s good because they help control the other bugs crawling around down there! yuck!  If any item deserved a little TLC, and a makeover it was this table! I cleaned it in our utility sink and brought it upstairs.  The glass was easily removable, and the table cleaned up nicely.

Basement Rolling Glass Table Rescue

I laid out the fabric,  I was using on the floor and traced the glass on to the back of the fabric with a fine tipped marker.  I cut the tracings with scissors, and set the fabric aside. It is amazing that a pair of curtains bought at Goodwill, and originally sold by Ikea has been used in 5 previous projects on this blog! These curtains were a great buy and I still have scrap pieces left.  When I started doing this, I was shocked at the high cost of fabric. I always make sure I take a walk by the linens aisle at the thrift stores. Old bed sheets and curtains are great for  furniture re-styles because of their durability and come in great patterns.  You can still purchase this fabric called “Fredrika” through Ikea here.  I love it! For me, Even though it is modern made, it has a 60’s flower power appeal, and I love the colorful textiles from that era.

DSC_0211

I generously applied the Mod Podge, with a paint brush to the outside of the glass.

DSC_0212

Then, I carefully applied the fabric to the glass, smoothing it out with my hands.  I repeated this three times once for each piece of glass.  I allowed the pieces to dry in front of a fan. Once dry,  I applied Mod Podge over the top of the fabric to coat the surface.  I applied 3 coats to each table top.

DSC_0214

Ta da! The colorful fabric turned a dirty and dusty table bound for the junkyard, into a colorful, and fun piece!  A true basement rescue!

Upcycled Rolling Glass Table Restyled with Ikea Fabric

The Genealogy Series: Murder in a small town, and the man who cracked the case.

Margaret “Maggie” Sullivan, was born in 1890, in Moorestown, NJ (Formally Chester Township, NJ) to Irish Immigrant parents Patrick F. Sullivan and Ellen L.  Larkin.  (She is the sister of William Sullivan who is my husband’s grandfather, and daughter’s Great-Grandfather.)  On November 26th 1912, Margaret married John H. Bradshaw  in Moorestown, NJ.   They began raising a family and had two children.

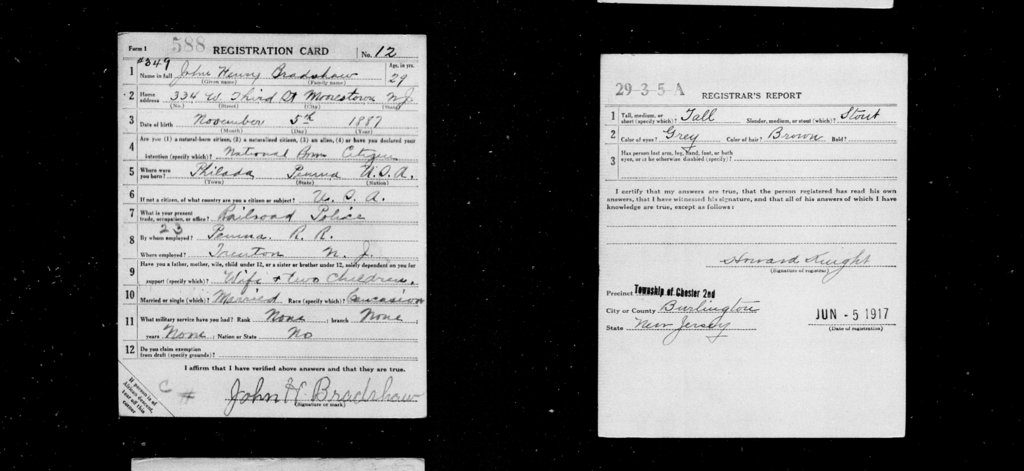
In 1917, John Bradshaw Sr. registered for the World War I draft.  He worked for the Pennsylvania Railroad as a Railroad Policeman.  Draft registration cards are a great resource for family researchers as they offer a treasure trove of information, such as birthdate, full name, marital status and much more. It also offers a physical description of the individual.  John is described as “tall, and stout with grey eyes and brown hair.”

Draft Card

Sometime after 1917,  John Bradshaw became a Moorestown Police Officer, and later would become chief of police of the town.  Moorestown, NJ is a quiet New Jersey suburb of Philadelphia. The town was founded in 1686 when John Rodman bought a few hundred acres of land.  The town having originally been named “Village of Rodmantown.” and for many years after that was known as Chester Township.  The town consisted of mostly farm land, and later many residents found  work on the railroad that cut-through the town.

I never expected when researching the Bradshaw Family, that I would come across such very high-profile murder cases John Bradshaw was involved in solving.  I discovered articles posted online in the archives of the NY Tribune, and Philadelphia Evening Public Ledger, mentioning the details of these cases.  Genealogy has opened my eyes to the facts.  Many horrible acts we think occur more now, happened back then as well, and with more frequency than even I previously realized.  All you have to do is look at any of these old newspaper articles and the stories within the pages. These horrors occurred everywhere and in every time. No town in America was safe from crime as it remains today, and Moorestown was no exception.  It became apparent after reading the details of these two high-profile cases Chief Bradshaw was involved in.   These cases were the Matilda Russo Murder,  and The Quigley Murder He also worked along side the famous detective Ellis Parker.

In 1921, Matilda Russo was the seven year-old daughter of town Tailor Frank Russo.  Matilda went missing one day.  Her body was discovered in the basement of a neighbor’s house, and the accused murderer was on the run with a huge manhunt ensuing.   A terrible child murder, the horrible details of which were outlined in the newspapers.  Turns out, John Bradshaw helped break the case and discovered the body of this little girl.  Because his name was mentioned in the above articles, I was able to discover these stories via search engines.  One of the best and probably most under used resources in genealogy are search engines and the best part is they are free!  I was able to discover more about John Bradshaw then I had ever expected this way, including online images of some of the actual newspaper articles.  According to the 1930 Federal Census, John remained chief of police into the 30’s and remained in Moorestown on Second Street with his wife Maggie and their two adult sons John (Pipefitter)  and Edward (mechanic).

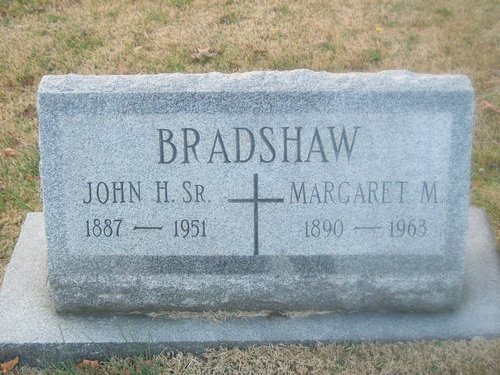
John Bradshaw passed away in 1953, and Margaret Bradshaw passed away 12- years later, in 1963.  They are buried in Mt. Carmel Cemetary in Moorestown, NJ.

Bradsaw

No let up in hunt for child’s slayer                                                                                                     Evening Public Ledger June 14th 1921

Matilda Russo News Article Have you discovered any surprises using search engines?  Do you Google your ancestor’s names and info regularly?

Stay Calm and Craft- A Simple Wooden Tray Decoupage

Nothing helps me manage stress better than crafting and creating.  When I don’t put my nervous energy to good use, the anxiety levels within me rise.  When I am creating I feel as though my stress levels decrease and my positive energy increases, and I am a better, lesser stressed out version of myself.  When I am working on a piece of art or a craft project, it is one of the few times my mind is clear of all worry and I become completely focused.  I was feeling a bit stressed and this small and simple wooden tray decoupage craft was exactly what the Dr. ordered.

Little Wooden Tray

I picked this wooden tray up at A Goodwill store.  It was  marked with a red tag and on this day red tag items were 50% off.  This was a bargain item costing only 50 cents.  The wood on this piece was in very nice condition. I decided not to paint it, I chose a nice piece of Victorian Artwork and traced and cut the print to fit the inside of the tray.  I generously applied Mod Podge with a small foam craft brush to the inside of the tray.  I adhered the print carefully to the tray, smoothing the paper out as I applied it to the wood.  Once dry, I applied two coats of Mod Podge over top of the image to seal it. I used a paper towel and vaseline (works great on wood!) to shine and buff the wood.

Victorian Artwork Decoupage

Ah now that’s better!  Try a simple craft during a stressful day. You won’t regret it!

(and I think our Victorian model would agree!)

Materials:

Printed Art

Small Wooden Tray

Mod Podge

Scissors

Craft foam brush

Vaseline/cloth or paper towel

Upcycled Decorative Jar Lamp: Take Three

Upcycled Decorative Jar Lamp


It all started with a spaghetti Jar, a broken lamp and a upcycle idea.  I found myself making a third decorative fabric covered glass jar lamp tonight.  (See Decorative Lamp # 1 and #2 to read tutorials on how I make these jar lamps.) I enjoy making these because each one turns out unique and the style possibilities are endless when it comes to the different fabrics you can use.

I also had the chance to work on a few smaller projects and organizing my craft space.  I decided to use the same sheet  I used for Cloth Covered Galvanized Bucket.  The Lamp is being displayed in a built-in vanity in our hallway that displays a special family blue vase.  The light this lamp omits illuminates the vase nicely and it is pleasing to the eye as you walk up our stairs.  Upon further inspection today, on a trip up to our attic, I stumbled across more of these “nightlight bulb lights”  These certainly will come in handy for future luminary crafts!

Upcycled Decorative Jar Lamp Reflection


Fabulous Fabric: Little White Wall Shelf Restyle

Old white flip shelf

While I was going through our spare bedroom and it’s contents in the attempt to make way for a crafting space, I discovered this little, white, framed wall shelf.  I remember purchasing this from a department store many years ago.  It came in a set of three and the frames where various sizes.  I used this shelf in our bathroom for quite sometime.  This shelf was the largest among them.  I did not find the two other, smaller shelves, and I  was unsure of their whereabouts.  I am hoping I come across them again.

Although these frames functioned well, I thought they lacked style  and were rather plain.  That is when I got an idea.  I decided to upholstery staple some fabric to the back of the shelf frame.  I spread a large piece of this spare fabric snuggly over the back of the shelf with the design facing outward,  I stapled the fabric to the wooden shelf about every inch around,  I then trimmed the fabric with a pair of scissors.

upholstery stapler

When I turned the shelf around I noticed a few scratches and minor chips on the shelf area.  In order to conceal this, I used black acrylic paint and applied two coats allowing the paint to dry between coats.  Once the paint was completely dry, I applied a coat of Mod Podge to seal the paint and prevent any further chipping.

Shelf restyle, paint fabric and Mod Podge

Now that is more like it!  I love the difference the fabric makes in this piece.

Fabric and Mod Podge Shelf

I decided to display our Willow Tree figurine we were given as a gift when our daughter was born.  It hangs below our family photo canvas and I think it fits in nicely!

DSC_0105

Materials:

Framed Wall Shelf

Fabric of choice

Acrylic Paint

Mod Podge

Scissors

Upholstery Stapler

One Lucky Little Upcycle Blog…

liebsteraward

I would like to say a long overdue “Thank you” to Crafty Madre who has a wonderful craft blog by the same name. Be sure and stop by and visit her idea filled blog. A true crafting artist!  She nominated “On The Upcycle” for the Liebster award, Which is given to blogs who have reached the 100 plus readership mark, A goal this blog recently reached.  The word Liebster means ” dearest” in German. Awwe *Shucks*

I have to be honest I am a bit of a “newbie”  When it comes to this or any similar blogger awards.  I did a bit of research on the award rules and am a bit unsure of what the official rules are, I am sure of one thing: I wanted to thank Crafty Madre for taking the time to send some encouragement to your humble blog author and Mod Podge maniac.  Most of the blogs I follow are way beyond the 100 readership mark so I am unsure as far as nominations, but I follow so many great blogs and wish I could recognize each and every one of you!  All of you are “dearest” blogs in my eyes!

Hooray for Cloth Covered Galvanized Buckets!

I picked up this little galvanized metal bucket for a couple bucks at Goodwill.  As mentioned in a previous post, I am working on creating a small crafting space in our spare bedroom.  At the moment,  I am particularly interested in items that can assist in organizing this space. Although many of these storage items can be made from cans, jars, and boxes,  I couldn’t resist this cute little bucket. Organizing this room is not an easy task as the job requires moving a few larger items from the room and up into the attic, small steps…

I decided to try to decoupage this bucket.  I saw some examples online and liked the look.  I realize some may prefer the bucket without decoupage, but since I was making it for a craft room, I wanted to make it fun and experiment.  It also gave me the opportunity to use Mod Podge for the first time on metal.  I had this great old bed sheet, colorful and fun.   I thought it would be perfect for this bucket and would contrast nicely with the silver metal.

I cut off a piece of fabric and wrapped it around the bucket and trimmed off any access fabric.  I used a foam craft brush to apply Mod Podge to the outside of the bucket.  I then very slowly applied the fabric smoothing it out with my hands,  after it dried I applied 4 coats of Mod Podge allowing to dry between coats.  It dried with a few wrinkles, but it was a bit of a challenge due to the handles to perfectly wrap the fabric around the bucket.  Despite this, the bucket will come in handy for various craft supplies and provide the durability of galvanized metal.

Decoupage Galvanized Buckets

A Perfect Pair: Fabric Decoupage Book Ends

I found these ordinary bookends in the housewares aisle at a thrift shop near home.  It was the only item I felt compelled to buy on this day, and they were priced right at $1.99.  Lately, I have made it a goal to begin to organize my crafting space, and these little book ends would help alleviate some of “the bookcase overload” this room is experiencing. Of course they were in need of a little restyling flare. Right now the craft room is more of a storage room, so these book ends are a very small step in the right direction, but  I am determined.  Stay tuned!

Fabric Decoupage Book Ends


Materials:

Fabric of choice cut and traced to size

Pair of bookends

Mod Podge

Scissors, Black Marker

OOPS! Not Pictured

Foam Craft Brush, Paint Brush

Black Acrylic paint

I had fabric that I did not use from another project that I thought would look lovely on this project.  I traced the book ends on the back of the fabric.  I used scissors to carefully cut along the traced line.  I set aside while I applied Mod Podge to the inside and outside of the book ends.  I carefully applied the fabric to the bookends smoothing out and wrinkles with my hands.  I then painted the edges where the fabric did not cover with black acrylic paint.  I allowed the bookends to dry.  Once dry, I applied 2 coats of Mod Podge to seal them.  Now, A close up of a finished one of the finished book ends! A great beginner Mod Podge project!

Fabric Decoupage Book Ends (2)


The Green Crafts Lifestyle (and their special promotion starting this Friday . . . and a new call for submissions!)

Thanks again to Katherine at Pillows ALA Mode.  Today, I feature her blog  to help spread the word about green crafting.  Be sure and check out this amazing free e-book! The Green Crafts Lifestyle FREE TO DOWNLOAD 8/16 thru 8/18 on Amazon! CLICK HERE! To download your copy!

This book Features “On The Upcycle” projects, along with other amazing crafts from upcycling artists from around the world. Don’t miss out!

Pillows A-La-Mode's avatarPILLOWS A-LA-MODE

Book CoverIn June, I wrote in this post about our crafty upcycling friend Mahe (aka MZ) that included a call for submissions for her new upcycled craft book. The Green CraftsLifestyle is now out, and it’s amazing! It includes sections on paper, plastic, wood, metal, and fabric and has projects from 20 artists around the world, including four of my bloggy friends:

Along with 35 projects detailed on nearly 200 pages of photographs and step-by-step directions, you’ll find author bios and photos with links to their blogs, websites, and other online contacts.

Now for the promotion! To provide all crafters with a chance to learn from these techniques, Mahe’s Altered Upcycling business will provide unlimited…

View original post 194 more words